Would you like to send field values from your checkboxes with the WPForms Webhooks addon? By default, the field label would be sent but with a small PHP snippet, you can easily send the value instead. In this tutorial, we’ll walk you through how to do this.
This tutorial is going to create a Slack Workflow as well as creating variables that we’ll assign our form fields to so that our form data will post to Slack through our webhook so that we can provide an online feature request form on our site and have that data post to Slack whenever the form is completed by our visitors.
Sending field values
Currently, the only way to send multiple form fields from WPForms to Slack through a webhook is by using the Slack Workflow. For more information on Slack Workflows, please see this documentation.
If you only want to send 1 value to Slack through a webhook, please see this documentation.
We’re going to begin by creating a workflow in Slack first so that we can create the variables that we’ll use later when setting up the webhook inside the form builder.
1)Adding a new workflow in Slack
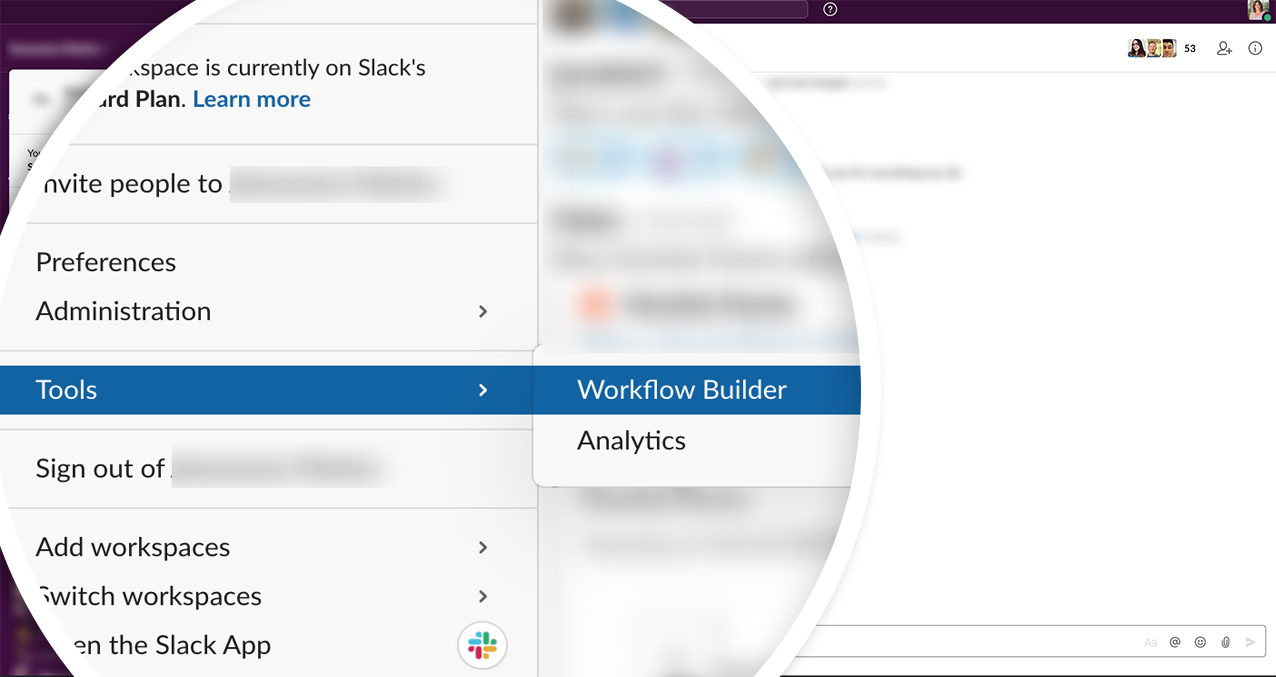
First, you’ll need to log into your Slack through the web browser. Once you’re logged in, click the arrow next to the company name, and under Tools, select Workflow Builder.
Next, you click the Create button in the top right corner of the page and give your workflow a name then click Next.
2) Selecting the type of workflow
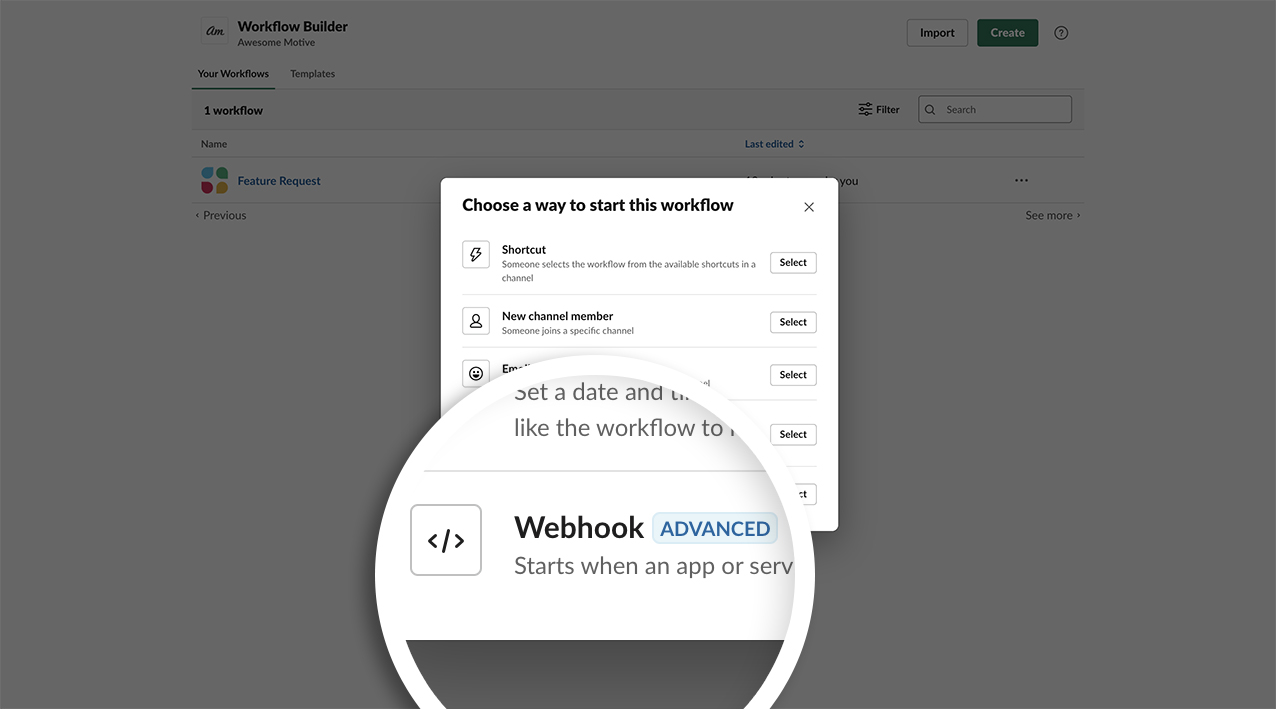
The next screen you’ll see is where you will select what type of workflow you want to create. Since we’re going to be using the WPForms Webhooks addon, we’ll click the Select button next to Webhook.
3) Creating the variables for the workflow
The next screen is where we are going to create the variables that we’ll be posting. For the purpose of this tutorial, we know we’re going to create a form with the Name, Email, Checkbox (for our product list), and Paragraph Text (for our comments) form fields. So we’re going to create variables that will work with those fields.
Once you click the Add Variables link a new window will ask you for the Key and the Data Type.
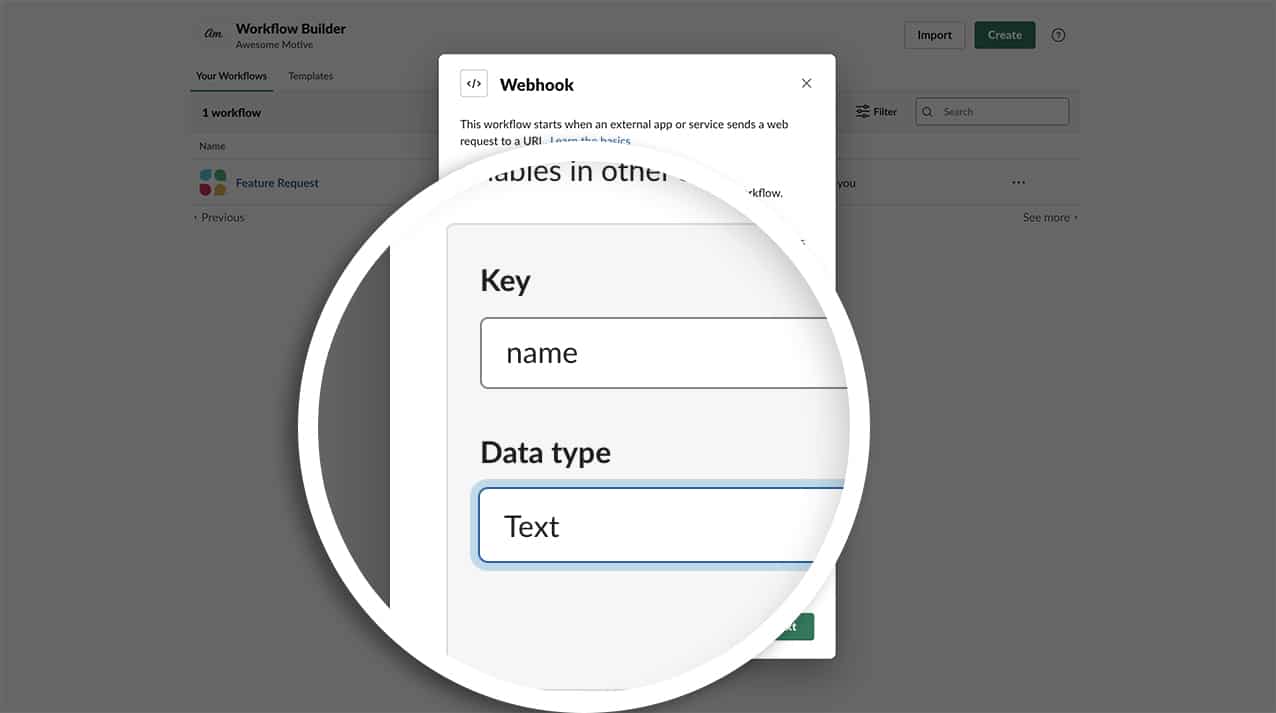
Our first variable Key will be name and our Data Type will be Text.
Click Done when you are finished adding the variable and repeat this step for each variable you want to add to this workflow by clicking the Add Variable link until you are finished adding all variables.
We’re going to repeat this step for the Email, Checkbox, and Paragraph Text form fields.
Now that we’ve added all of our variables, click the Next button to finish building the workflow.
4)Adding the steps to the workflow
Now it’s time to add the steps that our new workflow will take.
Next, click the Add button next to Send a message. Here you can choose to post to a particular channel or person in Slack.
The next screen you’ll see will ask you to select from a dropdown who you’d like to send the message to. Then you’ll get to build the message that will send.
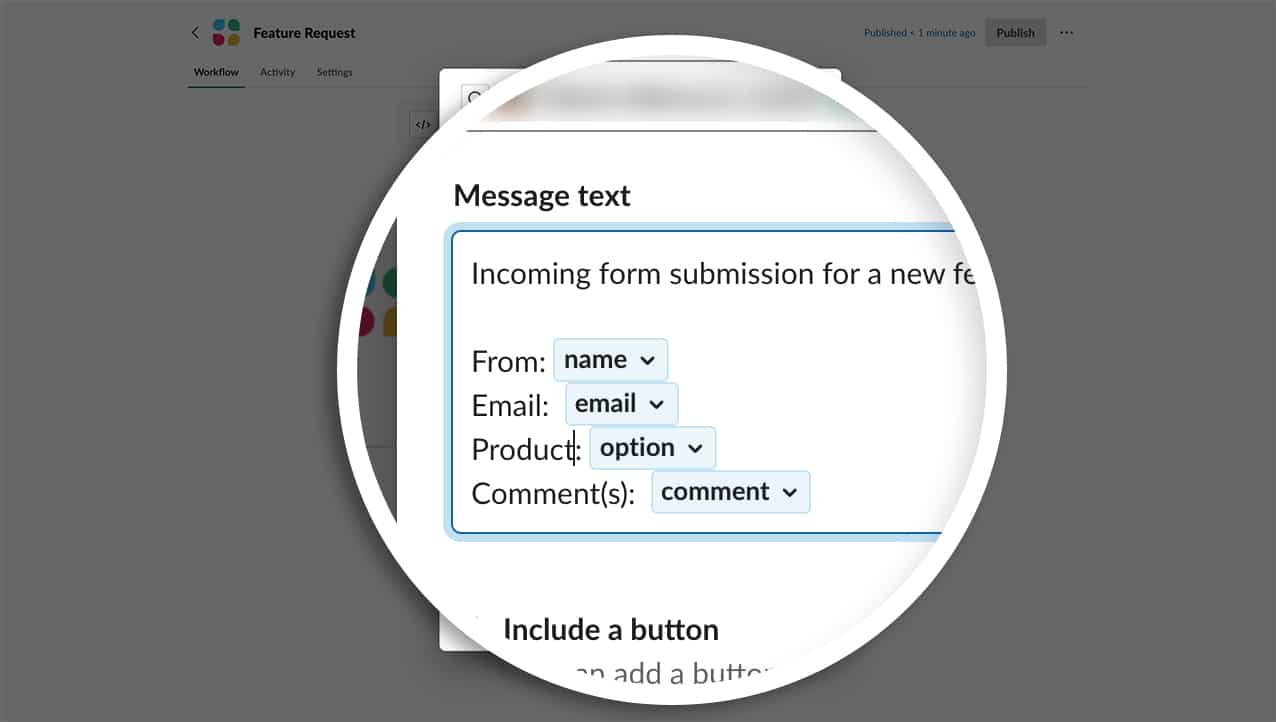
The message itself will accept the typed text that you enter as well as the variables that you added in the last step. For our message, we’ll start with what this message is “Incoming form submission for a new feature”.
Then we’ll start building the text and variables together on a new line for each. Once you’ve typed From, click the Insert Variable link and select the name variable. Repeat this step for each of the variables you’ve added and click Save to save the changes.
The popup window will be closed and you’ll just need to click the Publish button to publish the workflow. Once you’ve published your workflow you can click the Copy button next to the URL that gets created for the webhook. We’ll use this URL in a later step.
Creating the form
Before we can send our field values through the webhook, we need to create our form. Our form will contain the Name, Email, Checkbox (for a list of our products), and a Paragraph Text (for our comments) form fields.
If you need help creating a form, please see this documentation.
Adding the code snippet
Now it’s time to add the code snippet that will create and send field values with webhooks from our Checkbox form field.
Just copy and paste this code snippet to your site. If you need help with adding code snippets to your site, please see this tutorial.
First, we’ll add the snippet that allows us to add field values for Dropdowns, Checkboxes, and Multiple Choice fields from this tutorial.
/**
 * Show values in Dropdown, checkboxes, and Multiple Choice.
 *
 * @link https://wpforms.com/developers/add-field-values-for-dropdown-checkboxes-and-multiple-choice-fields/
 */

add_action( 'wpforms_fields_show_options_setting', '__return_true' );
Next, we’re going to add a snippet that allows us to send those field values with webhooks.
/**
 * Send field values in Dropdown, checkboxes, and Multiple Choice through webhook.
 *
 * @link https://wpforms.com/developers/how-to-send-field-values-with-webhooks/
 */

function wpf_dev_webhooks_process_delivery_request_options($options, $webhook_data, $fields, $form_data, $entry_id) {

	    if ( ! wpforms_show_fields_options_setting() ) {
			return $options;
		}

	    //Only run on form ID 322
		if ( empty( $form_data[ 'id' ] ) || $form_data[ 'id' ] !== '322' ) {
			return $options;
		}

		if (
			empty( $options[ 'body' ] ) ||
			empty( $webhook_data[ 'body' ] ) ||
			empty( $fields )
		) {
			return $options;
		}

		$body = ! is_array( $options[ 'body' ] ) ? json_decode( $options[ 'body' ], true ) : $options[ 'body' ];
		foreach ( $body as $param_key => $param_value ) {
			if (
				! isset( $webhook_data[ 'body' ][ $param_key ] ) ||
				empty( $fields[ $webhook_data[ 'body' ][ $param_key ] ] ) ||
				! isset( $fields[ $webhook_data[ 'body' ][ $param_key ] ][ 'value_raw' ] )
			) {
				continue;
			}
			$body[ $param_key ] = $fields[ $webhook_data['body'][ $param_key ] ]['value_raw'];
		}

		// Format request data.
		if (
			! empty( $options[ 'method' ] ) &&
			$options[ 'method' ] !== 'GET' &&
			$webhook_data[ 'format' ] === 'json'
		) {
			// Encode request body.
			$options[ 'body' ] = wp_json_encode( $body );
		}

		return $options;

	}

add_filter( 'wpforms_webhooks_process_delivery_request_options', 'wpf_dev_webhooks_process_delivery_request_options', 10, 5);
Please remember to update the form ID from 322 to whatever your form ID is. If you need help in finding your form ID, please see this tutorial.
Editing the form to enable showing the values
Once you’ve added your code snippet, just edit your form and click on the Checkbox field so that you can fill in your field values. This is what will be sent to Slack through the webhook instead of the label.
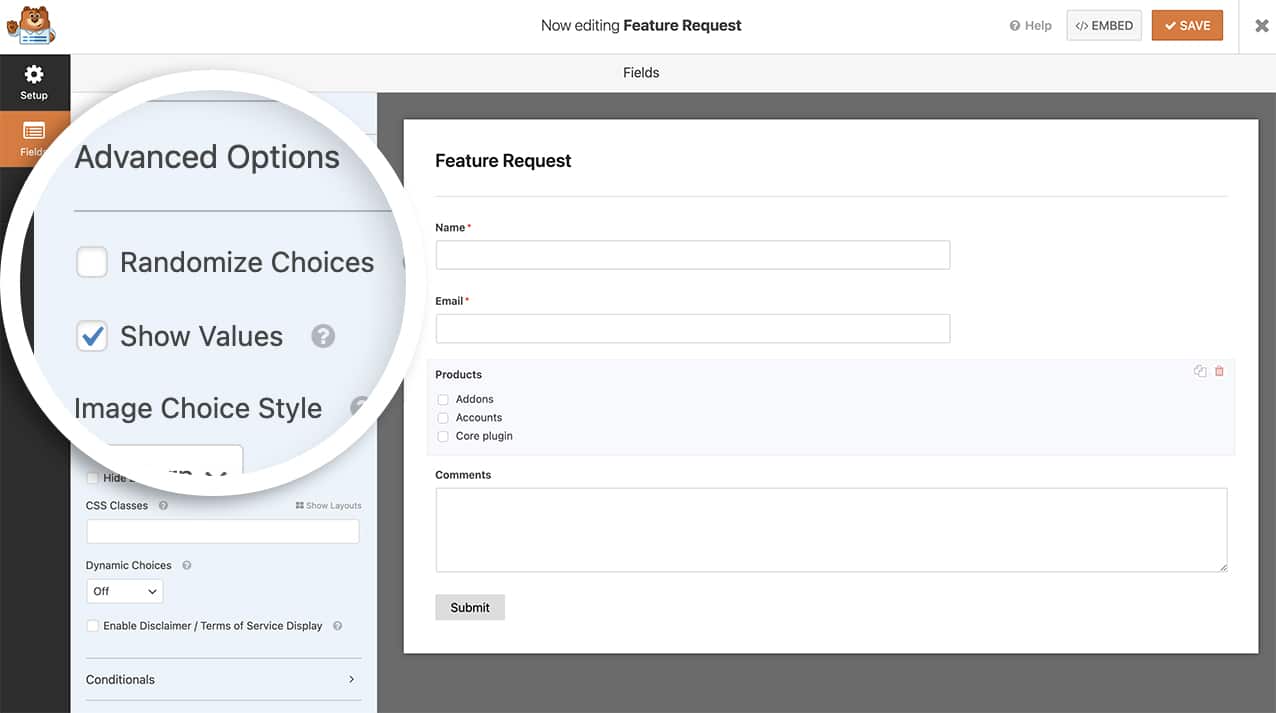
Now you’ll need to edit your form and select the Checkbox form field. In the Advanced Options, click the checkbox for the Show Values.
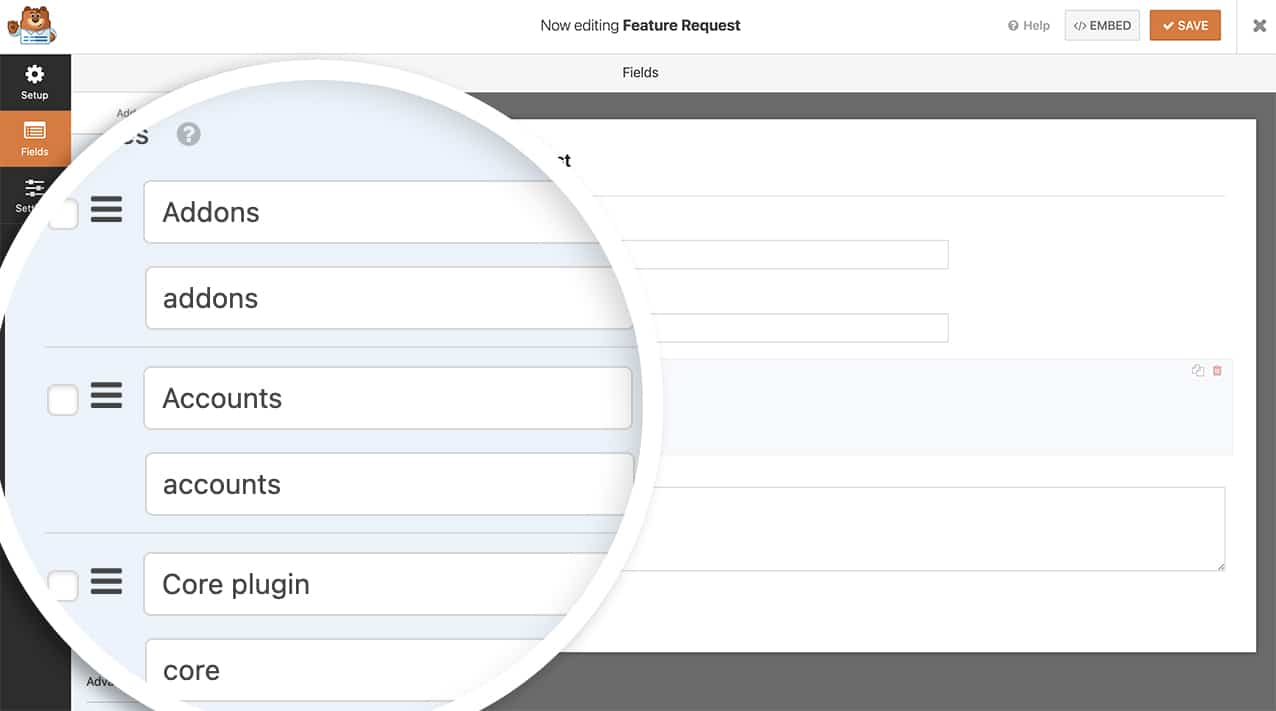
Once you’ve done this, you’ll be able to add your values to the field.
Mapping the webhook fields
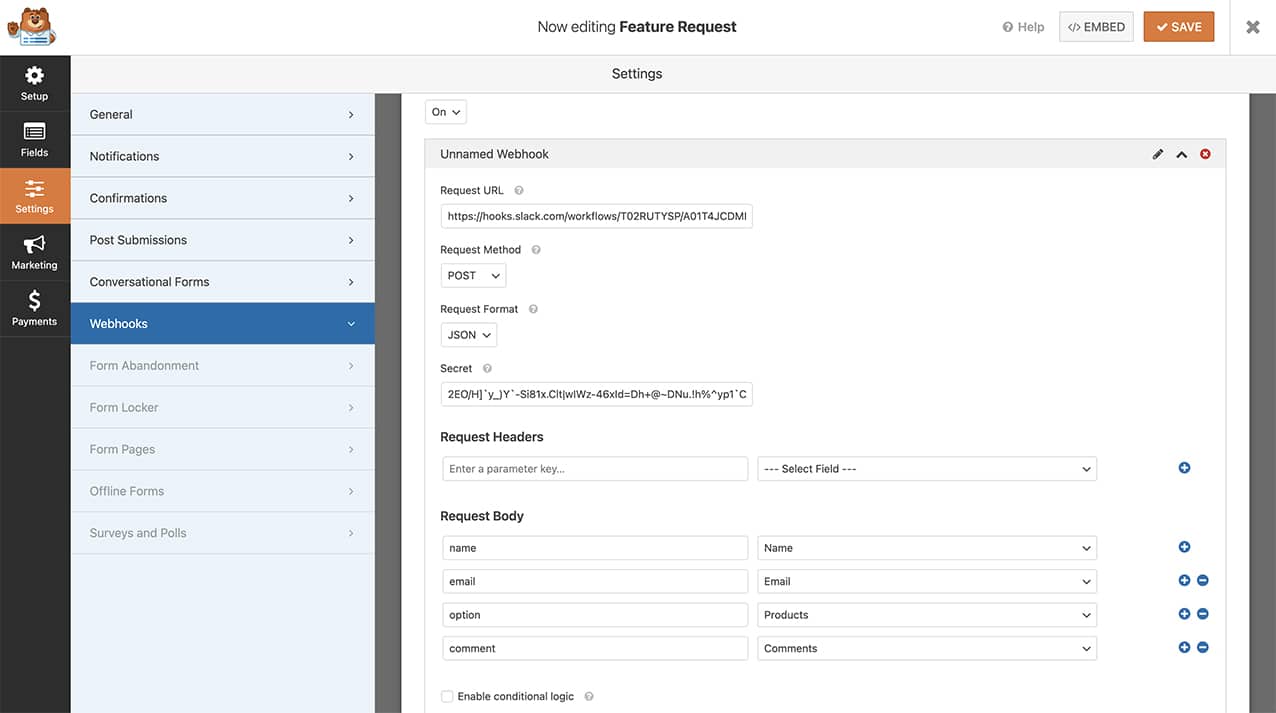
The final step is to map over the form fields to match the variables that we set up in our Slack workflow. To complete this step, from inside the form builder click the Settings tab. Then click Webhooks.
From the Webhooks dropdown, switch this setting to On.
The Webhooks URL is the URL you copied in Step 4 above. The Request Method will be Post and the Request Format will be JSON.
You can leave the Secret and Request Headers section blank. We won’t need to alter these settings.
In the Request Body, this is where we will map our variables from Step 3 to our form fields.
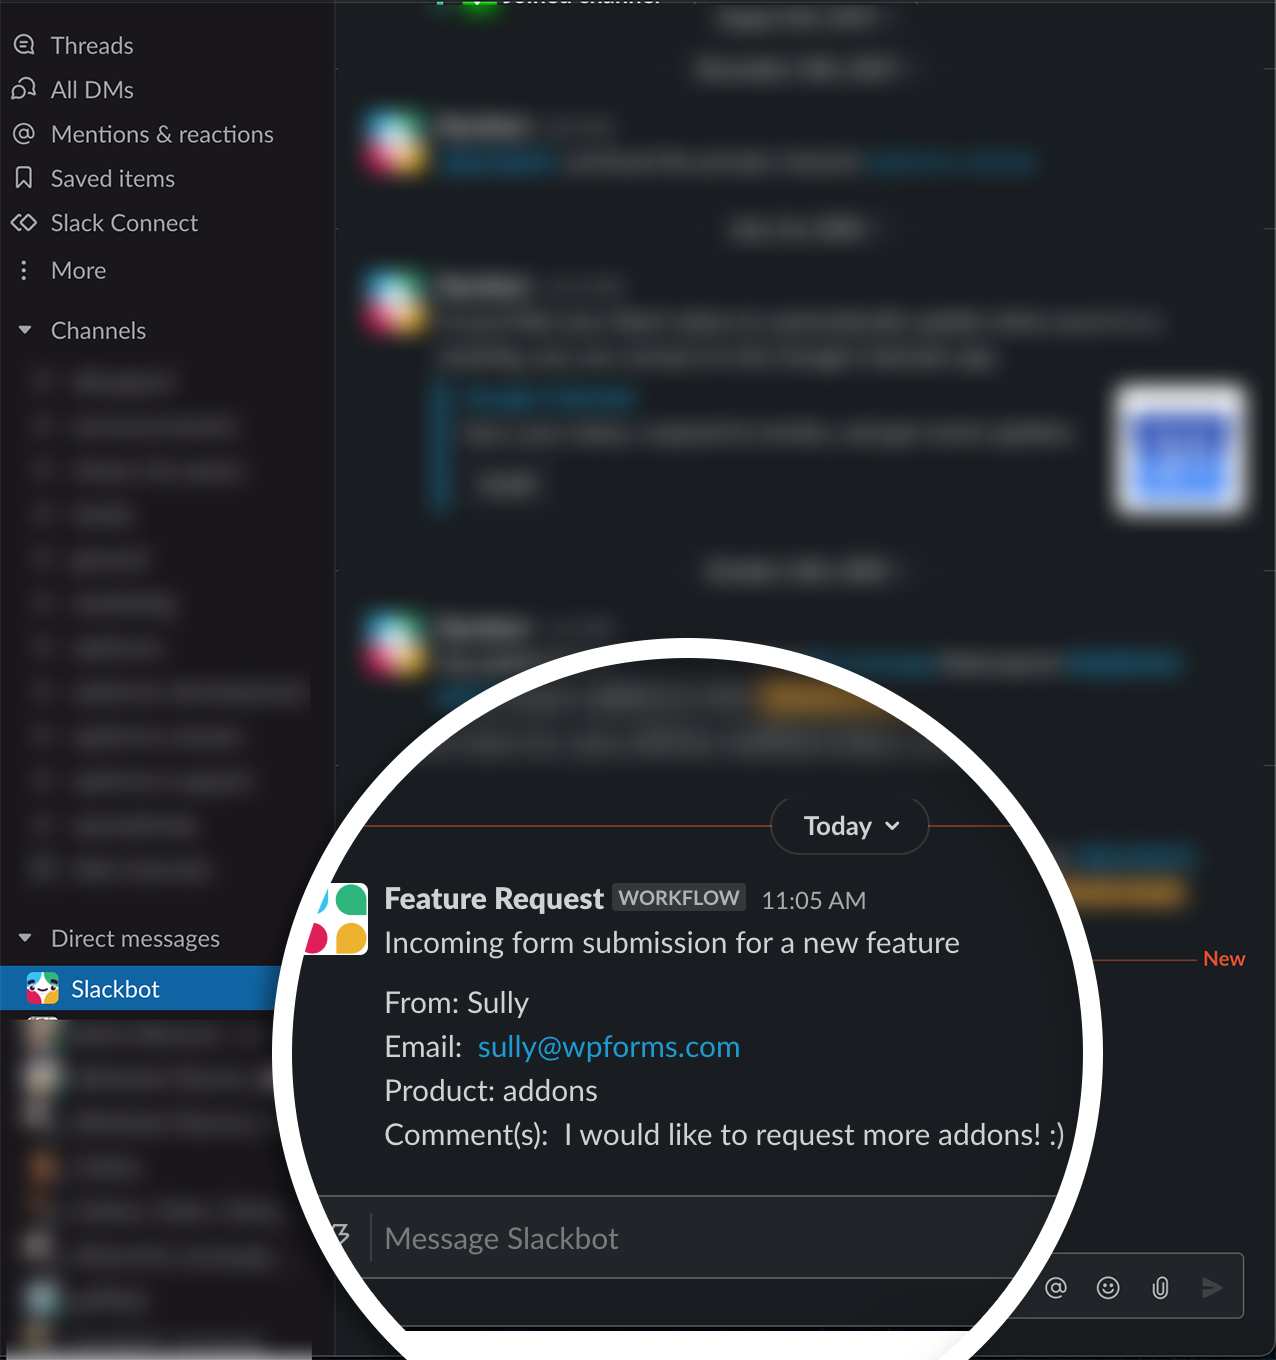
Now when the form is completed, not only will a Slackbot will send a message to the person or channel you set up in your webhook but it will also send the field values through the webhook instead of the field label.
And that’s it! Would you like to also add some animated confetti to your confirmation message upon successful form submission? Take a look at our tutorial on How to Add Confetti Animation to Confirmation Message.
