Introduction
Are you interested in displaying a personalized message outside of WPForms? You can achieve this by leveraging JavaScript, and we’re here to guide you through the process!
In this tutorial, we’ll guide you through the process of adding a customized message to your page. This message will dynamically display form field values outside of WPForms, allowing you to seamlessly integrate and showcase user-input data on your page. Let’s get started!
Let’s dive in and learn how to add values to your page effectively.
Creating your redirect page
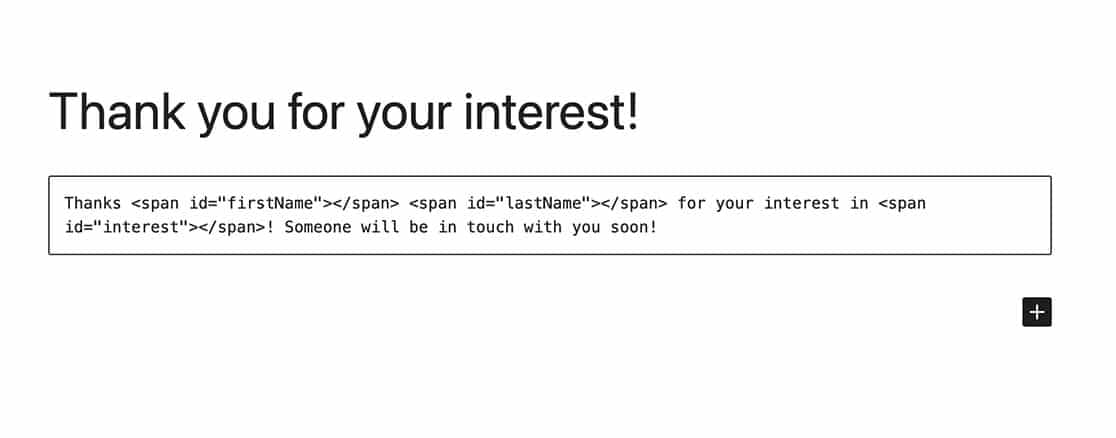
The opening section of our page will feature a personalized message comprising three empty HTML spans. An HTML span is an inline, non-semantic HTML element employed for embedding inline content within our page.
In the subsequent steps, our form will transmit both the first and last name, as well as the user’s interest selection, through a query string that we’ll construct later on.
A query string is an integral part of a URL that contains data or parameters used for communication with a web server, facilitating the retrieval of information. It is situated after the question mark (?) in a URL and is composed of key-value pairs separated by ampersands (&). For a comprehensive guide on using form field values within a query string, you can refer to this documentation, which provides a detailed breakdown for each form field.
To initiate the creation of these empty spans, we’ll begin by incorporating a Custom HTML block onto our page. This introductory paragraph will reside within this block since it necessitates the inclusion of pure HTML for the spans.
To add a Custom HTML block to your WordPress page, simply click the plus (+) sign, search for Custom HTML, and select the block to insert it onto your page.
Next, copy this HTML and add it to your HTML block on the page.
<p>Thanks <span id="firstName"></span> <span id="lastName"></span>
for your interest in <span id="interest"></span>!
Someone will be in touch with you soon!</p>

Creating the form
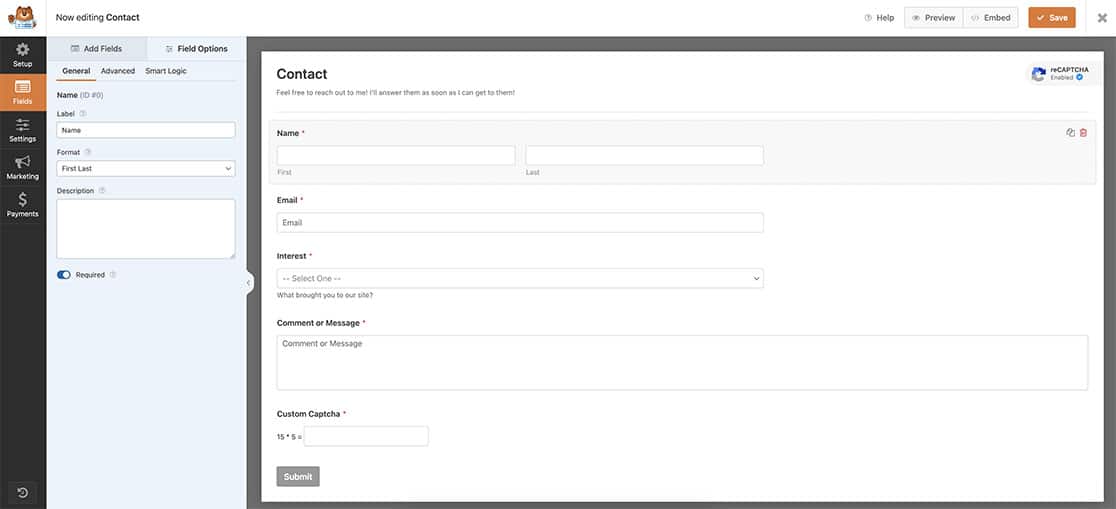
Now, let’s craft our form and add the necessary fields. If you find yourself in need of any assistance during this form creation process, be sure to check out this handy guide for step-by-step instructions.
In this tutorial, we’re keeping it straightforward by crafting a basic contact form. Its primary goal is to enable our users to share their interests with us, allowing us to send them a more personalized newsletter every month. To achieve this, we’ll gather their name, email address, and their interests using a Dropdown field. Additionally, we’re providing a comments section for any extra messages they’d like to convey.

Customizing the Redirect URL
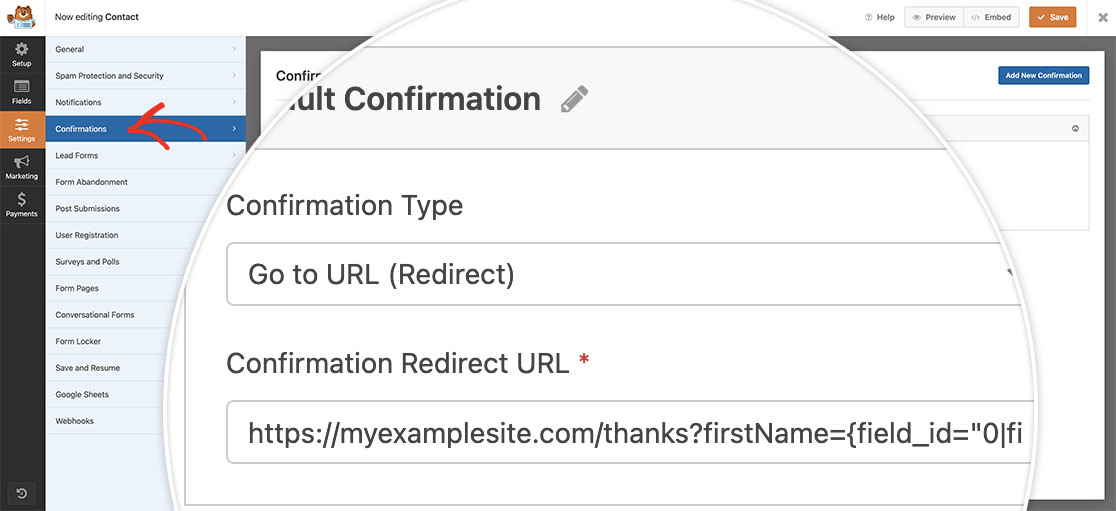
In our upcoming step, we’ll tailor the redirect URL to our needs. After creating your form and adding the necessary fields, head over to the form builder’s Settings and then select Confirmations.
Within the Confirmation Type dropdown menu, opt for “Go to URL (Redirect).” In the Confirmation Redirect URL field, enter the URL of the Thank You page you established in the initial step. For this illustration, our URL is https://myexamplesite.com/thanks.
To populate our page with the name and interests collected from the form, we’ll extend this URL by appending a query string. This query string will include the IDs of the spans we introduced and assign them to specific form fields from our form. Consequently, our comprehensive URL will appear as https://myexamplesite.com/thanks?firstName={field_id="0|first"}&lastName={field_id="0|last"}&interest={field_id="16"}.
Let’s deconstruct this query string for clarity. Given that our form gathers both first and last names, we must segregate these values to ensure they are correctly conveyed within the URL. The field ID for our Name field is 0, but since we’re collecting the first and last name in this field, our query string will include these using a pipeline (|) followed by first or last, depending on which one we’re calling. So you can see in the string we’re calling {field_id="0|first"} and assigning it to span ID of firstName and the {field_id="0|last"} is assigned to the lastName span.
The Interest dropdown selection is being passed using the {field_id="16"} and will be assigned to the interest span.

You’ll need to update the URL to match your own site but you’ll also need to update the field IDs to match your own form. If you need help with where to find your field IDs, please review this tutorial.
Adding the snippet
Now, let’s integrate the snippet into our setup. If you’re unsure about the process of adding snippets to your site, you can consult this comprehensive guide for detailed instructions.
In this tutorial, we’ve employed the WPCode plugin to handle our snippet.
To begin, start by creating a new custom snippet. Provide it with a suitable name. In the Code Type dropdown, select JavaScript Snippet. For the Location dropdown, you can opt for Site Wide Footer. This will ensure that our JavaScript snippet is appropriately placed and executed on your site after the page has finished loading.
Pro tip: If you have the licensed version of the plugin that allows you to only add a snippet to a specific page, we recommend doing this. This ensures that your custom snippet will not run on all your pages, but only your Thank You page. To read more about this feature, please check out the plugin’s documentation on Page-Specific snippets.
/**
 * Display personalized message outside of the form using form submitted data.
 *
 * @link https://wpforms.com/developers/how-to-display-personalized-message-outside-wpforms/
 */

// Function to get URL query parameters
        function getQueryParameters() {
            var queryParams = {};
            var queryString = window.location.search.slice(1);
            var queryVars = queryString.split('&');

            for (var i = 0; i < queryVars.length; i++) {
                var pair = queryVars[i].split('=');
                var key = decodeURIComponent(pair[0]);
                var value = decodeURIComponent(pair[1]);
                queryParams[key] = value;
            }

            return queryParams;
        }

        // Get query parameters
        var params = getQueryParameters();

        // Populate spans with query parameter values
	    if (params.hasOwnProperty('firstName')) {
            document.getElementById('firstName').textContent = params['firstName'];
        }

        if (params.hasOwnProperty('lastName')) {
            document.getElementById('lastName').textContent = params['lastName'];
        }
        if (params.hasOwnProperty('interest')) {
            document.getElementById('interest').textContent = params['interest'];
        }
As you can observe, we’re dissecting the URL, breaking it down meticulously to extract the query string values. Subsequently, we utilize the textContent property to precisely allocate these parameters to the corresponding span IDs on our Thank You page.
And there you have it! From this point forward, whenever a visitor fills out our contact form, they’ll be greeted with a personalized message featuring their name and interests on the redirected Thank You page. It’s that simple! 🎉
Would you like to auto populate another form with query strings? Take a look at our tutorial on How to Use Query Strings to Pre-Populate Form Fields From Another Form.
