
Resumo de IA
Quer redirecionar utilizadores para outra página depois de premirem submeter no seu formulário de contacto? Redirecionamentos são uma forma simples e eficaz de levar os utilizadores imediatamente para o próximo passo após a submissão do formulário.
Pode enviá-los para uma página de agradecimento, uma página de destino personalizada, ou qualquer outra parte do seu site que faça sentido. E se estiver a realizar qualquer tipo de campanha ou a recolher leads, esse redirecionamento pode fazer uma grande diferença nas conversões.
Neste post, vou mostrar-lhe a forma mais fácil de lidar com um redirecionamento de formulário WordPress, desde um simples redirecionamento de uma página a redirecionamentos dinâmicos que enviam as pessoas para diferentes páginas com base no que elas selecionam.
Crie o Seu Formulário WordPress Agora! :)
Como Criar um Redirecionamento de Formulário no WordPress
Adicionar um redirecionamento após o envio de um formulário é fácil com o WPForms, e não precisará de qualquer código. Abra as Definições » Confirmações do seu formulário, escolha um Tipo de Confirmação e selecione para onde quer que as pessoas aterrem.
Selecione Mostrar Página para as enviar para uma página no seu site, ou Ir para URL (Redirecionamento) para as direcionar para qualquer outro endereço web, depois guarde o seu formulário para ativar o redirecionamento.
Abaixo, irei guiá-lo através de todo o processo passo a passo, incluindo redirecionamentos condicionais que enviam as pessoas para páginas diferentes com base no que enviam.
- Passo 1: Instalar o Plugin WPForms
- Passo 2: Criar um Novo Formulário
- Passo 3: Criar um Redirecionamento de Formulário
- Passo 4: Configurar Redirecionamentos Condicionais de Formulário (Opcional)
- Passo 5: Publicar um Formulário WordPress com Redirecionamentos de Página Personalizados
- Dica Bónus: Opções Avançadas de Redirecionamento para Desenvolvedores
Passo 1: Instalar o Plugin WPForms
Para começar, você vai precisar de um plugin fácil de redirecionamento de formulários de contato para WordPress. O WPForms é o melhor construtor de formulários para WordPress, e é conhecido pela sua ferramenta de redirecionamento de formulários amigável para iniciantes.
Embora você possa criar redirecionamentos básicos com o WPForms Lite, eu costumo recomendar o uso do WPForms Pro se quiser mais controle sobre para onde os seus utilizadores vão após o envio de um formulário.
Com o WPForms Lite, você pode redirecionar todos os envios de formulário para uma única página de agradecimento ou URL. Isso funciona bem para formulários de contato simples ou geração básica de leads.
Mas se você estiver a recolher diferentes tipos de envios (como vários pedidos de serviço ou inquéritos de produtos), pode querer que esses utilizadores aterrem em páginas diferentes com base no que enviaram.
Com o WPForms Pro, você pode usar a lógica condicional para criar redirecionamentos dinâmicos. Por exemplo, se alguém selecionar "Consulta de Negócios" no seu menu suspenso, você pode enviá-los para a sua página de serviços.

Se ainda não instalou o WPForms, vá em frente e faça isso primeiro. Leva apenas um minuto. E se não tiver a certeza de como instalá-lo, pode consultar este guia passo a passo para obter ajuda.
Depois de ativar o plugin, você pode começar a criar novos formulários e adicionar redirecionamentos da sua escolha. Vou mostrar-lhe como fazer isso a seguir.
Atualize para o WPForms Pro Agora! :)
Passo 2: Criar um Novo Formulário
Se esta é a sua primeira vez a usar o WPForms, precisará de começar por criar um formulário e depois adicionar um redirecionamento a ele. Criar um formulário é super fácil com o WPForms. Para começar, abra o seu painel WordPress e vá para WPForms » Adicionar Novo.

Isso abrirá a interface do construtor de formulários. Dê um nome ao seu formulário para que possa identificá-lo facilmente mais tarde. Role para baixo até à área Modelos e selecione um modelo para o seu formulário clicando no botão Usar Modelo.

O seu modelo selecionado será agora carregado e aparecerá no seu ecrã, onde poderá ver os Campos disponíveis juntamente com a pré-visualização do formulário.

Depois disso, você está livre para personalizar o formulário da maneira que quiser. Use a funcionalidade de arrastar e soltar para adicionar, remover ou reordenar campos.

“💡 Dica Pro: Antes de configurar o seu redirecionamento, pense em que informação precisa de recolher. Se estiver a usar o WPForms Pro, pode querer adicionar campos que ajudem a determinar para onde enviar utilizadores diferentes (como um menu suspenso “Como podemos ajudar?”).”
Quando estiver satisfeito com a aparência do seu formulário, clique em Guardar na parte superior do construtor de formulários. Agora, é hora de adicionar um redirecionamento de formulário usando as configurações de confirmação do WPForms.
Passo 3: Criar um Redirecionamento de Formulário
O WPForms oferece-lhe muita flexibilidade no que diz respeito à configuração das definições de redirecionamento e confirmação de formulários. Pode redirecionar os visitantes do seu site para dois locais utilizando o WPForms. Mostrarei como configurar ambas as opções:
- Uma página diferente no seu site
- Uma página externa para um site diferente.
3.1. Redirecionar utilizadores para uma página no seu site
Por defeito, o WPForms exibe uma mensagem de sucesso simples quando alguém submete o seu formulário. Se pretender redirecionar os visitantes para uma página específica no seu site, selecione Definições » Confirmações no construtor de formulários.

Depois disto, escolha Mostrar Página no menu suspenso Tipo de Confirmação. Isto fará com que um novo menu suspenso – Página de Confirmação – apareça abaixo.
Utilize o menu suspenso Página de Confirmação para selecionar uma página no seu site para onde redirecionar os visitantes após a submissão do formulário. Depois de ter escolhido a página para onde redirecionar os utilizadores, clique em Guardar.

Nota: Certifique-se de que já criou a página de redirecionamento no seu site para que a possa escolher no menu suspenso Página de Confirmação.
3.2. Redirecionar utilizadores para uma página noutro site
Em alguns casos, poderá querer redirecionar os visitantes para um site completamente diferente quando submetem um formulário. Isto pode ser útil se quiser enviar os visitantes para as suas páginas de redes sociais a partir do seu site, por exemplo.
Para fazer isto, vá a Definições » Confirmação como antes. Desta vez, selecione Ir para URL (Redirecionar) no menu suspenso Tipo de Confirmação.
Em seguida, cole o URL completo da página externa para onde gostaria de enviar o utilizador no campo rotulado URL de Redirecionamento de Confirmação.

Depois de ter configurado para onde redirecionar os utilizadores após submeterem um formulário no seu site, clique em Guardar para garantir que todo o seu progresso está seguro.
Passo 4: Configurar Redirecionamentos Condicionais de Formulário (Opcional)
O WPForms Pro permite-lhe redirecionar utilizadores para diferentes páginas dependendo da resposta fornecida por eles ao submeter um formulário.
Por exemplo, se tiver um formulário de pedido de orçamento que permite aos utilizadores selecionar um dos muitos serviços que oferece, pode redirecionar as pessoas para páginas de serviços específicas com detalhes com base na sua seleção.
Normalmente, isto funciona melhor se tiver campos como Múltipla Escolha, Caixas de Verificação ou outros campos que dão aos seus utilizadores uma escolha de opções. Depois, dependendo da escolha do utilizador, pode configurar diferentes páginas de redirecionamento.

Para configurar redirecionamentos de formulário condicionais, precisa de ter pelo menos duas confirmações. A partir da janela Confirmações, prima o botão Adicionar Nova Confirmação.

Dê um nome à sua confirmação e clique em OK. Em seguida, clique no botão Ativar Lógica Condicional. Isto expandir-se-á para opções adicionais.
Pode utilizar os campos de lógica condicional para definir as regras para quando um redirecionamento de formulário específico deve ser acionado. Neste exemplo, quero redirecionar os utilizadores para a página de marketing do site se um utilizador selecionar "Marketing" no campo Caixa de Verificação.

Repita este processo para definir a lógica para todas as opções de campo disponíveis e os respetivos redirecionamentos de página que pretende acionar para cada opção. Quando terminar, certifique-se de clicar em Guardar.
Passo 5: Publicar um Formulário WordPress com Redirecionamentos de Página Personalizados
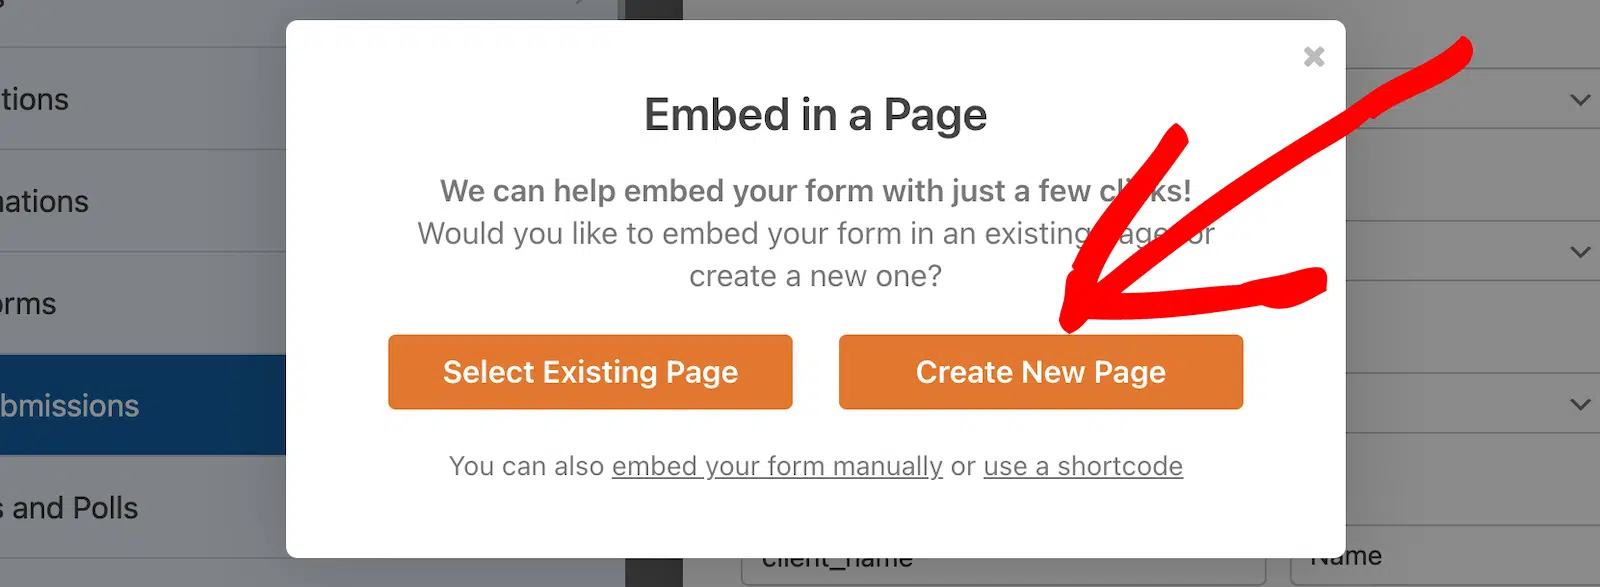
O seu formulário com redirecionamentos de página está agora pronto para ser lançado! Para incorporar o formulário, clique no botão Incorporar ao lado de Guardar no construtor de formulários.

Se pretender adicionar o seu formulário a uma nova página, clique em Criar Nova Página ou escolha a opção Selecionar Página Existente, conforme necessário!
Em seguida, ser-lhe-á pedido para dar um nome à nova página. Este será o título da sua nova página. Clique em Vamos a Isso quando estiver pronto.

O WPForms irá levá-lo para o editor de blocos do WordPress com um bloco para o seu novo formulário já adicionado. Pode alterar quaisquer definições ou adicionar mais conteúdo à página, se desejar. Quando estiver pronto, clique em Publicar.

Quando os utilizadores começarem a enviar este formulário, serão redirecionados para a página que especificou nas definições de confirmação do formulário acima. E é tudo! Agora, sabe como redirecionar utilizadores após o envio do seu formulário.
“💡 Dica Pro: Não posso stressar isto o suficiente. Teste sempre os redirecionamentos do seu formulário antes de o colocar online. Já vi demasiados formulários a enviar utilizadores para páginas quebradas ou URLs incorretas, e essa é uma forma rápida de perder potenciais leads.”
Dica Bónus: Opções Avançadas de Redirecionamento para Desenvolvedores
Os passos acima cobrem tudo o que a maioria das pessoas precisa. Se se sente confortável com um pouco de código, o WPForms oferece mais duas formas de ajustar os redirecionamentos.
Por defeito, um redirecionamento abre na mesma aba do navegador. Se preferir abrir o redirecionamento numa nova aba, pode adicionar um pequeno trecho para o fazer. Isto é útil quando está a enviar as pessoas para um site externo, mas quer que elas mantenham a sua página de agradecimento aberta por trás dela.
Também pode passar dados do formulário para o URL de redirecionamento para que a página de destino saiba o que o visitante enviou. O WPForms inclui um filtro chamado wpforms_process_redirect_url que lhe permite modificar o URL de redirecionamento na hora, por exemplo, adicionando o nome ou e-mail do visitante como uma string de consulta.
FAQs sobre Redirecionamentos Após Envio de Formulário
Configurar redirecionamentos após o envio de formulários é um tópico popular entre os nossos leitores. Aqui estão respostas a algumas perguntas comuns sobre o assunto.
Quando são úteis os redirecionamentos de formulário?
Os redirecionamentos de formulário são muito úteis quando pretende enviar utilizadores para uma página específica após terem enviado um formulário.
Em vez de simplesmente mostrar uma mensagem de confirmação, pode usar o envio do formulário como uma oportunidade para se conectar ainda mais com os seus visitantes e levá-los a uma página que oferece exatamente o que eles precisam.
Dependendo da intenção do seu formulário, pode redirecionar utilizadores para diferentes tipos de páginas. Aqui estão alguns exemplos comuns de páginas de redirecionamento de formulário:
- Página de Agradecimento: Uma página dedicada a agradecer ao utilizador por preencher o formulário oferece uma excelente oportunidade para convidar os utilizadores a realizar outras ações. Pode promover os seus artigos de blog populares, fazer upsell do seu produto ou oferecer algum outro incentivo para manter os visitantes envolvidos com a sua marca.
- Conteúdo Protegido: Uma campanha de lead magnet é uma forma poderosa de recolher leads. Pode solicitar aos visitantes que preencham o seu formulário em troca de acesso gratuito a um recurso valioso. Por exemplo, pode redirecionar pessoas para uma página de download gratuito de um eBook, webinar, podcast, etc.
Como redireciono um formulário no WordPress após o envio?
Para redirecionar um formulário após o envio no WordPress, pode usar o plugin WPForms. É simples:
- Primeiro, instale e ative o plugin WPForms.
- Em seguida, crie ou edite um formulário no WPForms.
- No editor de formulário, clique em Definições e depois em Confirmações.
- Selecione o Tipo de Confirmação como Ir para URL (Redirecionar).
- Por fim, escreva o URL para o qual os utilizadores serão redirecionados após enviarem o formulário.
Este método garante que, assim que alguém preencher o seu formulário, será automaticamente levado para uma nova página à sua escolha, melhorando a sua experiência no seu website.
Como redireciono o utilizador para outra página após o envio do formulário?
Redirecionar utilizadores para outra página após enviarem um formulário no WordPress pode melhorar significativamente a experiência do utilizador. Para conseguir isto, pode utilizar o plugin WPForms.
Tudo o que tem de fazer é navegar para Definições » Confirmações. Em seguida, altere o Tipo de Confirmação para Ir para URL (Redirecionar). Depois de concluído, basta introduzir o URL da página para a qual deseja que os utilizadores sejam redirecionados após o envio do formulário.
Porque é que o meu formulário não está a redirecionar após o envio?
O seu formulário pode não estar a redirecionar após o envio porque a opção de redirecionamento não está configurada corretamente nas definições do seu formulário.
Verifique novamente se selecionou o tipo de confirmação correto (como "Ir para URL") e se o link de redirecionamento foi adicionado corretamente.
Além disso, certifique-se de que o URL de redirecionamento está ativo e não leva a uma página quebrada ou não publicada.
Em seguida, Permita que os Utilizadores Carreguem Ficheiros com Formulários
Pode querer consultar o nosso guia sobre como criar um formulário de carregamento de ficheiros no WordPress para que possa recolher todas as informações de que necessita dos visitantes do site de uma só vez.
Além disso, se procura ferramentas para tornar a gestão do site eficiente e sem esforço, aqui estão as nossas principais ferramentas recomendadas para gestão de sites WordPress.
Crie o Seu Formulário WordPress Agora
Pronto para construir o seu formulário? Comece hoje com o plugin construtor de formulários WordPress mais fácil. O WPForms Pro inclui muitos modelos gratuitos e oferece uma garantia de devolução do dinheiro em 14 dias.
Se este artigo o ajudou, por favor siga-nos no Facebook e Twitter para mais tutoriais e guias gratuitos do WordPress.

