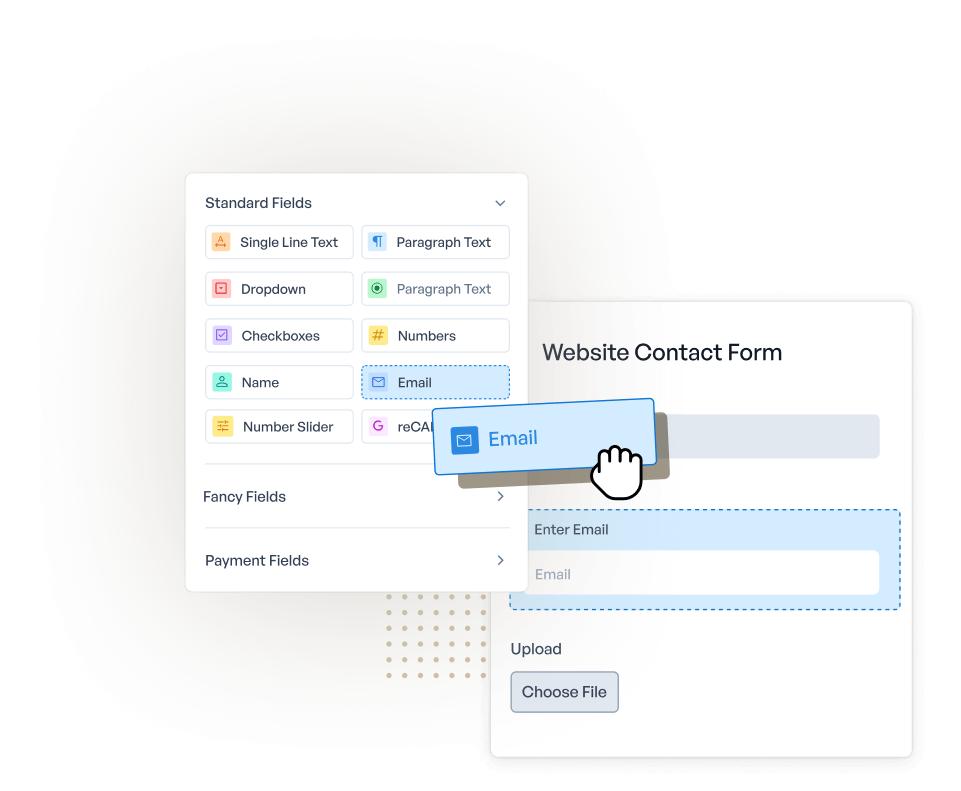
how-to-make-a-mautic-wordpress-form_o

How to Make a Mautic WordPress Form (The Easy Way)

Editorial Note: We may earn a commission when you visit links on our website.

Are you looking for an easy way to create a Mautic WordPress form? Integrating WordPress with Mautic will allow you to collect information about leads right from your website.

In this article, we’ll show you how to use Zapier to automatically save your visitors as Mautic contacts when they submit your form.

Click Here to Create a Mautic WordPress Form Now

Here’s a table of contents so you can quickly skip to the right section:

  1. Create a Mautic WordPress Form
  2. Publish Your Mautic WordPress Form on Your Website
  3. Enable Authentication in Mautic
  4. Connect WPForms to Zapier
  5. Connect Zapier to Mautic
  6. Test Your Mautic WordPress Integration

What Is Mautic?

Mautic is a free and open-source marketing automation platform.

It lets you design marketing campaigns and target them at specific people or groups.

You can use Mautic to:

  • Collect, manage, and score leads
  • Build targeted marketing campaigns
  • Create dynamic content
  • Send email newsletters.

We’ll show you how to set up a Mautic WordPress form in this article.

What Is a Mautic WordPress Form?

A Mautic WordPress form is a form on your website that sends data into Mautic when it’s submitted.

You don’t need to create a Focus Item to do this. And you can try this out with any Mautic site, including the sandbox account. Just make sure your Mautic site is set up and ready before you start.

You can use this guide to get visitor data into Mautic from any form on your site.

Step 1: Create a Mautic WordPress Form

You can store a lot of data about leads in Mautic. To keep it simple, let’s collect a small number of fields in this example.

To start, install and activate the WPForms plugin. If you need help, jump over to this guide on how to install a plugin in WordPress.

In the WordPress dashboard, click WPForms » Add New. To make it really easy, we’re going to select the Simple Contact Form template and customize it.

WordPress contact form template

The Contact Form template has 4 fields:

  • First Name
  • Last Name
  • Email
  • Message

You can add more fields to match the Standard Contacts fields in Mautic and remove fields you don’t need.

Just use the drag and drop builder to drag fields from the left-hand pane to the right-hand pane.

For example, Mautic has a Mobile field, so you can add that to your form like this:

Mautic WordPress form builder

Click Save when your form is done.

Step 2: Publish Your Mautic WordPress Form on Your Website

WPForms makes it really easy to embed your form on your website without touching any code.

You can place it on a page, in a post, or in the sidebar.

If you’re not sure where to add your form, check out this guide on the best places to add a contact form to get more leads.

For this example, let’s create a page in WordPress. Click the plus icon to add a block. Then search for WPForms and click the WPForms widget.

Add Mautic WordPress form widget

Select the form you created earlier and add it to the page.

Select form in WordPress

Now click Publish or Update to publish the form on your website.

It’s important to send a test entry through the form so that Zapier knows it’s working. Here’s an example:

Mautic WordPress form test entry

When you’re testing your form, be sure to use an email address that isn’t already in your Mautic contacts. If the email address already exists in Mautic, your test entry will overwrite the record.

There’s just 1 more thing you need to do before you integrate Mautic with WordPress.

Step 3: Enable Authentication in Mautic

It’s important to enable authentication in Mautic. If you don’t do this, you’ll see an error message in Zapier.

In Mautic, head to your settings and click Configuration.

Mautic Configuration screen

Click API Settings on the left, then under Enable HTTP basic auth? select Yes.

Enable HTTP basic auth

Now you’re ready to start working in Zapier.

Step 4: Connect WPForms to Zapier

We’re going to use Zapier to build a ‘bridge’ between WPForms and Mautic.

When Zapier detects a trigger – a new form submission – it’ll create or update a contact record in Mautic automatically.

In WPForms, check that the Zapier addon is enabled before you start. If you need help with this, read our tutorial on how to install and use the Zapier addon in WPForms.

Now let’s get started in Zapier. Click Make a Zap to begin.

Make a Zap in Zapier

At the top, click the name of the Zap to customize it.

Then, under Choose App and Event, search for WPForms and click the icon.

Select WPForms in Zapier

Zapier will ask for your WPForms key. To get this, go back to your WordPress site. In the dashboard, navigate to WPForms » Settings » Integrations.

Click Zapier in the list to show your key.

Get Zapier key

Copy and paste the key from the WPForms settings page into Zapier. Then type your domain name in the box underneath and click Yes, Continue.

Connect to WPForms in Zapier

Once Zapier’s connected to your site, click Continue.

Confirm WPForms account in Zapier

Select the form you created in step 1.

Select WordPress Mautic form

Now click Test Trigger.

WPForms test trigger

Remember the test form entry we created? Zapier will connect to WordPress and pull in all of the fields. In the next step, we’ll send all of that data to Mautic.

Step 5: Connect Zapier to Mautic

Under Do This, search for Mautic and select it. Then select Create or Update Contact.

Choose Mautic event in Zapier

Now it’s time to start connecting Mautic to Zapier. Type in your Mautic login details and URL. Once connected, click Yes, Continue.

Zapier Mautic login

Now let’s map the fields from the WordPress form to the Mautic contact record. This is really easy. Zapier helps us out by showing us the data from our test form entry next to the field name.

Your finished mapping will look something like this:

Create or Update Mautic contact from WordPress

This next step is optional, but it’s a neat trick. Under Tags, we’re going to add a custom tag: Imported from WPForms. That way we can easily target our WordPress visitors with specific Campaigns.

You can learn more about tagging on the Mautic website.

Mautic tag in Zapier

Click Test and Continue.

That’s it! It’s time to see if everything worked.

Step 6: Test Your Mautic WordPress Integration

If your Mautic WordPress integration is working, you should see the test WordPress form entry in Mautic. Let’s check.

In Mautic, click Contacts on the left-hand side.

Mautic dashboard

Click the row to open the contact. You should see all of the data you entered into your form.

Mautic Contact from WordPress

Great! It looks like Zapier has copied all of the fields to the right place.

Don’t forget to turn on your Zap when you’re ready to go live. Then check out our guide on how to get more leads so you can drive even more traffic to your Mautic form.

Click Here to Create a Mautic WordPress Form Now

Final Thoughts

You’re done! Now you know everything you need to know to connect your WordPress forms to Mautic.

Now you can easily create or update contacts automatically when your visitor submits a form on your website.

If you’d like to save your visitors’ information in WordPress, check out this tutorial on how to save your contact form data in your WordPress database.

Ready to build your Mautic WordPress form? Get started today with the easiest WordPress form builder plugin. WPForms Pro includes tons of free templates and offers a 14-day money-back guarantee.

If this article helped you out, please follow us on Facebook and Twitter for more free WordPress tutorials and guides.

Using WordPress and want to get WPForms for free?

Enter the URL to your WordPress website to install.

Comments

    1. Hey Daniel- We don’t have an inbuilt addon integrated with Mautic. Thanks for the suggestion. I have gone ahead and added your vote to the feature request.

      Have a good one 🙂

    1. Hey Jaydul, Thanks for reaching out!

      A dedicated addon for the Mautic is still in the works. I have added your vote and email to the feature- request list.

      Have a good one! 🙂

  1. Can you document a way to manually integrate to Mautic using webhooks, or some other way to call the Mautic API that doesn’t have a charge like Zapier does?

    1. Hi Robert,

      Thanks for sharing the suggestion! I have requested our concerned team about your request. However, if you are a paid license user and facing issues with connecting to Mautic using our Webhooks addon, then, I would recommend you to reach out to our support team for further assistance.

Add a Comment Cancel reply

We're glad you have chosen to leave a comment. Please keep in mind that all comments are moderated according to our privacy policy, and all links are nofollow. Do NOT use keywords in the name field. Let's have a personal and meaningful conversation.

This form is protected by reCAPTCHA and the Google Privacy Policy and Terms of Service apply.