How to Create Mailchimp Custom Fields in WordPress to Personalize Your Email Campaigns

Editorial Note: We may earn a commission when you visit links on our website.

Do you want to create Mailchimp subscribe forms in WordPress with personalized, custom form fields for your target audience? By adding custom fields to your Mailchimp forms, you can gather special information for use in your email marketing campaigns.

In this article, we’ll show you how to set up Mailchimp custom fields in WordPress for creating more personalized email campaigns.

Why Use Mailchimp Custom Fields?

Personalization is a powerful marketing tool to boost your revenue.

But, it can be tough to get started if you’re not very technically inclined.

Luckily, Mailchimp gives you an easy way to personalize your email campaigns by using custom fields.

What is a Mailchimp custom field? A custom form field goes beyond the basics (name and email address) and asks subscribers for more information. You can ask your subscribers for their company name, website, birthday, and more.

This gives you an easy way to segment your email list to get better results.

One common way to use custom fields for eCommerce personalization is to ask subscribers for their birthday so you can send them an exclusive discount code on their big day.

That’s exactly what we’ll show you how to do in this tutorial, but you can use custom fields to ask for any kind of information you want.

Easy Way to Customize Your Mailchimp Forms

If you use Mailchimp as your email service provider, you probably know you can create basic subscribe forms right from your Mailchimp account.

But what if you’re looking to create more advanced forms?

With WPForms, you can:

Best of all, you can quickly and easily create your forms using a drag and drop builder. That’s why WPForms is one of the best Mailchimp integrations on the market.

How to Create Mailchimp Custom Fields in WordPress

In this tutorial, we’re going to stick to the basics and show you how to use WPForms to create your own form with Mailchimp custom fields.

Step 1: Add Your Custom Field in Mailchimp

First, we’ll make sure to set up your Mailchimp custom field, so you can start collecting that data in your list.

To start creating your custom fields, sign in to your Mailchimp account. Next, navigate to Audience » Audience Dashboard in the menu on the left.

Opening your audience dashboard in Mailchimp

In the Audience Dashboard, click the Manage Audience dropdown, and then click Settings.

Opening audience settings in Mailchimp

Scroll down to the section labeled Audience fields and *IMERGEI* tags and click on it. This is where you can add Mailchimp list custom fields to your WordPress form.

Mailchimp merge tag settings

The screen that appears will now have all of the form fields in your subscribe form. To add a Mailchimp custom field, click on Add A Field.

Adding a Mailchimp custom field

Here, you will see all of the available custom fields you can add to your WordPress form.

Selecting a field type for a custom field in Mailchimp

Simply click on the custom field you would like to add to your WordPress form.

For this tutorial, we’ll click on Birthday so we can ask subscribers to add their birthday to their form submission.

Once you click on the custom field, it will automatically be added to the above list of form fields. Here, you can name the field. We’ll name ours Birthday.

You can also choose the date format.

Naming the Birthday field in Mailchimp

Once you have added all of the custom fields you want to your form, click on Save Changes.

Step 2: Create a New WordPress Form

Now we’ll create your custom signup form on your WordPress site.

The first thing you’ll need to do is install and activate the WPForms plugin. For more details, follow this step by step guide on how to install a plugin in WordPress.

Once you have installed WPForms, go to WPForms » Addons and find the Mailchimp addon. Click Install Addon to install and activate it.

Install Mailchimp addon

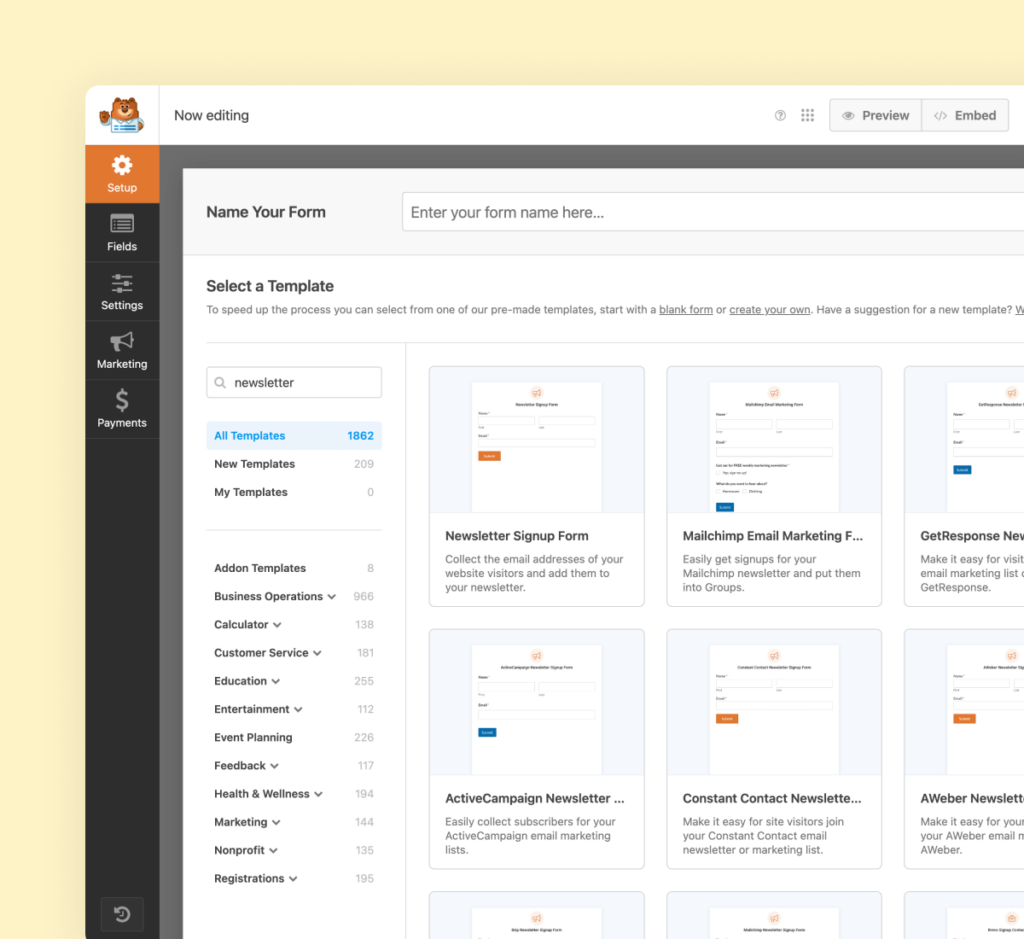
Once your WPForms Mailchimp addon is active, you need go to WPForms » Add New to create a new form. On the setup screen, name your form and select the Newsletter Signup Form template.

Choosing the Newsletter Signup Form template

WPForms will create a simple newsletter signup form.

You can add additional fields by dragging them from the left column onto the form. You can also click the fields on the preview side of the form builder to customize them or to rearrange their order.

The Newsletter Signup Form template

In this tutorial, we’ll be asking for the user’s birthday. So, let’s add a Date / Time field by dragging and dropping it from the menu.

Adding an Date / Time field to a Newsletter Signup Form

Then you can click on the field to customize it. We’ll change the label to “Birthday” and add a description to tell users why we collect this information. We’ll also choose the Date format since we don’t need users to select a time.

The Date / Time field's field options

Be sure to save your form.

Next, we’ll make sure all the information users fill out in your newsletter form goes to your Mailchimp list.

Step 3: Connect Your Form to Mailchimp

The next step is to connect your form to Mailchimp. To do that, click on the Marketing tab in the form builder.

Select MailChimp from the list on the left and then click on Add New Account.

Adding a new Mailchimp account in the form builder

You’ll then be asked to verify your Mailchimp account by providing the API key.

You can do this by logging in to your Mailchimp account, and navigating to Profile » Extras » API keys.

Copying your Mailchimp API key

Copy your Mailchimp API key and paste it into the form builder, add a nickname to help you identify this account in your WPForms settings, and click on Add.

Adding your Mailchimp API key

A popup will appear asking you to name the connection. This nickname is specific to this form, in case you want to connect it to multiple email lists. Name your connection anything you want and click on OK.

Adding a nickname for your form's Mailchimp connection

After you have verified your API key with WPForms, a new screen will appear with a dropdown where you can select the Mailchimp account you just integrated with WPForms.

Selecting your Mailchimp account to connect it to your newsletter form

After you choose your account, you can pick a specific audience from Mailchimp as well as which action you want to perform when a user submits this form. In this case, we’re going to add the user as a subscriber.

Selecting a Mailchimp audience and action to perform

Next, select your form’s Email field from the Subscriber Email dropdown.

Selecting your newsletter form's Email field to send subscribers to Mailchimp

After that, there are several additional settings you can configure, such as adding tags from your Mailchimp account to new subscribers, marking new subscribers as VIPs, and more. Check out our Mailchimp addon documentation for all the details.

For this tutorial, we’re going to scroll past all those options to the custom fields section. First, we’ll select the custom birthday field we created in Mailchimp from the dropdown on the left.

Choosing your Mailchimp custom field in the WPForms form builder settings

Then we’ll choose the Date / Time field from our form where users will enter their birthdays from the dropdown on the right.

Connecting your Mailchimp custom form field to your newsletter form field

Now click Save at the top of the form builder to save your Mailchimp connection settings.

If you’d like, now is also the best time to customize your confirmation message and email notifications.

Step 4: Add Your Form to Your Site

Once you’re happy with your form, you’re ready to make it visible to your website visitors.

WPForms allows you to add your forms in several locations including your blog posts, pages, and even as a sidebar widget.

Let’s use the easy Embed option to add our Mailchimp newsletter form to a page.

Start by clicking the Embed at the top of the form builder.

Embedding a newsletter signup form from the form builder

Next, you need to click Create New Page.

Embed Mailchimp form in a new page

And then give your page a name and click Let’s Go.

Name newsletter signup form

WPForms will create the page and embed your Mailchimp form into it automatically. Just click Publish here to go live.

Publish newsletter signup page

Now your form is live and ready for people to sign up! We recommend submitting a test entry to make sure your custom Mailchimp field is working correctly.

Next, Level Up Your Email Marketing Campaigns

And that’s it! You have successfully added a Mailchimp custom field in WordPress that you can use to personalize your email campaigns and provide more valuable content to those who are interested in what you have to offer.

Want to customize your forms even more? Check out how to redirect site visitors after they submit a subscribe form. This way you can guide users to a thank you page or a custom landing page and keep them engaged in your content.

Plus, you might also like these other Mailchimp-related posts:

And, if you liked this article, don’t forget to follow us on Facebook and Twitter for more free WordPress tutorials.

Using WordPress and want to get WPForms for free?

Enter the URL to your WordPress website to install.

Comments

  1. Is there a way to add the new Mailchimp tags via WP Forms as well? And what about other tag based providers like ActiveCampaign?

    1. Hi Chris,

      We don’t currently have a way to send tags via our MailChimp addon, but that’s on our feature request list for consideration. Though we also don’t currently have direct integration with ActiveCampaign (though this can be set up through Zapier), some of our other marketing integrations (like AWeber and Drip) already have a tag option built in.

      I hope this helps! If you have additional questions, please get in touch 🙂

      1. Hi Adam,
        This feature is currently unavailable, I apologize for any inconvenience!
        However, I saw that some users could set up a MailChimp integration using our apier addon and send through tags to the MailChimp this way.
        I hope this helps.
        Have a good one 🙂

      2. Hi Boris!
        Currently, we do not have tags integration with Mailchimp. I do agree it would be super helpful, though. I’ve made a note of the feature request and we’ll keep it on our radar as we plan out our roadmap for the future.
        I have heard that some users are using our Zapier addon as with Zapier it is possible to add tags while you are saving contact to MailChimp from WPForms.
        I hope this helps.
        Have a good one 🙂

      3. Just wanted to add that I’d love to see a Mailchimp tags integration as well. Any progress since this was added to the feature list for consideration 2 years ago? 😉

      4. Hey Andrew – Unfortunately, this feature is not yet available but the good news is, this is an active project at the moment. I can’t provide an exact ETA but if all goes as per the plan, you should expect it anytime soon. We are already working on our MailChimp addon update which should have this feature.

        I hope this helps!

      5. Hello! I was just curious if there was any update on MailChimp Tags being added to the MailChimp addon.

      6. Hey Ryan – I am afraid this is still not available. I agree it is going to be a great help having tags included in the Mailchimp addon, however, I can’t provide an ETA about this feature’s availability, but I have gone ahead and added your vote to the feature request.

        Thanks for your patience!

      7. Hi there, any update on this? Customers have been asking about this and following up for about 2 years now. Tagging contacts is pretty standard practice on just about every software on earth that stores contact records. Is this feature a priority for WPforms? Thanks.

      8. Hey there – I totally understand how useful a tag feature can be for this addon. I am sorry for not being able to provide an ETA but I have gone ahead and added your vote to the feature request. We have plans to add this feature, I just don’t have an exact ETA to share right now.

        Thank you for your patience!

      9. We would also really appreciate the ability to segment our form submissions by tags. Seems like a pretty basic request and key functionality for any mailchimp user. Having to add on another plugin and service with Zapier is certainly not ideal. Thanks!

      10. Hey Hillary – I totally understand how useful this feature can be. We are already working on our Mailchimp addon update. I have gone ahead and added your vote to the feature request.

        Thanks for your patience.

      11. Any news here for the Tags feature? It would be a very useful thing for us Mailchimp users.

      12. Hi Jakob! We have a big update to our Mailchimp addon coming up soon that should be satisfying for many people 😉

  2. But what about the following: IF you have a list of subscribers (email, name) and you want to know if they are interested in a product. So you make in Mailchimp a radio button with YES and NO options.

    Can you start a new form on your website, with email and ‘Interested?’, where if they fill in:
    – already subscribed ? > field of interested is filled in, not resulting in a double entry of the customer
    – not subscribed? > a new customer subscription is made

    ? Is that possible

  3. Hi,
    is there a way to return the chosen value in the “single item” field to a custom mailchimp field?

    1. Hi Luca — I apologize, but there isn’t any way to send data from payment fields (like our Single Item field) to Mailchimp right now. I’ll add this to our feature request list, though, in case that’s something that our developers might be able to add down the road 🙂

  4. I have a form set up that works correctly with MailChimp when the user submits. However, it MailChimp doesn’t get the abandoned entries. Is there a special setup to push the abandoned out to MailChimp?

    1. Hey Ed – You’re right about that, currently entry data will only be sent to Mailchimp when the user submits the form but It sounds like a good feature request to capture the abandoned entries too. I’ve shared this idea with our team, and we’ll keep it on our radar for down the road.

      If there’s any other way we can help, please feel welcome to contact our support team 🙂

Add a Comment Cancel reply

We're glad you have chosen to leave a comment. Please keep in mind that all comments are moderated according to our privacy policy, and all links are nofollow. Do NOT use keywords in the name field. Let's have a personal and meaningful conversation.

This form is protected by reCAPTCHA and the Google Privacy Policy and Terms of Service apply.