AI Summary
Introduction
Would you like to give your visitors the option to show or hide their password as they type it into your form? By default, the Password field in WPForms masks the input with asterisks for security.
WPForms includes a built-in setting that lets you add a password visibility toggle with just one click in the builder. If you’d prefer to add this feature with code for more control, this tutorial will also show you how to do it with a snippet.
Built-in Option for Password Visibility
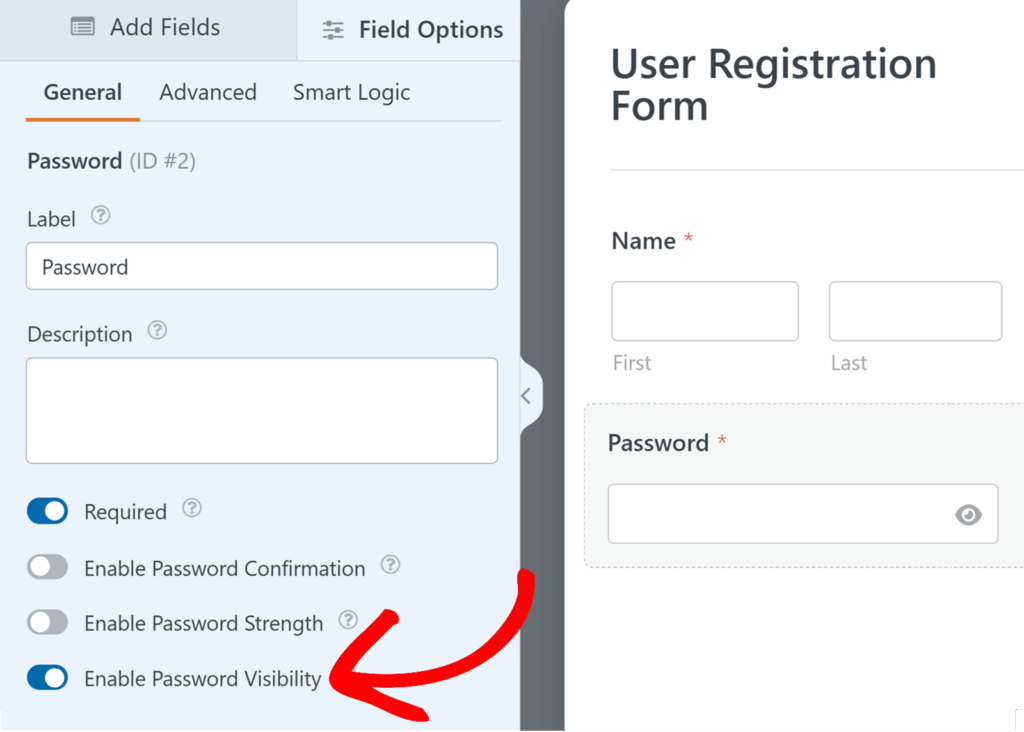
Starting with WPForms version 1.9.8, you can enable a built-in option that lets users toggle password visibility, no custom code required.
To enable this feature, click on the Password field in the form builder to open its Field Options panel. Then, under the General tab, toggle on the Enable Password Visibility setting.

This is the quickest and easiest way to add a password visibility toggle to your forms.
If you’d prefer more control or want to customize the behavior and styling, you can still follow the tutorial below to add this functionality with a code snippet.
Adding the Snippet
To manually add a password visibility toggle, you’ll need to place a small code snippet on your site. This method gives you more flexibility to adjust how the toggle looks and works.
Copy the snippet below to your site.
Note: Before adding this code snippet, make sure you’ve installed the Font Awesome plugin.
If you need any assistance in how and where to add custom code snippets, please review this tutorial.
/**
 * Provide a password visibility toggle switch
 *
 * @link https://wpforms.com/developers/how-to-add-a-password-visibility-toggle-button/
 */

function wpf_dev_password_toggle() {
    ?>

<script type="text/javascript">

    jQuery(function($){

        $( '.wpforms-field-password' ).each(function(){

            $(this).find( 'input' ).each(function(){

                $(this).before( '<i class="fa fa-eye-slash fa-eye" id="password-toggle"></i>' );
                var $passwordInput = $(this);

                $(this).parent().find( '#password-toggle' ).on( 'click', function(){

                    var type = $passwordInput.attr( 'type' ) === 'password' ? 'text' : 'password';
                    $passwordInput.attr( 'type', type);
                    $(this).toggleClass( 'fa-eye-slash' );

                });

            });

        });

    });

    </script>

<?php
}

add_action( 'wpforms_wp_footer_end', 'wpf_dev_password_toggle', 30 );
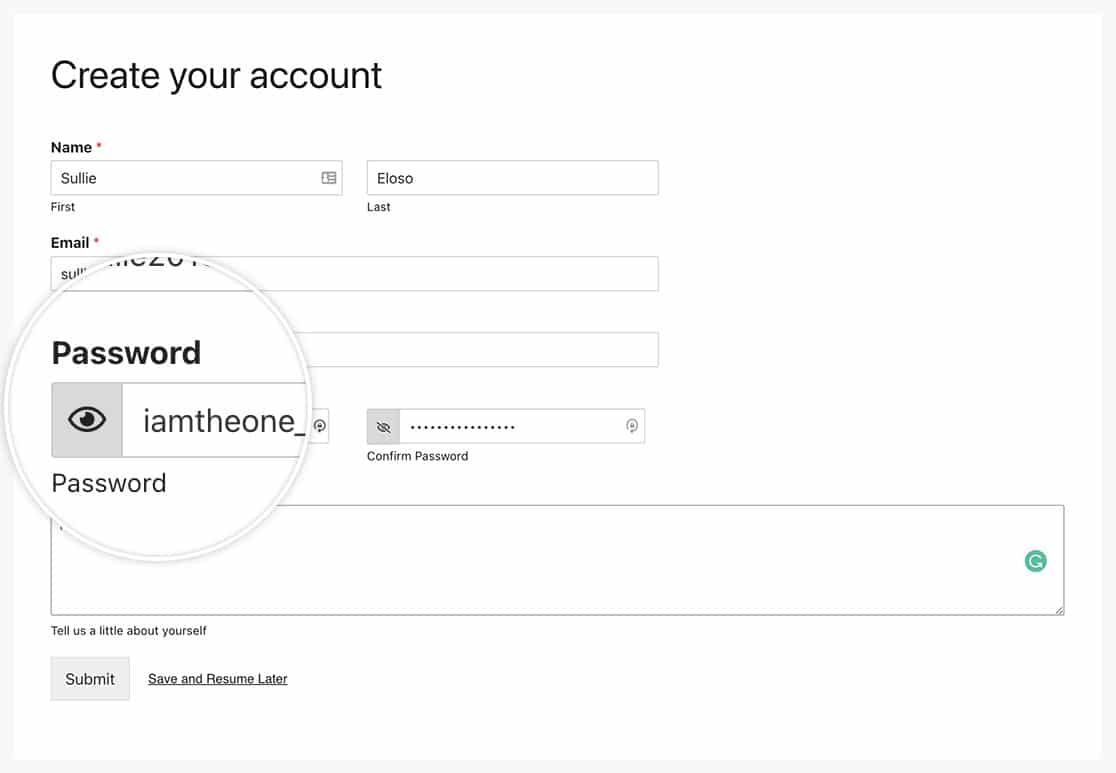
This snippet will be applied to every Password field added through WPForms. It will automatically apply a specific icon class using the before pseudo-class. When this icon is clicked, it will invoke the CSS ID of password-toggle so that it will show the password instead of the asterisks.
Applying Custom CSS
Now, in our final step, we’re going to add some custom CSS to style this icon. To do this, we’re going to copy and paste this custom CSS to your site.
For any assistance in how and where to add custom CSS, please check out this tutorial.
.wpforms-field-password,
.wpforms-field-password .wpforms-field-row-block {
     display: flex;
     flex-flow: wrap;
}

.wpforms-field-row-block *:not(input):not(i),
.wpforms-field-password *:not(input):not(i) {
     flex-basis: 100% !important;
}

#password-toggle {
     width: 35px;
     font-family: "FontAwesome" !important;
     text-align: center;
     line-height: 35px;
     background: #d9d9d9;
     border-radius: 2px 0 0 2px;
     border: 1px solid #ccc;
     border-right: 0;
}

.wpforms-field-password input {
     width: calc(100% - 50px) !important;
     border-radius: 0 2px 2px 0 !important;
}

.fa-eye-slash:before {
    font-size: 12px;
}
Now when you see the form, you’ll see the password visibility toggle switch.

And that’s it! Would you like to also change the sub-labels as well? Check out our tutorial on How to Change the Password Field Sublabels.
FAQ
Action Reference: wpforms_wp_footer_end
