AI Zusammenfassung
Möchten Sie ein Autovervollständigungsfeld in Ihrem Formular einrichten? Die Autovervollständigungsfunktion kann die Benutzerfreundlichkeit erheblich verbessern, indem sie während der Eingabe Vorschläge macht, Zeit spart und die Datenkonsistenz gewährleistet. In diesem Artikel zeigen wir Ihnen, wie Sie JavaScript verwenden, um die automatische Vervollständigung für ein Texteingabefeld mit einer Liste von vorab genehmigten Antworten zu implementieren.
Erstellen des Formulars
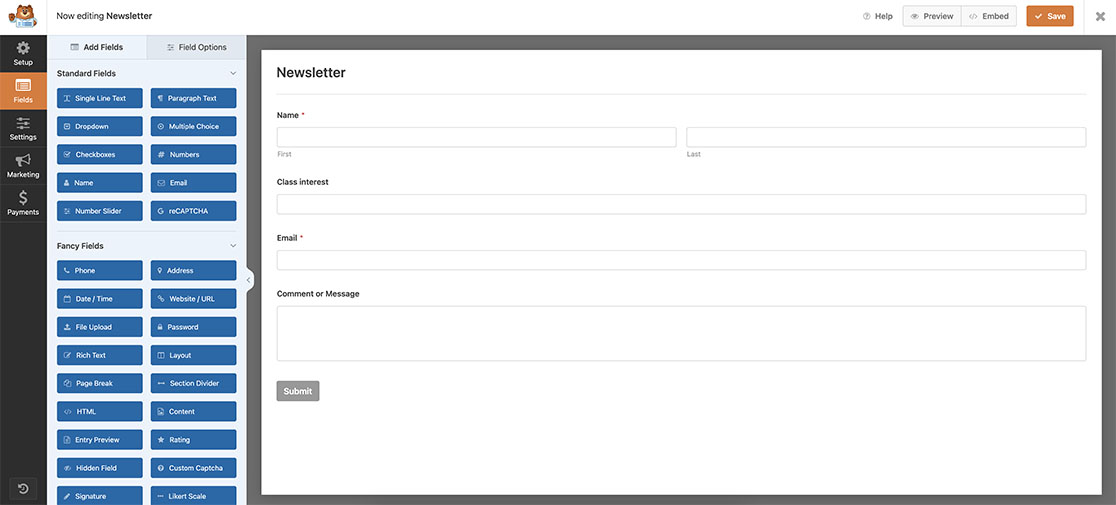
Wir beginnen mit der Erstellung eines neuen Formulars und fügen unsere Felder hinzu, die mindestens ein einzeiliges Textformularfeld enthalten werden. Wenn Sie Hilfe bei der Erstellung Ihres Formulars benötigen, lesen Sie bitte diese hilfreiche Anleitung.

Erstellen eines Feldes zum automatischen Vervollständigen
Jetzt ist es an der Zeit, dieses Snippet zu Ihrer Website hinzuzufügen. Wenn Sie wissen möchten, wo und wie Sie ein benutzerdefiniertes Snippet zu Ihrer Website hinzufügen können, lesen Sie bitte dieses Lernprogramm.
/**
 * Turn any Single Line Text field into an autocomplete field
 *
 * @link https://wpforms.com/developers/how-to-create-an-autocomplete-field-in-your-form/
 */

function wpf_dev_text_autocomplete( ) {
?>

<script>
function autocomplete(inp, arr) {

  /*the autocomplete function takes two arguments,
  the text field element and an array of possible autocompleted values:*/
  var currentFocus;

  /*execute a function when someone writes in the text field:*/
  inp.addEventListener("input", function(e) {
      var a, b, i, val = this.value;

      /*close any already open lists of autocompleted values*/
      closeAllLists();
      if (!val) { return false;}
      currentFocus = -1;

      /*create a DIV element that will contain the items (values):*/
      a = document.createElement("DIV");
      a.setAttribute("id", this.id + "autocomplete-list");
      a.setAttribute("class", "autocomplete-items");

      /*append the DIV element as a child of the autocomplete container:*/
      this.parentNode.appendChild(a);

      /*for each item in the array...*/
      for (i = 0; i < arr.length; i++) {

        /*check if the item starts with the same letters as the text field value:*/
        if (arr[i].substr(0, val.length).toUpperCase() == val.toUpperCase()) {

          /*create a DIV element for each matching element:*/
          b = document.createElement("DIV");

          /*make the matching letters bold:*/
          b.innerHTML = "<strong>" + arr[i].substr(0, val.length) + "</strong>";
          b.innerHTML += arr[i].substr(val.length);

          /*insert a input field that will hold the current array item's value:*/
          b.innerHTML += "<input type='hidden' value='" + arr[i] + "'>";

          /*execute a function when someone clicks on the item value (DIV element):*/
          b.addEventListener("click", function(e) {

              /*insert the value for the autocomplete text field:*/
              inp.value = this.getElementsByTagName("input")[0].value;

              /*close the list of autocompleted values,
              (or any other open lists of autocompleted values:*/
              closeAllLists();
          });
          a.appendChild(b);
        }
      }
  });

  /*execute a function presses a key on the keyboard:*/
  inp.addEventListener("keydown", function(e) {
      var x = document.getElementById(this.id + "autocomplete-list");
      if (x) x = x.getElementsByTagName("div");
      if (e.keyCode == 40) {

        /*If the arrow DOWN key is pressed,
        increase the currentFocus variable:*/
        currentFocus++;

        /*and and make the current item more visible:*/
        addActive(x);
      } else if (e.keyCode == 38) { //up

        /*If the arrow UP key is pressed,
        decrease the currentFocus variable:*/
        currentFocus--;

        /*and and make the current item more visible:*/
        addActive(x);
      } else if (e.keyCode == 13) {

        /*If the ENTER key is pressed, prevent the form from being submitted,*/
        e.preventDefault();
        if (currentFocus > -1) {

          /*and simulate a click on the "active" item:*/
          if (x) x[currentFocus].click();
        }
      }
  });

  function addActive(x) {

    /*a function to classify an item as "active":*/
    if (!x) return false;

    /*start by removing the "active" class on all items:*/
    removeActive(x);
    if (currentFocus >= x.length) currentFocus = 0;
    if (currentFocus < 0) currentFocus = (x.length - 1);

    /*add class "autocomplete-active":*/
    x[currentFocus].classList.add("autocomplete-active");
  }

  function removeActive(x) {

    /*a function to remove the "active" class from all autocomplete items:*/
    for (var i = 0; i < x.length; i++) {
      x[i].classList.remove("autocomplete-active");
    }
  }

  function closeAllLists(elmnt) {

    /*close all autocomplete lists in the document,
    except the one passed as an argument:*/
    var x = document.getElementsByClassName("autocomplete-items");
    for (var i = 0; i < x.length; i++) {
      if (elmnt != x[i] && elmnt != inp) {
        x[i].parentNode.removeChild(x[i]);
      }
    }
  }

  /*execute a function when someone clicks in the document:*/
  document.addEventListener("click", function (e) {
      closeAllLists(e.target);
  });
}

/*An array containing all the programming class names*/
var classes = ["JavaScript","HTML/CSS","Python","C","C+","C++","Java","TypeScript","Pearl","R","SQL","PHP"];

/*initiate the autocomplete function on the "myInput" element, and pass along the countries array as possible autocomplete values:*/
autocomplete(document.getElementById("wpforms-3241-field_6"), classes);
</script>

<?php
}

add_action( 'wpforms_wp_footer_end', 'wpf_dev_text_autocomplete', 30 );
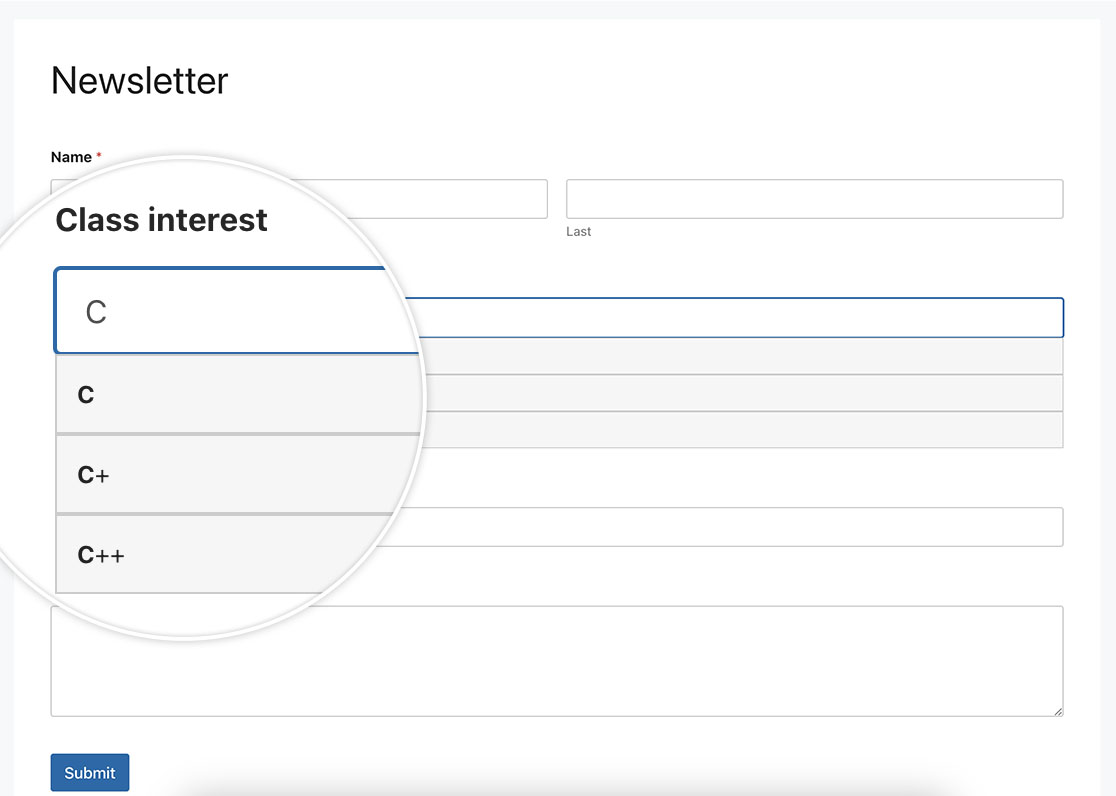
Die Funktion autocomplete(document.getElementById("wpforms-3241-field_6"), classes); zielt speziell auf die Formular-ID 3241 und die Feld-ID 6 ab, und wenn dieses Feld angeklickt wird, wird dieses Snippet ausgelöst und versucht, eine automatische Vervollständigung auf der Grundlage der Zeichen durchzuführen, die in das Feld eingegeben werden, während in der Klassenliste gesucht wird, die wir hier im Snippet haben.
var classes = ["JavaScript", "HTML/CSS", "Python", "C", "C+", "C++", "Java", "TypeScript", "Pearl", "R", "SQL", "PHP"];
Sie müssen die Klassenliste so aktualisieren, dass sie mit dem übereinstimmt, was Sie für Ihr Feld benötigen. Außerdem müssen Sie das Feld wpforms-3241-field_6 aktualisieren, damit es Ihren eigenen IDs entspricht. Hilfe bei der Suche nach Ihren IDs finden Sie in diesem Tutorial.
Hinzufügen des CSS
Der letzte Schritt besteht darin, CSS hinzuzufügen. Kopieren Sie dieses CSS und fügen Sie es auf Ihrer Website ein. Wie und wo Sie benutzerdefinierte CSS hinzufügen können, erfahren Sie in diesem Tutorial.
.autocomplete-items div {
  padding: 10px;
  cursor: pointer;
  background-color: #f6f6f6;
  border: 1px solid #cccccc;
  font-size: 12px;
}

/*when hovering an item:*/
.autocomplete-items div:hover {
  background-color: #e9e9e9;
}

/*when navigating through the items using the arrow keys:*/
.autocomplete-active {
  background-color: #1E90FF !important;
  color: #ffffff;
}
Und das war's! Wir haben ein einzeiliges Textfeld erfolgreich in ein Feld zum automatischen Ausfüllen verwandelt. Möchten Sie ein Farbauswahlfeld zu Ihrem Formular hinzufügen? Sehen Sie sich unser Tutorial über das Hinzufügen eines Farbwählers zu Ihrem Formular an.

