AIサマリー
はじめに
WordPressのユーザープロフィールから情報を引き出すWPFormsで使用するカスタムユーザースマートタグを作成したいですか?
スマートタグは、フォームの通知設定やフィールドのデフォルト値に関連情報を挿入するために使用できるコードのビットです。このチュートリアルでは、プロフィールを構成するすべてのWordPressデフォルトのユーザープロンプトのフォームを作成し、ユーザが情報を確認するためのページに表示します。
デフォルトでは、ユーザーID、表示名、ユーザーメタなど、WPFormsで利用可能なユーザー関連のスマートタグが既にいくつか用意されています。
ユーザーメタ・スマートタグは、ソーシャルリンクやWordPressユーザープロフィールに追加されたカスタムフィールドの空白領域として使用できます。
新規ユーザーの作成 スマートタグ
まず、このコード・スニペットをサイトに追加する必要がある。最初の関数は wpforms_smart_tags フィルターがスマートタグを作成する。2番目の関数は wpforms_smart_tag_process フィルターがスマートタグを定義する。
コード・スニペットをサイトに追加する際にヘルプが必要な場合は、こちらのチュートリアルをご覧ください。
/**
 * Create User Smart Tags from the WordPress profile.
 *
 * @link   https://wpforms.com/developers/how-to-create-more-user-smart-tags/
 */

function wpf_dev_register_user_profile_smart_tags ( $tags ) {

    // Key is the tag, item is the tag name.
    $tags[ 'wp_nickname' ]     = 'WP Profile Nickname';
    $tags[ 'wp_username' ]     = 'WP Profile Username';
    $tags[ 'wp_url' ]          = 'WP Profile URL';
    $tags[ 'wp_user_role' ]    = 'WP Profile User Role';
    $tags[ 'wp_user_bio' ]     = 'WP Profile Bio';

    return $tags;
}

add_filter( 'wpforms_smart_tags', 'wpf_dev_register_user_profile_smart_tags', 10, 1 );


/**
 * Process the User Smart Tags from the WordPress profile.
 *
 * @link   https://wpforms.com/developers/how-to-create-more-user-smart-tags/
 */

function wpf_dev_process_user_profile_smart_tags( $content, $tag ) {

    $userID = get_current_user_id();

    // Nickname from WordPress profile
    if ( 'wp_nickname' === $tag ) {

        $wp_nickname = get_the_author_meta( 'nickname', $userID );

        // Replace the tag with the nickname pulled from the user's WordPress profile.
        $content = str_replace( '{wp_nickname}', $wp_nickname, $content );

    }

    // Username from WordPress profile
    if ( 'wp_username' === $tag ) {

        $wp_username = get_the_author_meta( 'user_login', $userID );

        // Replace the tag with the username pulled from the user's WordPress profile.
        $content = str_replace( '{wp_username}', $wp_username, $content );

    }

    // Website URL from WordPress profile
    if ( 'wp_url' === $tag ) {

        $wp_url = get_the_author_meta( 'user_url', $userID );

        // Replace the tag with the Website URL pulled from the user's WordPress profile.
        $content = str_replace( '{wp_url}', $wp_url, $content );

    }

    // Current role from WordPress profile
    switch ($tag) {

        case "wp_user_role":
        $user = wp_get_current_user();
        $roles = implode(', ', (array) $user->roles);
        $content = str_replace( '{' . $tag . '}', $roles, $content );
        break;

    }

    // Bio from WordPress profile
    if ( 'wp_user_bio' === $tag ) {

        $wp_user_bio = get_the_author_meta( 'description', $userID );

        // Replace the tag with the user bio pulled from the user's WordPress profile.
        $content = str_replace( '{wp_user_bio}', $wp_user_bio, $content );

    }

    return $content;
}

add_filter( 'wpforms_smart_tag_process', 'wpf_dev_process_user_profile_smart_tags', 10, 2 );
このスニペットでは、WP Profile Nickname、WP Profile Username、WP Profile URL、WP Profile User Role、WP Profile Bioを追加しています。これらのスマートタグは、ユーザーのWordPressプロフィールからすでに持っている情報をフォームに取り込むために使用します。
フォームの作成
それでは、新しいスマートタグを使えるようにフォームを作成しましょう。フォームの作成にヘルプが必要な場合は、こちらの記事をご覧ください。
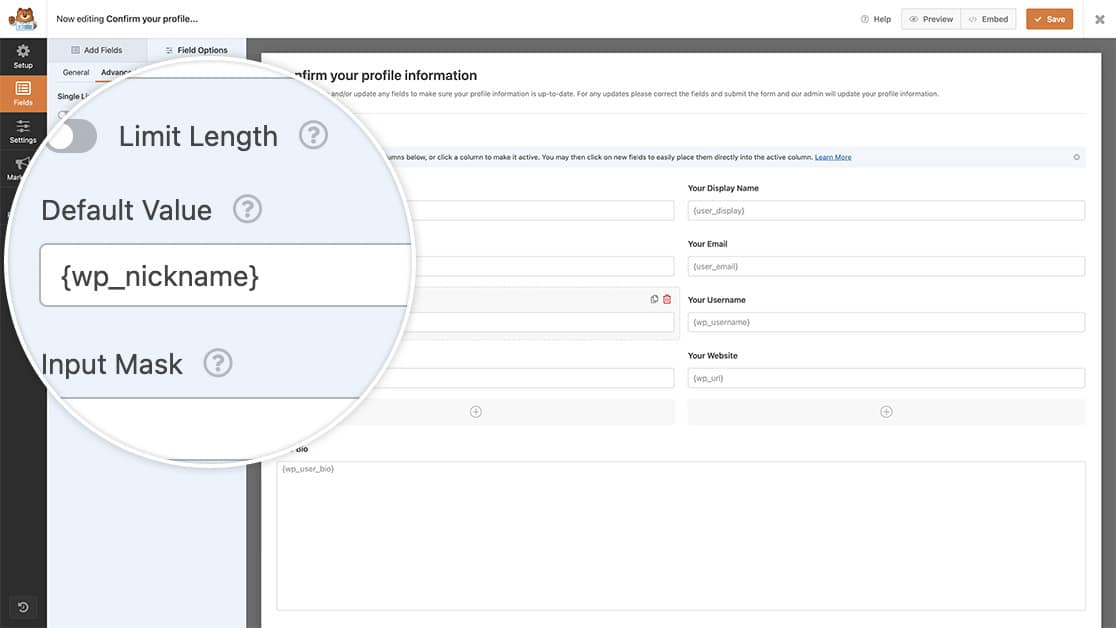
このフォームのほとんどのフィールドは、一行テキストフォームフィールドを追加するだけです。フィールドを追加してラベルを更新したら、詳細設定タブをクリックします。 デフォルト値フィールドが表示されるので、スマートタグを表示するを選択し、追加したスマートタグが見つかるまでスクロールします。正しいものを選択すると、そのスマートタグがフィールドのデフォルト値の中に表示されます。

引き続き、同じ方法でフィールドとスマートタグを追加していきます。Bioフィールドでは、Paragraph Textフォームフィールドを使用してBioを表示しますが、デフォルト値フィールドにスマートタグを追加する手順は上記とまったく同じです。
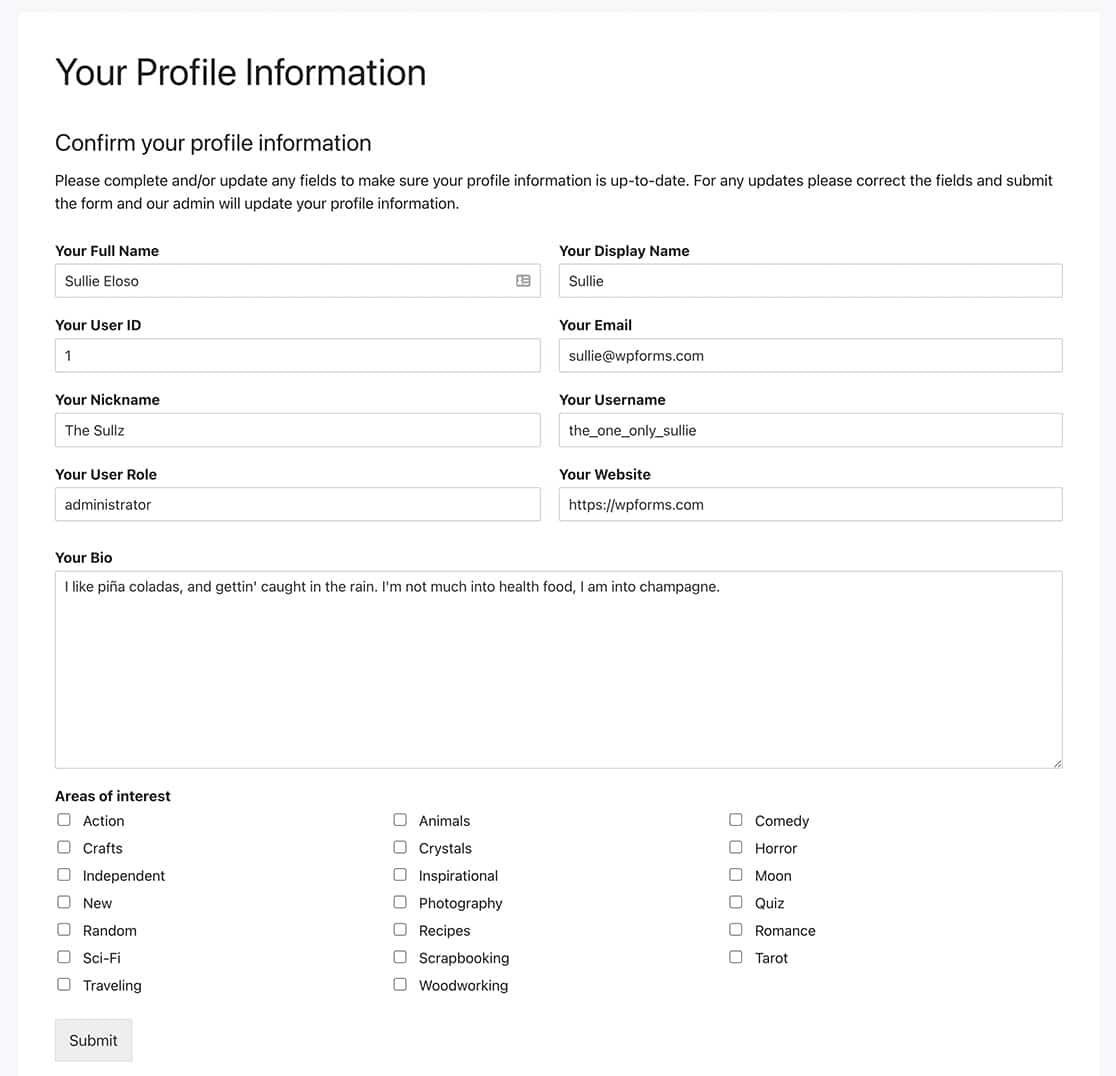
ユーザーがこのフォームにアクセスすると、デフォルトで情報がすでに取り込まれていることがわかります。

その他のスマートタグの作成については、カスタムスマートタグの作成方法の記事をご覧ください。
WPFormsでスマートタグを作成するために必要なことは以上です。 これらのスマートタグをHTML / コードブロック内で使用したいですか? チュートリアル「HTMLフィールドでスマートタグを処理する方法」では、PHPを使用してこのタイプのフォームフィールドでスマートタグを許可する方法を紹介します。
関連
フィルター参照:
