Resumen de la IA
¿Le gustaría crear un ID único para cada una de sus entradas de formulario? Dar a cada entrada de formulario un número de referencia único puede facilitar el seguimiento de cualquier función interna a la que quiera hacer referencia más tarde. Usando PHP y WPForms Smart Tags, puede lograrlo fácilmente. En este tutorial, lo guiaremos a través de cada paso.
Ya existe una etiqueta inteligente predeterminada en WPForms que generará un valor único. Sin embargo, el propósito de este tutorial es controlar cuál puede ser ese valor único, como limitarlo a números solamente, agregar un prefijo antes del ID único, etc. Para obtener más información sobre la etiqueta inteligente de valor único, consulte esta útil guía.
Para este tutorial, crearemos un formulario de soporte para nuestros visitantes. A cada solicitud de soporte se le asignará un ID único. Este será su número de ticket de soporte. Almacenaremos ese número dentro de la entrada en un campo oculto.
Creación del identificador único
Normalmente empezamos nuestros tutoriales creando nuestro formulario. Sin embargo, como queremos utilizar esta etiqueta inteligente dentro de nuestro creador de formularios, esta vez empezaremos añadiendo el fragmento de código a nuestro sitio. Si necesitas ayuda para añadir fragmentos de código a tu sitio, puedes leer este tutorial.
/*
 * Create a unique_id Smart Tag and assign it to each form submission.
 *
 * @link https://wpforms.com/developers/how-to-create-a-unique-id-for-each-form-entry/
 */

// Generate Unique ID Smart Tag for WPForms
function wpf_dev_register_smarttag( $tags ) {

    // Key is the tag, item is the tag name.
    $tags['unique_id'] = 'Unique ID';

    return $tags;
}

add_filter( 'wpforms_smart_tags', 'wpf_dev_register_smarttag' );

// Generate Unique ID value
function wpf_dev_process_smarttag( $content, $tag, $form_data, $fields, $entry_id ) {

    // Only run if it is our desired tag.
    if ( 'unique_id' === $tag && !$entry_id ) {

        // Replace the tag with our Unique ID that will be prefixed with wpf.
        $content = str_replace( '{unique_id}', uniqid( 'wpf', true ), $content );
    } elseif ( 'unique_id' === $tag && $entry_id ) {

        foreach ( $form_data['fields'] as $field ) {

            if ( preg_match( '/\b{unique_id}\b/', $field['default_value'] ) ) {
                $field_id = $field['id'];
                break;
            }
        }

        $content = str_replace( '{unique_id}', $fields[$field_id]['value'], $content );
    }

    return $content;
}

add_filter( 'wpforms_smart_tag_process', 'wpf_dev_process_smarttag', 10, 5 );
Este fragmento no sólo creará el código que necesitamos para crear un ID único con cada envío de formulario, sino que también nos permitirá utilizar este número como una etiqueta inteligente para que podamos adjuntarlo a nuestras entradas de formulario.
Creación del formulario
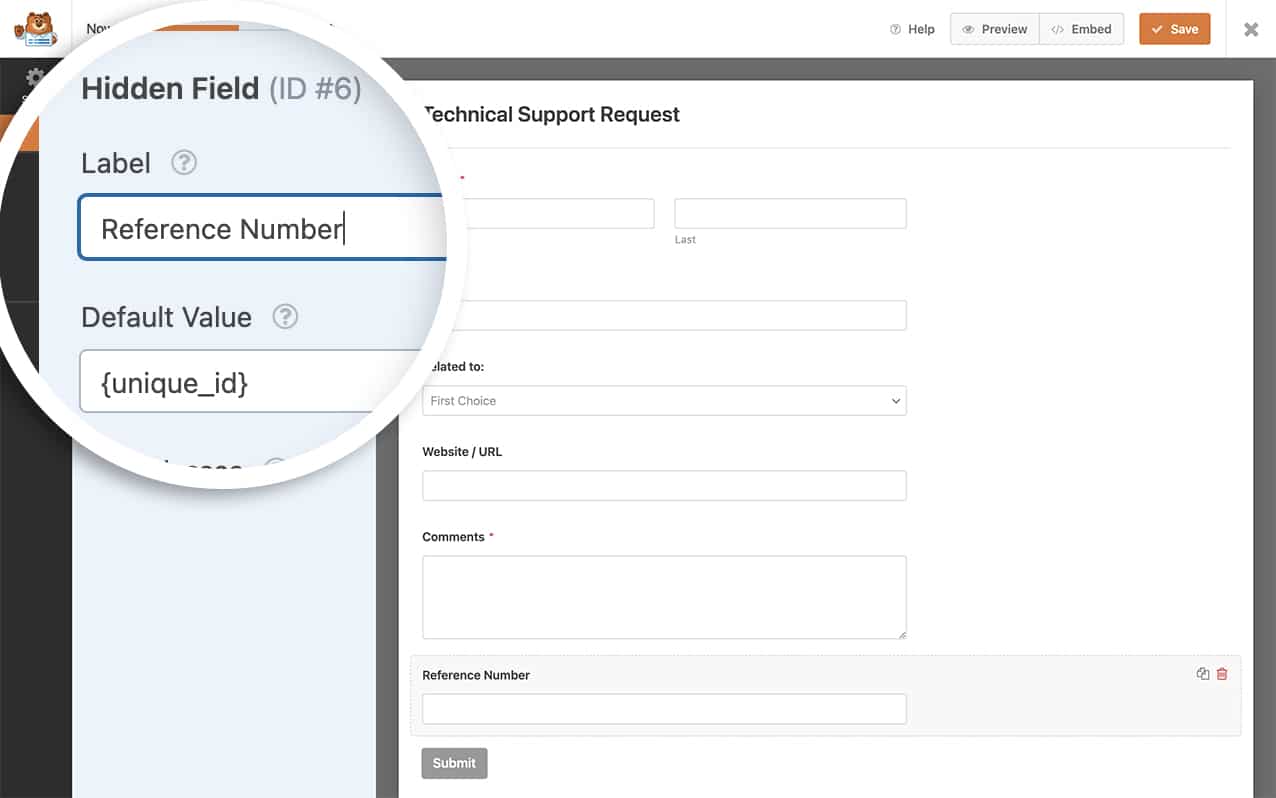
A continuación, crearemos nuestro formulario de soporte. Este formulario contendrá campos para el nombre, la dirección de correo electrónico, un campo desplegable para tratar de capturar el problema y, por último, un campo de formulario de párrafo de texto para permitir a nuestros visitantes un lugar para dar más información sobre el apoyo que están buscando. Sin embargo, como queremos almacenar este número como parte de nuestras entradas, también añadiremos un campo oculto para almacenar ese número de identificación único.
Después de añadir el Campo Oculto, haga clic sobre él para abrir el panel de Opciones de Campo. A continuación, vaya a la sección Opciones avanzadas.
En el valor predeterminado, simplemente añada la etiqueta inteligente {unique_id}.

Añadir el ID único a los mensajes de confirmación
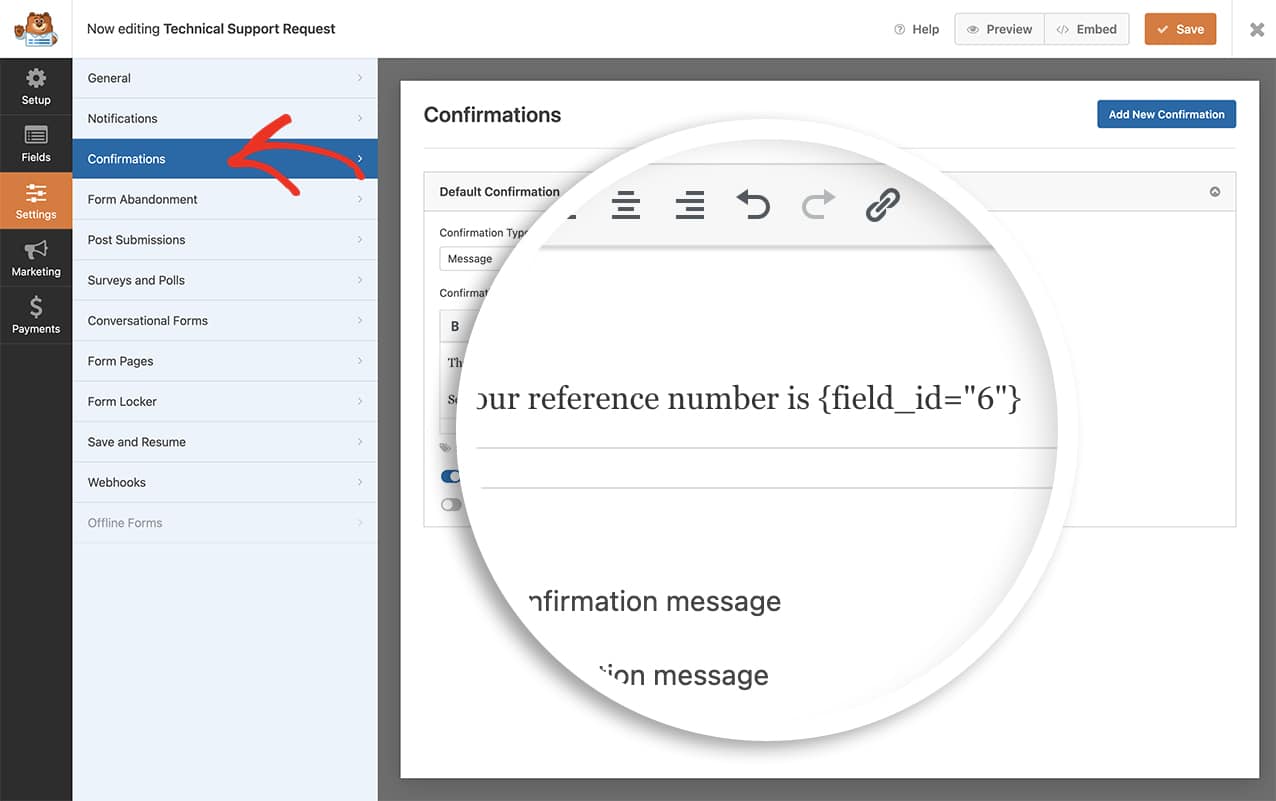
Si desea añadir su ID único a su mensaje de confirmación, tendrá que colocar el valor que se almacena dentro del campo oculto cuando se envía el formulario.
En nuestro formulario, el ID del campo era 6, como puedes ver en la imagen anterior. Así que vamos a añadir esto a nuestro mensaje de confirmación por lo que se tire en ese mismo valor exacto.
{field_id="6"}

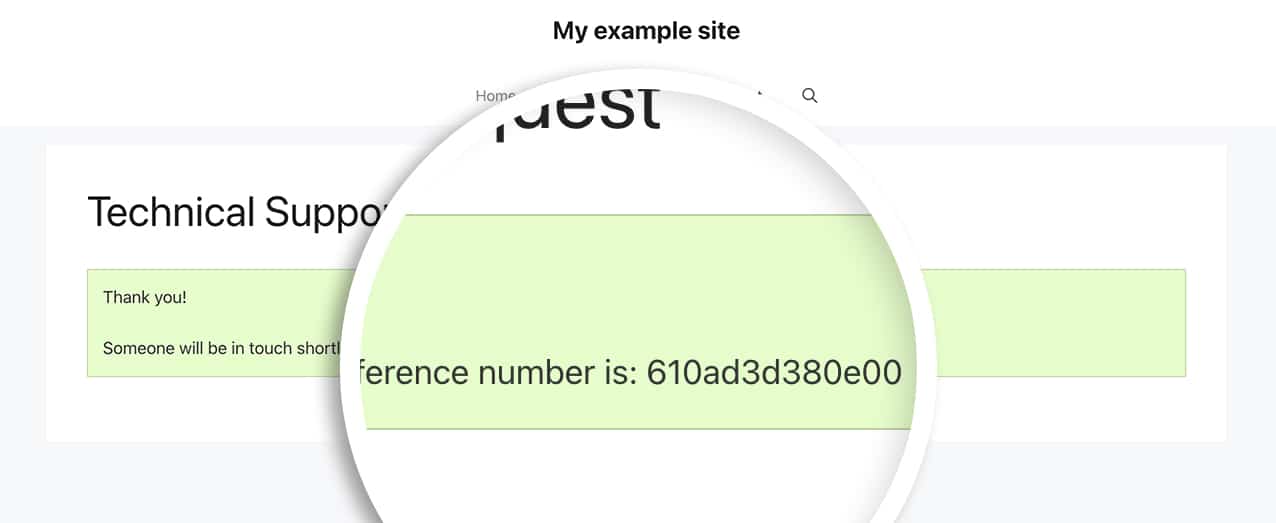
Ahora, cuando se envíe el formulario, sus visitantes verán el identificador único y se registrará en el campo oculto del formulario.

PREGUNTAS FRECUENTES
P: ¿Y si quiero un número concreto de caracteres para mi identificador único?
R: Puede ver que el siguiente ejemplo sólo proporcionará un ID único de 6 dígitos (sólo hexadecimales).
/*
 * Create a unique ID with a specific number of characters and assign it to each form submission.
 *
 * @link https://wpforms.com/developers/how-to-create-a-unique-id-for-each-form-entry/
 */

// Generate Unique ID Smart Tag for WPForms
function wpf_dev_register_smarttag( $tags ) {

    // Key is the tag, item is the tag name.
    $tags['unique_id'] = 'Unique ID';

    return $tags;
}

add_filter( 'wpforms_smart_tags', 'wpf_dev_register_smarttag' );

// Generate Unique ID value
function wpf_dev_process_smarttag( $content, $tag, $form_data, $fields, $entry_id ) {

    // Only run if it is our desired tag.
    if ( 'unique_id' === $tag && !$entry_id ) {

        // Generate a hexadecimal string based on the time to ensure uniqueness
        // Reduce the string to 6 characters
        $uuid = substr( md5( time() ), 0, 6 );

        // Replace the tag with our Unique ID.
        $content = str_replace( '{unique_id}', $uuid, $content );

    } elseif ( 'unique_id' === $tag && $entry_id ) {

        foreach ( $form_data['fields'] as $field ) {

            if ( preg_match( '/\b{unique_id}\b/', $field['default_value'] ) ) {
                $field_id = $field['id'];
                break;
            }
        }

        $content = str_replace( '{unique_id}', $fields[$field_id]['value'], $content );
    }

    return $content;
}

add_filter( 'wpforms_smart_tag_process', 'wpf_dev_process_smarttag', 10, 5 );
Este fragmento tomará la hora actual, la convertirá en una cadena hexadecimal y la restringirá a un número de 6 caracteres.
P: ¿Puedo utilizar este fragmento para obtener un valor sólo numérico?
A: Por supuesto. Puede utilizar este fragmento que devolverá un valor numérico único entre los números 1 - 5.000.000.000. El uso de este rango numérico significa que obtendrá un número único de entre 1 y 10 dígitos. Si desea reducir el número de dígitos generados, deberá reflejarlo en el campo rand(1, 5000000000).
/*
 * Create a unique_id numeric-only Smart Tag and assign it to each form submission.
 *
 * @link https://wpforms.com/developers/how-to-create-a-unique-id-for-each-form-entry/
 */

// Generate Unique ID Smart Tag for WPForms
function wpf_dev_register_smarttag( $tags ) {

    // Key is the tag, item is the tag name.
    $tags['unique_number_id'] = 'Unique Number ID';

    return $tags;
}

add_filter( 'wpforms_smart_tags', 'wpf_dev_register_smarttag' );

// Generate Unique ID value
function wpf_dev_process_smarttag( $content, $tag, $form_data, $fields, $entry_id ) {

    // Only run if it is our desired tag.
    if ( 'unique_number_id' === $tag && !$entry_id ) {

        // Generate a random numeric ID between 1 and 5,000,000,000
        $unique_id = rand(1, 5000000000);

        // Replace the tag with our Unique ID.
        $content = str_replace( '{unique_number_id}', $unique_id, $content );

    } elseif ( 'unique_number_id' === $tag && $entry_id ) {

        foreach ( $form_data['fields'] as $field ) {

            if ( preg_match( '/\b{unique_number_id}\b/', $field['default_value'] ) ) {
                $field_id = $field['id'];
                break;
            }
        }

        $content = str_replace( '{unique_number_id}', $fields[$field_id]['value'], $content );
    }

    return $content;
}

add_filter( 'wpforms_smart_tag_process', 'wpf_dev_process_smarttag', 10, 5 );
P: ¿Puedo poner un prefijo al identificador único?
R: Por supuesto. Si desea añadir un prefijo, puede utilizar este fragmento.
/*
 * Create a unique ID and add a prefix.
 *
 * @link https://wpforms.com/developers/how-to-create-a-unique-id-for-each-form-entry/
 */

// Generate Unique ID Smart Tag for WPForms
function wpf_dev_register_smarttag( $tags ) {

    // Key is the tag, item is the tag name.
    $tags['my_unique_id'] = 'My Unique ID';

    return $tags;
}

add_filter( 'wpforms_smart_tags', 'wpf_dev_register_smarttag' );

// Generate Unique ID value
function wpf_dev_process_smarttag( $content, $tag, $form_data, $fields, $entry_id ) {

    // Only run if it is our desired tag.
    if ( 'my_unique_id' === $tag && !$entry_id ) {

        // Replace the tag with our Unique ID that will be prefixed with "WPF-".
        $content = str_replace( '{my_unique_id}', uniqid('WPF-', true), $content );

    } elseif ( 'my_unique_id' === $tag && $entry_id ) {

        foreach ( $form_data['fields'] as $field ) {

            if ( preg_match( '/\b{my_unique_id}\b/', $field['default_value'] ) ) {
                $field_id = $field['id'];
                break;
            }
        }

        $content = str_replace( '{my_unique_id}', $fields[$field_id]['value'], $content );
    }

    return $content;
}

add_filter( 'wpforms_smart_tag_process', 'wpf_dev_process_smarttag', 10, 5 );
P: ¿Puedo controlar el número incrementando la cuenta?
R: Por supuesto. Sin embargo, si quieres aumentar el número, te recomendamos que sigas esta útil guía.
P: ¿Puedo utilizar el valor del campo del formulario como prefijo del ID único?
R: Sí. El siguiente fragmento le permitirá utilizar un campo específico de su formulario como prefijo para el ID único.
/*
 * Create a unique ID and add a prefix based on user submitted data.
 *
 * @link https://wpforms.com/developers/how-to-create-a-unique-id-for-each-form-entry/
 */

// Generate Unique ID on form submission and add to a hidden field
function wpf_dev_generate_unique_id( $fields, $entry, $form_data ) {

    // Replace '5' with the actual field ID of your field
    $field_id = 5;
    // Replace '3' with the actual field ID of your hidden field for unique ID
    $hidden_field_id = 3;

    // Check if the field exists and has a value
    if ( isset( $fields[$field_id]['value'] ) && ! empty( $fields[$field_id]['value'] ) ) {
        // Get the field value
        $field_value = $fields[$field_id]['value'];

        // Sanitize the field value to use as a prefix
        $prefix = preg_replace( '/[^A-Za-z0-9]/', '', $field_value );

        // Generate unique ID with the dropdown value as prefix
        $unique_id = $prefix . '-' . uniqid();

        // Add the unique ID to the hidden field
        foreach ( $fields as &$field ) {
            if ( $field['id'] == $hidden_field_id ) {
                $field['value'] = $unique_id;
                break;
            }
        }
    }

    return $fields;
}
add_filter( 'wpforms_process_filter', 'wpf_dev_generate_unique_id', 10, 3 );

// Register the Unique ID Smart Tag for WPForms
function wpf_dev_register_smarttag( $tags ) {
    // Key is the tag, item is the tag name.
    $tags['my_unique_id'] = 'My Unique ID';
    return $tags;
}
add_filter( 'wpforms_smart_tags', 'wpf_dev_register_smarttag' );

// Process Unique ID Smart Tag to retrieve the value from the hidden field
function wpf_dev_process_smarttag( $content, $tag, $form_data, $fields, $entry_id ) {
    // Only run if it is our desired tag
    if ( 'my_unique_id' === $tag ) {
        // Replace '3' with the actual field ID of your hidden field for unique ID
        $hidden_field_id = 3;
        if ( isset( $fields[$hidden_field_id]['value'] ) ) {
            $content = str_replace( '{my_unique_id}', $fields[$hidden_field_id]['value'], $content );
        }
    }
    return $content;
}
add_filter( 'wpforms_smart_tag_process', 'wpf_dev_process_smarttag', 10, 5 );
Tendrá que sustituir los valores de los campos $field_id con el ID del campo de formulario específico que desea utilizar para el prefijo. Además, sustituya la variable $hidden_field_id con el ID del campo oculto con la etiqueta inteligente de ID único de su formulario.
Y eso es todo lo que necesita para crear un ID único para cada envío de formulario. ¿Desea procesar una etiqueta inteligente dentro de etiquetas de campo de casilla de verificación? Pruebe nuestro tutorial sobre Cómo procesar etiquetas inteligentes en etiquetas de casilla de verificación.
