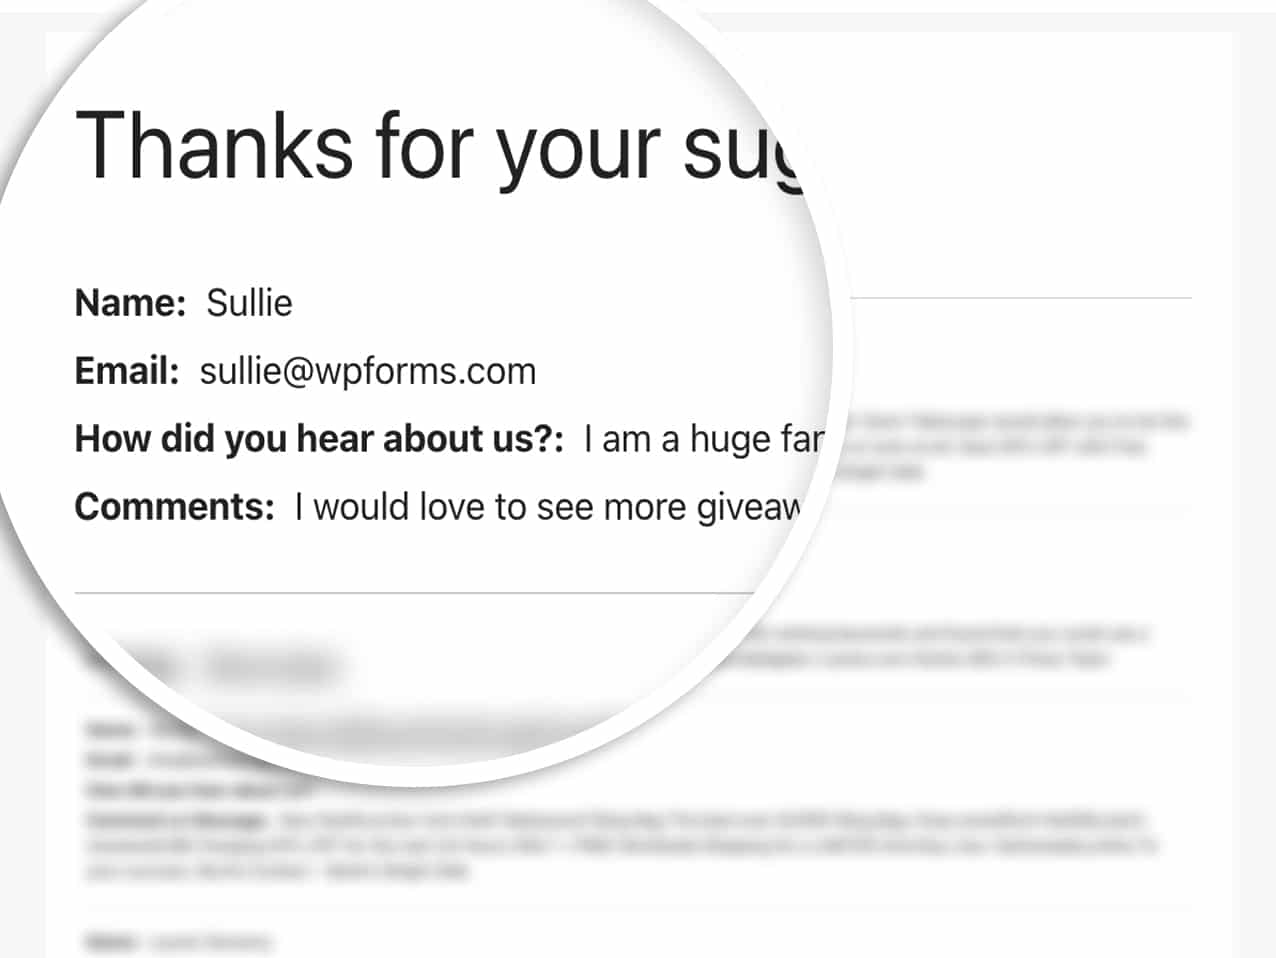
KI-Zusammenfassung
Möchten Sie Formulareinträge auf einer Seite Ihrer Website anzeigen, um die abgeschlossenen Formularübermittlungen von Benutzern öffentlich anzuzeigen? Diese Anleitung führt Sie durch die Erstellung und Implementierung dieser Funktionalität auf Ihrer WordPress-Website.
Standardmäßig können nur Pro-Benutzer Formulareinträge aus dem WordPress-Adminbereich anzeigen, basierend auf den ihnen zugewiesenen Zugriffskontrollen. Sie können jedoch ganz einfach die Funktionalität erstellen, um Formulareinträge im Frontend Ihrer Website anzuzeigen.
Erstellung des Shortcodes
Zuerst stellen wir Ihnen einen Code-Snippet zur Verfügung, der zu Ihrer Website hinzugefügt werden muss, damit Sie denselben Shortcode einfach wiederverwenden können, mit der Ausnahme, dass Sie nur die Formular-ID aktualisieren müssen, wenn Sie sie benötigen.
Fügen Sie einfach den folgenden Code-Snippet zu Ihrer Website hinzu. Wenn Sie nicht sicher sind, wie das geht, lesen Sie bitte diese Anleitung.
/**
* Custom shortcode to display WPForms form entries in table view.
*
* Basic usage: [wpforms_entries_table id="FORMID"].
*
* Possible shortcode attributes:
* id (required)  Form ID of which to show entries.
* user           User ID, or "current" to default to current logged in user.
* fields         Comma separated list of form field IDs.
* number         Number of entries to show, defaults to 30.
*
* @link https://wpforms.com/developers/how-to-display-form-entries/
*
* Realtime counts could be delayed due to any caching setup on the site
*
* @param array $atts Shortcode attributes.
*
* @return string
*/

function wpf_entries_table( $atts ) {

// Pull ID shortcode attributes.
$atts = shortcode_atts(
[
'id'     => '',
'user'   => '',
'fields' => '',
'number' => '',
'type'   => 'all', // all, unread, read, or starred.
'sort'   => '',
'order'  => 'asc',
],
$atts
);

// Check for an ID attribute (required) and that WPForms is in fact
// installed and activated.
if ( empty( $atts[ 'id' ] ) || ! function_exists( 'wpforms' ) ) {
return;
}

// Get the form, from the ID provided in the shortcode.
$form = wpforms()->form->get( absint( $atts[ 'id' ] ) );

// If the form doesn't exists, abort.
if ( empty( $form ) ) {
return;
}

// Pull and format the form data out of the form object.
$form_data = ! empty( $form->post_content ) ? wpforms_decode( $form->post_content ) : '';

// Check to see if we are showing all allowed fields, or only specific ones.
$form_field_ids = isset( $atts[ 'fields' ] ) && $atts[ 'fields' ] !== '' ? explode( ',', str_replace( ' ', '', $atts[ 'fields' ] ) ) : [];

// Setup the form fields.
if ( empty( $form_field_ids ) ) {
$form_fields = $form_data[ 'fields' ];
} else {
$form_fields = [];
foreach ( $form_field_ids as $field_id ) {
if ( isset( $form_data[ 'fields' ][ $field_id ] ) ) {
$form_fields[ $field_id ] = $form_data[ 'fields' ][ $field_id ];
}
}
}

if ( empty( $form_fields ) ) {
return;
}

// Here we define what the types of form fields we do NOT want to include,
// instead they should be ignored entirely.
$form_fields_disallow = apply_filters( 'wpforms_frontend_entries_table_disallow', [ 'divider', 'html', 'pagebreak', 'captcha' ] );

// Loop through all form fields and remove any field types not allowed.
foreach ( $form_fields as $field_id => $form_field ) {
if ( in_array( $form_field[ 'type' ], $form_fields_disallow, true ) ) {
unset( $form_fields[ $field_id ] );
}
}

$entries_args = [
'form_id' => absint( $atts[ 'id' ] ),
];

// Narrow entries by user if user_id shortcode attribute was used.
if ( ! empty( $atts[ 'user' ] ) ) {
if ( $atts[ 'user' ] === 'current' && is_user_logged_in() ) {
$entries_args[ 'user_id' ] = get_current_user_id();
} else {
$entries_args[ 'user_id' ] = absint( $atts[ 'user' ] );
}
}

// Number of entries to show. If empty, defaults to 30.
if ( ! empty( $atts[ 'number' ] ) ) {
$entries_args[ 'number' ] = absint( $atts[ 'number' ] );
}

// Filter the type of entries all, unread, read, or starred
if ( $atts[ 'type' ] === 'unread' ) {
$entries_args[ 'viewed' ] = '0';
} elseif( $atts[ 'type' ] === 'read' ) {
$entries_args[ 'viewed' ] = '1';
} elseif ( $atts[ 'type' ] === 'starred' ) {
$entries_args[ 'starred' ] = '1';
}

// Get all entries for the form, according to arguments defined.
// There are many options available to query entries. To see more, check out
// the get_entries() function inside class-entry.php (https://a.cl.ly/bLuGnkGx).
$entries = json_decode(json_encode(wpforms()->entry->get_entries( $entries_args )), true);

if ( empty( $entries ) ) {
return '<p>No entries found.</p>';
}

foreach($entries as $key => $entry) {
$entries[$key][ 'fields' ] = json_decode($entry[ 'fields' ], true);
$entries[$key][ 'meta' ] = json_decode($entry[ 'meta' ], true);
}

if ( !empty($atts[ 'sort' ]) && isset($entries[0][ 'fields' ][$atts[ 'sort' ]] ) ) {
if ( strtolower($atts[ 'order' ]) == 'asc' ) {
usort($entries, function ($entry1, $entry2) use ($atts) {
return strcmp($entry1[ 'fields' ][$atts[ 'sort' ]][ 'value' ], $entry2[ 'fields' ][$atts[ 'sort' ]][ 'value' ]);
});
} elseif ( strtolower($atts[ 'order' ]) == 'desc' ) {
usort($entries, function ($entry1, $entry2) use ($atts) {
return strcmp($entry2[ 'fields' ][$atts[ 'sort' ]][ 'value' ], $entry1[ 'fields' ][$atts[ 'sort' ]]['value']);
});
}
}

ob_start();

echo '<table class="wpforms-frontend-entries">';

echo '<thead><tr>';

// Loop through the form data so we can output form field names in
// the table header.
foreach ( $form_fields as $form_field ) {

// Output the form field name/label.
echo '<th>';
echo esc_html( sanitize_text_field( $form_field[ 'label' ] ) );
echo '</th>';
}

echo '</tr></thead>';

echo '<tbody>';

// Now, loop through all the form entries.
foreach ( $entries as $entry ) {

echo '<tr>';

$entry_fields = $entry[ 'fields' ];

foreach ( $form_fields as $form_field ) {

echo '<td>';

foreach ( $entry_fields as $entry_field ) {
if ( absint( $entry_field[ 'id' ] ) === absint( $form_field[ 'id' ] ) ) {
echo apply_filters( 'wpforms_html_field_value', wp_strip_all_tags( $entry_field[ 'value' ] ), $entry_field, $form_data, 'entry-frontend-table' );
break;
}
}

echo '</td>';
}

echo '</tr>';
}

echo '</tbody>';

echo '</table>';

$output = ob_get_clean();

return $output;
}
add_shortcode( 'wpforms_entries_table', 'wpf_entries_table' );
Dieser Code-Snippet ermöglicht es Ihnen, diesen Shortcode überall auf Ihrer Website zu verwenden, wo Shortcodes akzeptiert werden, wie z. B. auf Seiten, Beiträgen und Widget-Bereichen.
Nur durch die Verwendung von [wpforms_entries_table id="FORMID"] sehen Ihre Besucher die Einträge, die für das von Ihnen in id=”FORMID” angegebene Formular übermittelt wurden.
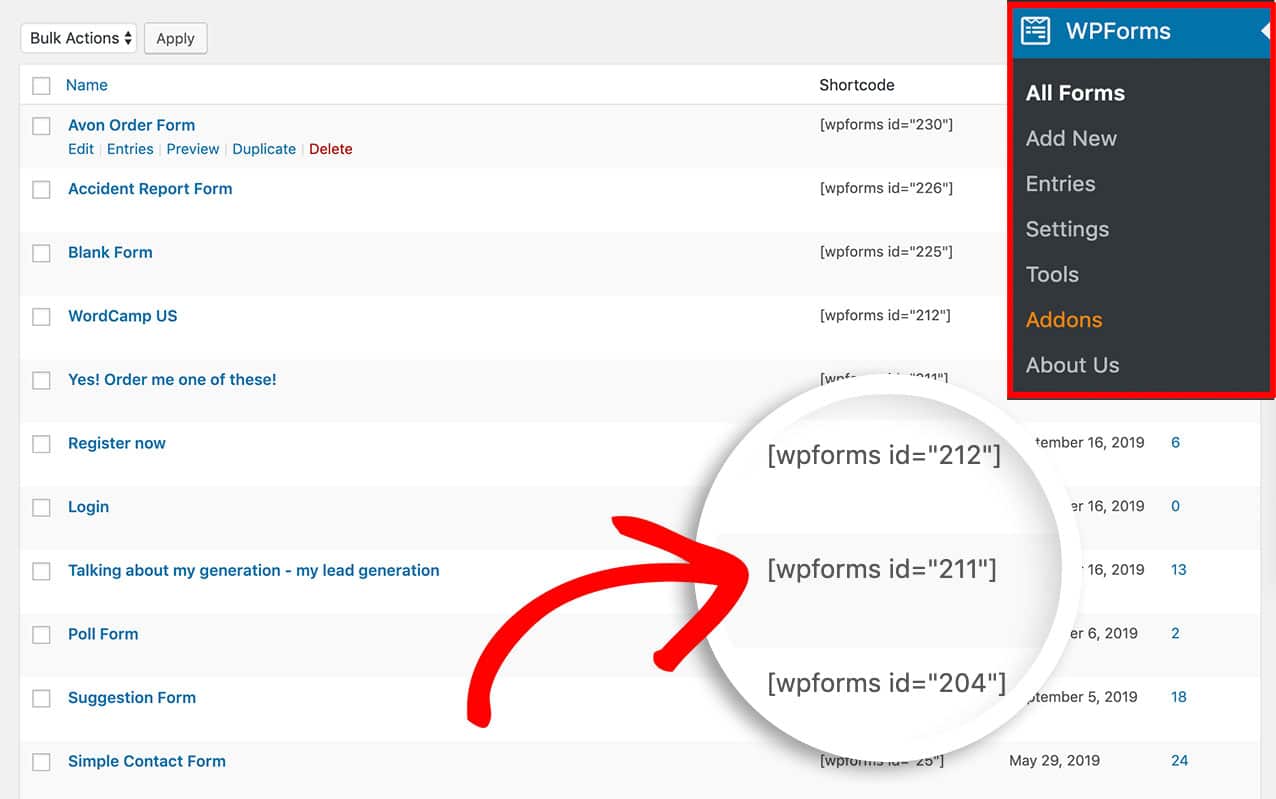
Die ID-Nummer eines Formulars finden Sie, indem Sie zu WPForms » Alle Formulare gehen und die Nummer in der Spalte Shortcode für jedes Formular suchen.
Formulareinträge anzeigen
Nachdem Sie den Shortcode erstellt haben, müssen Sie ihn zu einer Seite oder einem Beitrag auf Ihrer Website hinzufügen, um Ihre Einträge anzuzeigen.
Zuerst müssen Sie ermitteln, für welche Formular-ID Sie diese Einträge anzeigen möchten. In unserem Beispiel zeigen wir Einträge für die Formular-ID 211 an, sodass unser Shortcode wie folgt aussieht.
[wpforms_entries_table id="211"]
Das einzige erforderliche Attribut für die Verwendung des Shortcodes ist id. Ohne die Angabe in Ihrem Shortcode wird nichts angezeigt, daher muss die Formular-ID im Shortcode aufgeführt werden.
Sie können Ihre Einträge jedoch noch weiter filtern, indem Sie einige der Attribute des Shortcodes definieren, und wir werden jedes verfügbare Attribut überprüfen.
Definieren des type-Attributs
Das type-Attribut kann verwendet werden, wenn Sie nur markierte Einträge anzeigen möchten. Hier ist ein Beispiel.
[wpforms_entries_table id="211" type="starred"]
Nachfolgend finden Sie andere verfügbare Parametertypen, die Sie verwenden können:
- all – die Verwendung dieses Attributs zeigt alle Eintragsarten an.
- read – dieses Attribut zeigt nur Einträge an, die von einem Administrator angesehen wurden.
- unread – mit diesem Attribut sehen Sie nur Einträge, die von einem Administrator auf Ihrer Website noch nicht geöffnet wurden.
- starred – dieses Attribut zeigt nur Einträge an, die von einem Administrator markiert wurden.
Verwendung des user-Attributs
Wenn ein Benutzer derzeit auf Ihrer Website angemeldet ist und Sie nur möchten, dass er die von ihm eingereichten Formulareinträge sieht, verwenden Sie diesen Shortcode.
[wpforms_entries_table id="FORMID" user="current"]
Wenn der Benutzer nicht angemeldet ist, werden alle Einträge für dieses Formular angezeigt.
Wenn der Benutzer angemeldet ist, das Formular aber noch nicht (während der Anmeldung) ausgefüllt hat, wird Keine Ergebnisse gefunden. auf der Seite angezeigt.
Definieren des fields-Attributs
Um nur bestimmte Felder anzuzeigen, müssen Sie zuerst die IDs der Felder ermitteln, die Sie anzeigen möchten. Um diese Feld-IDs zu finden, lesen Sie bitte dieses Tutorial.
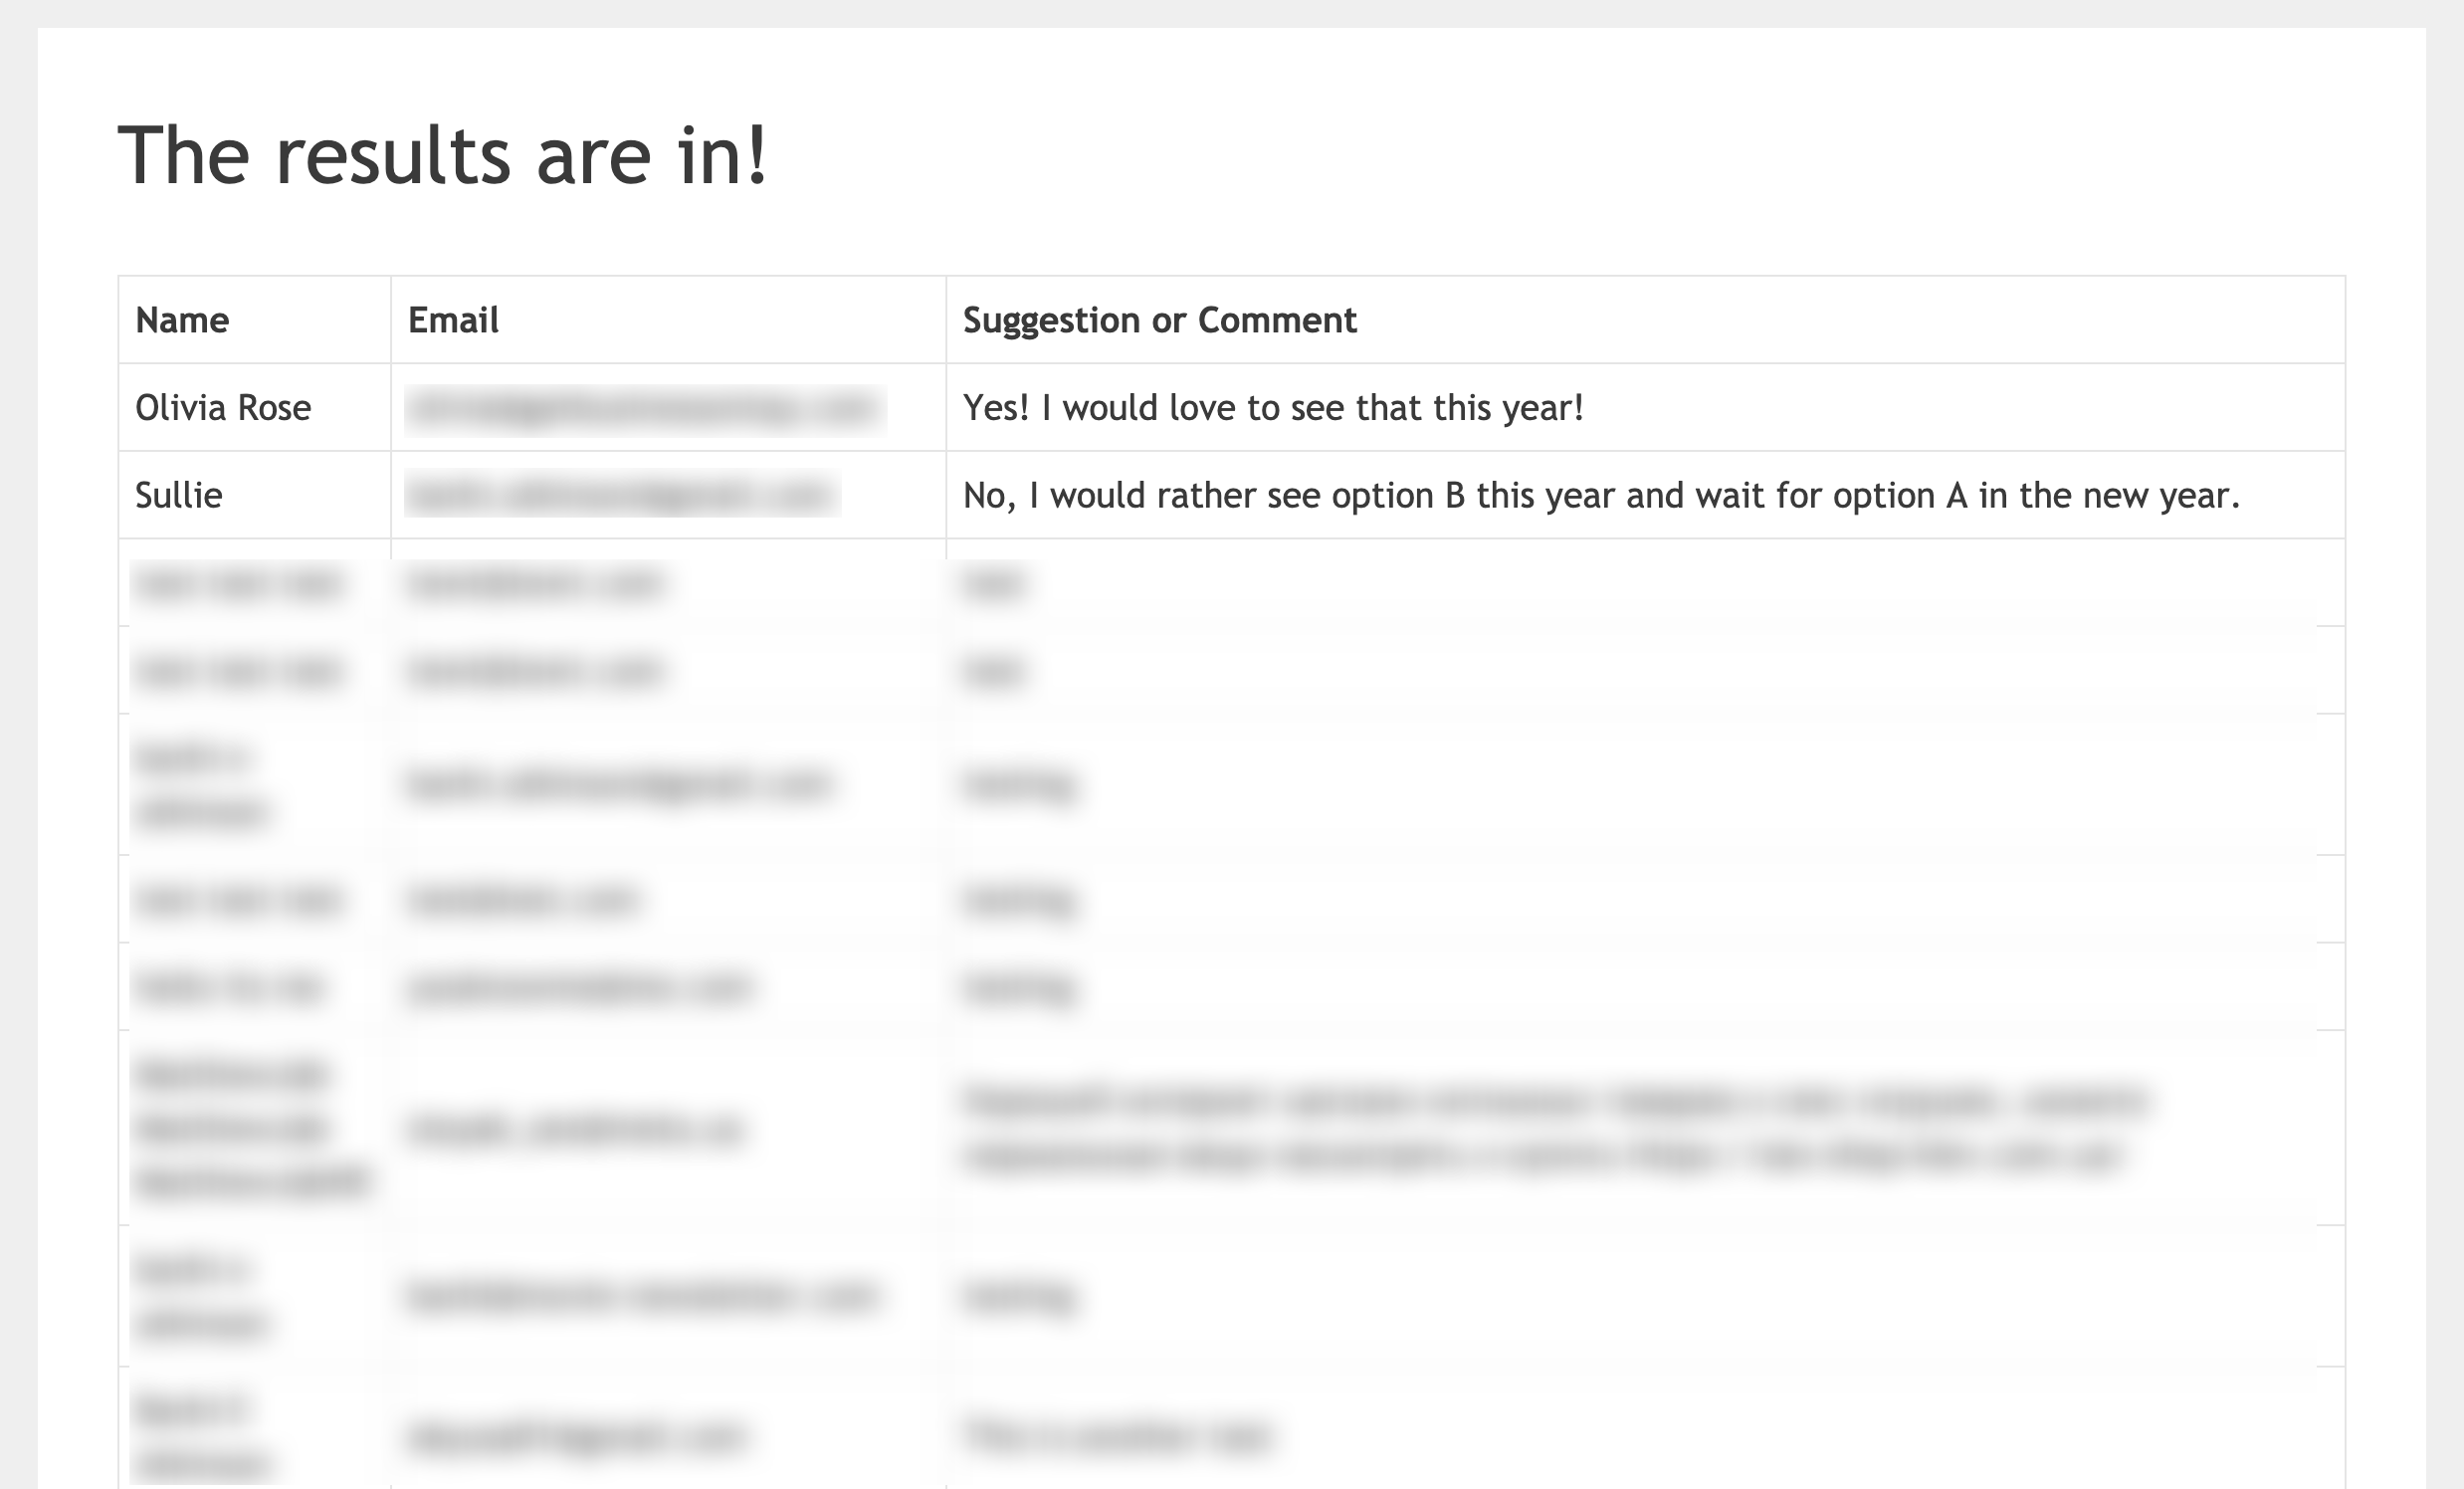
Sobald Sie die Feld-IDs kennen, verwenden Sie diese als Shortcode. In diesem Beispiel möchten wir nur das Feld Name mit der Feld-ID 0 und das Feld Kommentare mit der Feld-ID 2 anzeigen.
[wpforms_entries_table id="211" fields="0,2"]
Hinweis: Mehrere Feld-IDs werden im Shortcode durch ein Komma getrennt.
Verwenden des number-Attributs
Standardmäßig zeigt der Shortcode nur die ersten 30 Einträge an. Wenn Sie jedoch eine geringere Anzahl anzeigen möchten, müssen Sie den number-Parameter verwenden. Wenn Sie beispielsweise die ersten 20 Einträge anzeigen möchten, fügen Sie Ihren Shortcode wie folgt hinzu.
[wpforms_entries_table id="211" number="20"]
Die Variable number=”20″, die im Shortcode übergeben wird, bestimmt, wie viele Einträge die Tabelle anzeigt. Wenn Sie alle Einträge anzeigen möchten, ändern Sie die number auf 9999.
Verwenden der Attribute sort und order
Bei der Verwendung Ihres Shortcodes können Sie dem Shortcode mitteilen, nach welchem Feld die Tabelle sortiert werden soll, und dann definieren, ob sie asc (aufsteigend) oder desc (absteigend) sortiert werden soll. Ein Beispiel für diesen Shortcode würde wie folgt aussehen.
[wpforms_entries_table id="211" sort="1" order="asc"]
In diesem Beispiel zeigen wir eine Tabelle mit Einträgen für die Formular-ID 211 und sortieren diese Tabelle in asc (aufsteigender) Reihenfolge anhand der Feld-ID 1, der Feld-ID für das Feld Name des Formulars.
Formatieren der Tabelle (Optional)
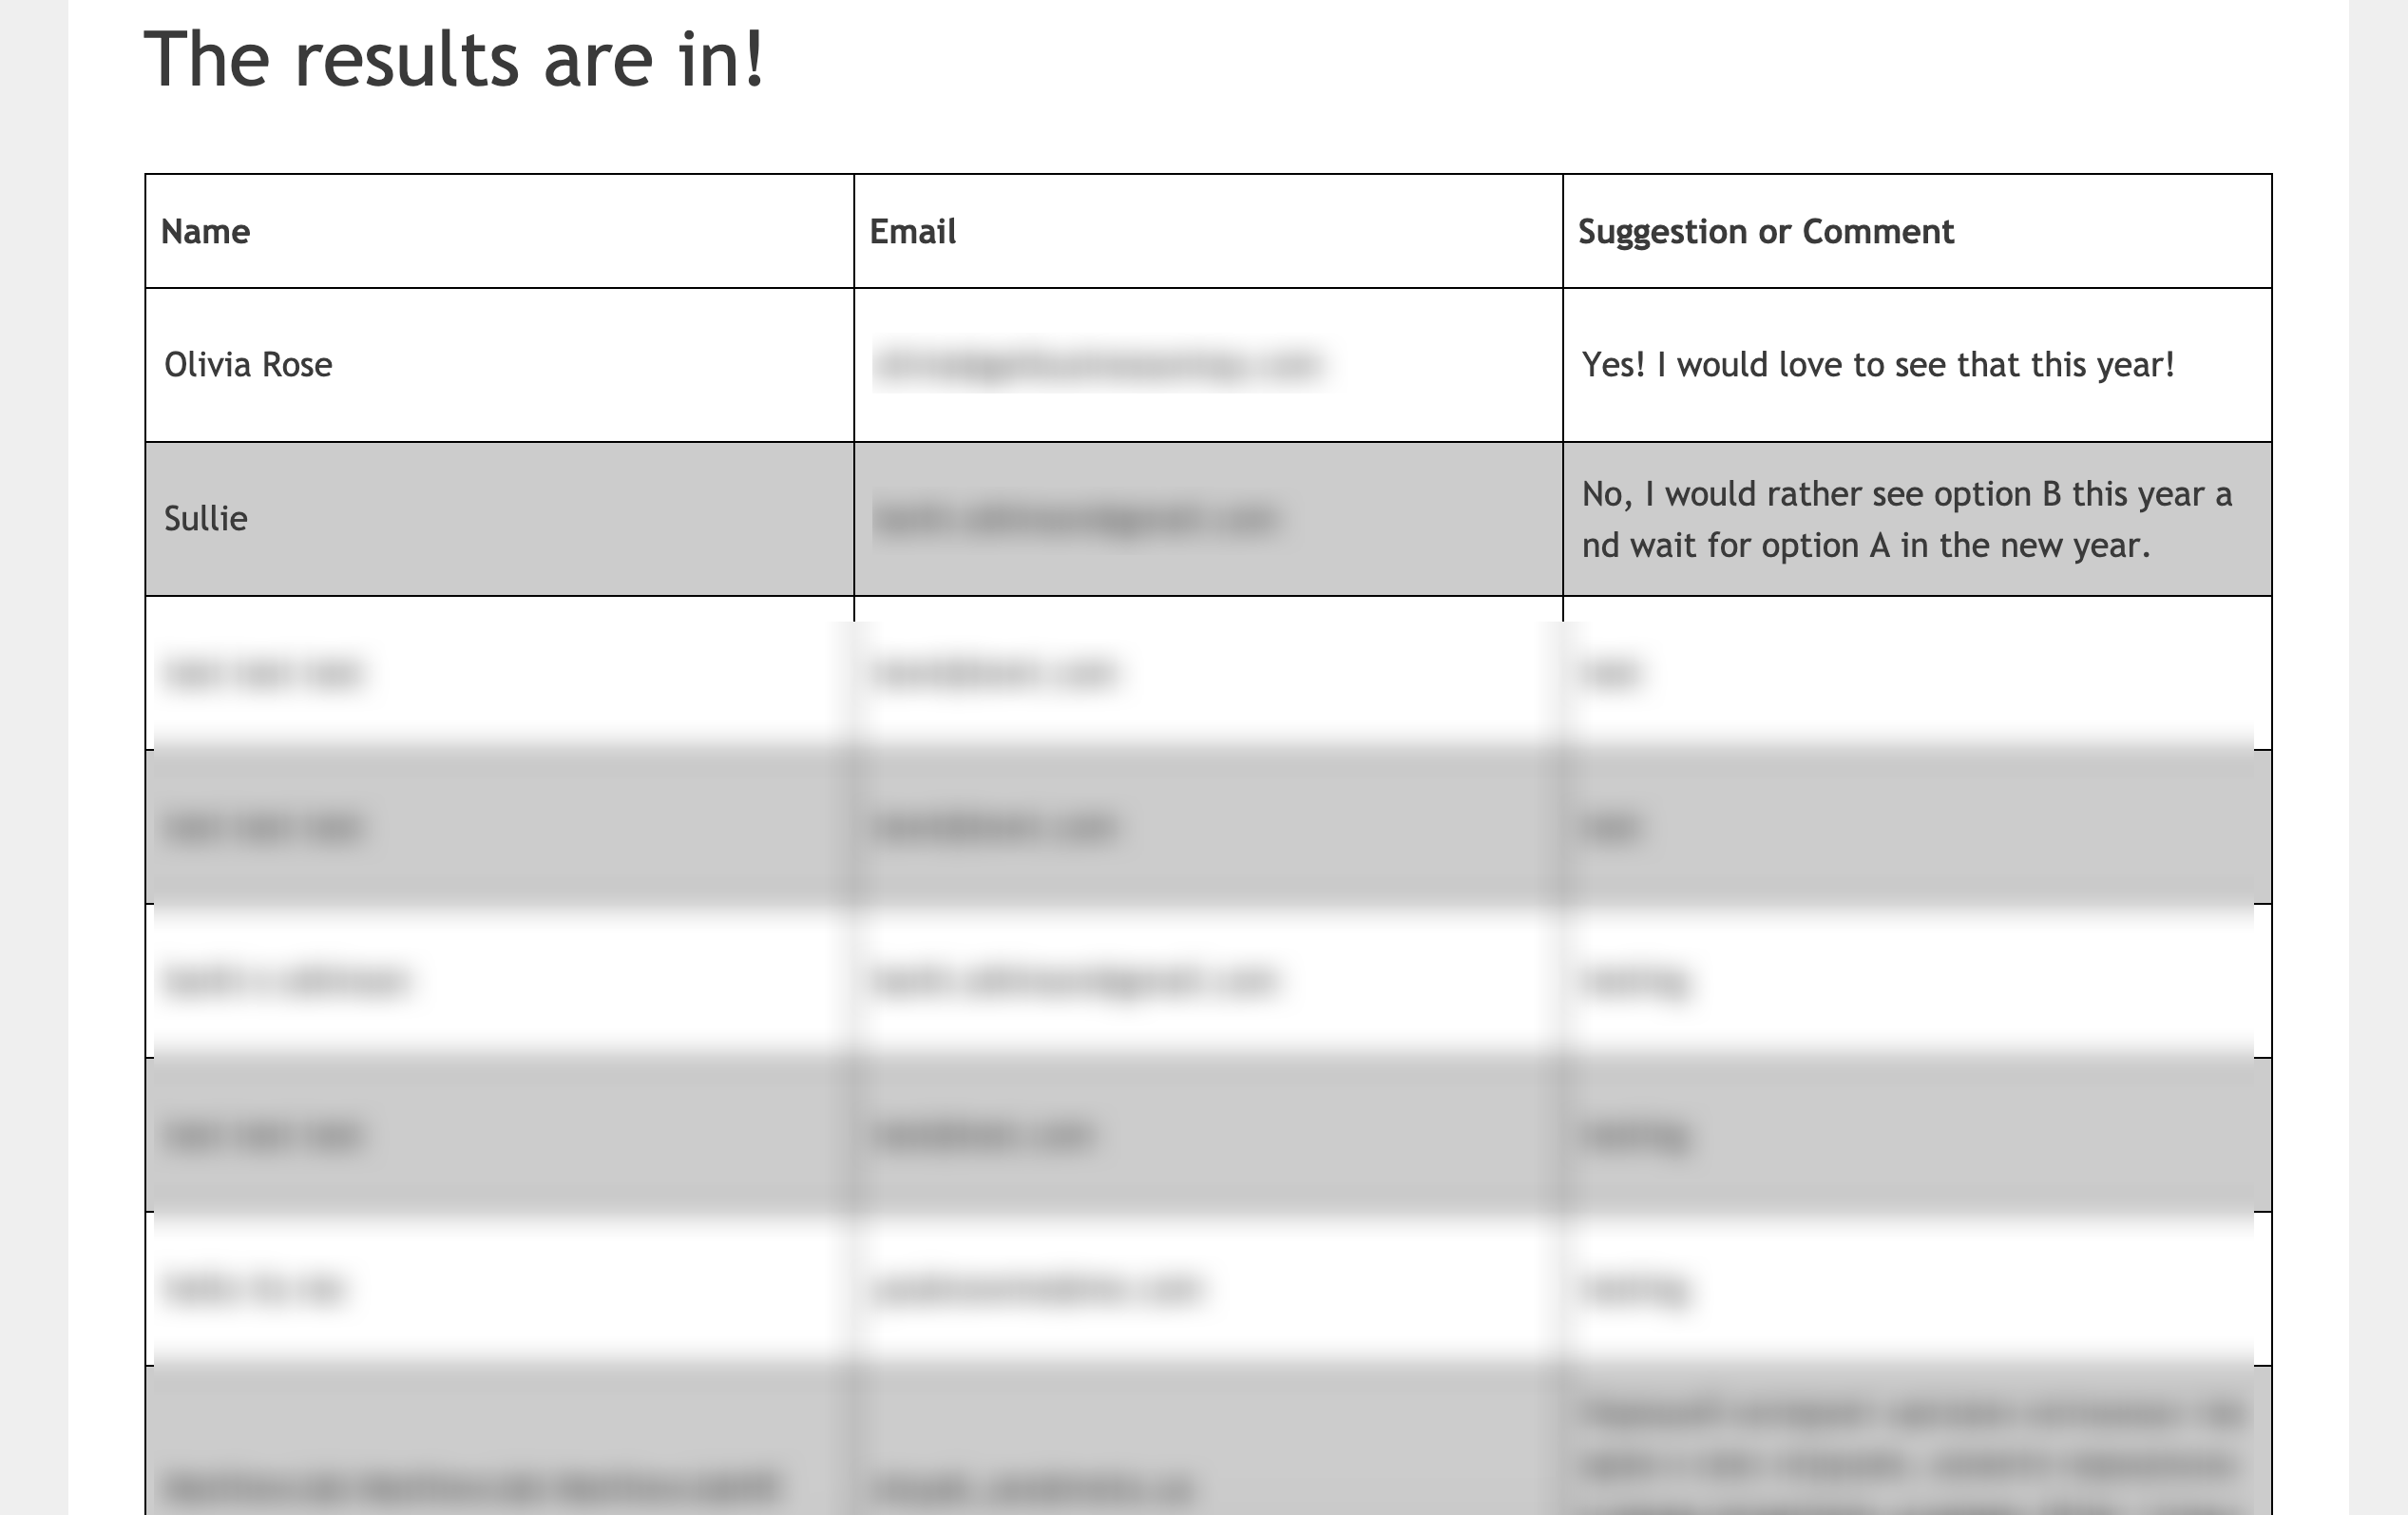
Das Formatieren der Eintrags-Tabelle ist optional, da die meisten Themes und Browser standardmäßig Tabellenstile integriert haben. Wir wollten Ihnen jedoch einen Einstieg mit einem Beispiel bieten. Wenn Sie die Standard-Tabellenstile ändern möchten, kopieren und fügen Sie dieses CSS auf Ihrer Website ein.
Für Unterstützung, wie und wo Sie CSS zu Ihrer Website hinzufügen können, lesen Sie bitte dieses Tutorial.
Die Formatierung Ihrer Eintrags-Tabelle hängt von den Standardstilen ab, die Ihr Theme möglicherweise für Tabellen hat oder nicht hat.
table {
border-collapse: collapse;
}

thead tr {
height: 60px;
}

table, th, td {
border: 1px solid #000000;
}

td {
white-space: normal;
max-width: 33%;
width: 33%;
word-break: break-all;
height: 60px;
padding: 10px;
}
tr:nth-child(even) {
background: #ccc
}

tr:nth-child(odd) {
background: #fff
}
Hinzufügen einer Nicht-Tabellen-Ansicht
Wenn Sie lieber keine HTML-Tabellenansicht zur Anzeige Ihrer Einträge verwenden möchten, haben wir auch dafür eine alternative Lösung für Sie. Anstatt Ihren Shortcode mit dem obigen Code-Snippet zu erstellen, verwenden Sie stattdessen dieses Code-Snippet.
/**
* Custom shortcode to display WPForms form entries in non-table view.
*
* Basic usage: [wpforms_entries_table id="FORMID"].
*
* Possible shortcode attributes:
* id (required)  Form ID of which to show entries.
* user           User ID, or "current" to default to current logged in user.
* fields         Comma separated list of form field IDs.
* number         Number of entries to show, defaults to 30.
*
* @link https://wpforms.com/developers/how-to-display-form-entries/
*
* Realtime counts could be delayed due to any caching setup on the site
*
* @param array $atts Shortcode attributes.
*
* @return string
*/

function wpf_entries_table( $atts ) {

// Pull ID shortcode attributes.
$atts = shortcode_atts(
[
'id'     => '',
'user'   => '',
'fields' => '',
'number' => '',
'type'   => 'all', // all, unread, read, or starred.
'sort'   => '',
'order'  => 'asc',
],
$atts
);

// Check for an ID attribute (required) and that WPForms is in fact
// installed and activated.
if ( empty( $atts[ 'id' ] ) || ! function_exists( 'wpforms' ) ) {
return;
}

// Get the form, from the ID provided in the shortcode.
$form = wpforms()->form->get( absint( $atts[ 'id' ] ) );

// If the form doesn't exist, abort.
if ( empty( $form ) ) {
return;
}

// Pull and format the form data out of the form object.
$form_data = ! empty( $form->post_content ) ? wpforms_decode( $form->post_content ) : '';

// Check to see if we are showing all allowed fields, or only specific ones.
$form_field_ids = isset( $atts[ 'fields' ] ) && $atts[ 'fields' ] !== '' ? explode( ',', str_replace( ' ', '', $atts[ 'fields' ] ) ) : [];

// Setup the form fields.
if ( empty( $form_field_ids ) ) {
$form_fields = $form_data[ 'fields' ];
} else {
$form_fields = [];
foreach ( $form_field_ids as $field_id ) {
if ( isset( $form_data[ 'fields' ][ $field_id ] ) ) {
$form_fields[ $field_id ] = $form_data[ 'fields' ][ $field_id ];
}
}
}

if ( empty( $form_fields ) ) {
return;
}

// Here we define what the types of form fields we do NOT want to include,
// instead they should be ignored entirely.
$form_fields_disallow = apply_filters( 'wpforms_frontend_entries_table_disallow', [ 'divider', 'html', 'pagebreak', 'captcha' ] );

// Loop through all form fields and remove any field types not allowed.
foreach ( $form_fields as $field_id => $form_field ) {
if ( in_array( $form_field[ 'type' ], $form_fields_disallow, true ) ) {
unset( $form_fields[ $field_id ] );
}
}

$entries_args = [
'form_id' => absint( $atts[ 'id' ] ),
];

// Narrow entries by user if user_id shortcode attribute was used.
if ( ! empty( $atts[ 'user' ] ) ) {
if ( $atts[ 'user' ] === 'current' && is_user_logged_in() ) {
$entries_args[ 'user_id' ] = get_current_user_id();
} else {
$entries_args[ 'user_id' ] = absint( $atts[ 'user' ] );
}
}

// Number of entries to show. If empty, defaults to 30.
if ( ! empty( $atts[ 'number' ] ) ) {
$entries_args[ 'number' ] = absint( $atts[ 'number' ] );
}

// Filter the type of entries: all, unread, read, or starred
if ( $atts[ 'type' ] === 'unread' ) {
$entries_args[ 'viewed' ] = '0';
} elseif( $atts[ 'type' ] === 'read' ) {
$entries_args[ 'viewed' ] = '1';
} elseif ( $atts[ 'type' ] === 'starred' ) {
$entries_args[ 'starred' ] = '1';
}

// Get all entries for the form, according to arguments defined.
// There are many options available to query entries. To see more, check out
// the get_entries() function inside class-entry.php (https://a.cl.ly/bLuGnkGx).
$entries = json_decode(json_encode(wpforms()->entry->get_entries( $entries_args )), true);

if ( empty( $entries ) ) {
return '<p>No entries found.</p>';
}

foreach($entries as $key => $entry) {
$entries[$key][ 'fields' ] = json_decode($entry[ 'fields' ], true);
$entries[$key][ 'meta' ] = json_decode($entry[ 'meta' ], true);
}

if ( !empty($atts[ 'sort' ]) && isset($entries[0][ 'fields' ][$atts[ 'sort' ]] ) ) {
if ( strtolower($atts[ 'order' ]) == 'asc' ) {
usort($entries, function ($entry1, $entry2) use ($atts) {
return strcmp($entry1[ 'fields' ][$atts[ 'sort' ]][ 'value' ], $entry2[ 'fields' ][$atts[ 'sort' ]][ 'value' ]);
});
} elseif ( strtolower($atts[ 'order' ]) == 'desc' ) {
usort($entries, function ($entry1, $entry2) use ($atts) {
return strcmp($entry2[ 'fields' ][$atts[ 'sort' ]][ 'value' ], $entry1[ 'fields' ][$atts[ 'sort' ]]['value']);
});
}
}

ob_start();

echo '<div class="wrapper">';

echo '<div class="header-row">';

// Loop through the form data so we can output form field names in
// the table header.
foreach ( $form_fields as $form_field ) {

// Output the form field name/label.
echo '<span class="column-label">';
echo esc_html( sanitize_text_field( $form_field[ 'label' ] ) );
echo '</span>';
}

echo '</div>';

echo '<div class="entries">';

// Now, loop through all the form entries.
foreach ( $entries as $entry ) {

echo '<div class="entry-details">';

$entry_fields = $entry[ 'fields' ];

foreach ( $form_fields as $form_field ) {

echo '<span class="details">';

foreach ( $entry_fields as $entry_field ) {
if ( absint( $entry_field[ 'id' ] ) === absint( $form_field[ 'id' ] ) ) {
echo apply_filters( 'wpforms_html_field_value', wp_strip_all_tags( $entry_field[ 'value' ] ), $entry_field, $form_data, 'entry-frontend-table' );
break;
}
}

echo '</span>';
}

echo '</div>';
}

echo '</div>';

echo '</div>';

$output = ob_get_clean();

return $output;
}
add_shortcode( 'wpforms_entries_table', 'wpf_entries_table' );
Es ist jedoch wichtig zu beachten, dass, da wir keine Standardtabelle verwenden, keine Standardformatierung angewendet wird, wenn diese Option verwendet wird. Daher ist der CSS im nächsten Schritt unerlässlich. Wir listen jedoch die verwendeten CSS-Klassen auf, damit Sie Ihre eigene Formatierung für diese Option anwenden können.
Formatierung der Nicht-Tabelle
Nachfolgend finden Sie eine detaillierte Liste der verwendeten CSS-Klassen und ihrer möglichen Zwecke (falls erforderlich).
- .wrapper – Dies ist ein allgemeiner Wrapper um den gesamten Block von Einträgen und kann verwendet werden, wenn Sie die Breite des Blocks reduzieren möchten, sodass er nicht 100 % Ihrer Seite einnimmt.
- .header-row – Dies ist ein weiterer allgemeiner Wrapper um die Bezeichnungen jeder Spalte (nur die Bezeichnungen), wenn Sie die Hintergrundfarbe des Bezeichnungsbereichs ändern möchten.>
- .column-label – Dieser Wrapper umschließt jede einzelne Spaltenbezeichnung. Zum Beispiel sind Name, E-Mail-Adresse und Vorschlag/Kommentar jeweils von einem solchen Wrapper umgeben und könnten verwendet werden, um die Größe dieses Textes zu steuern.
- .entries – Dies ist ein allgemeiner Wrapper um die Einträge selbst, wenn Sie die Hintergrundfarbe dieses Bereichs anders als die Bezeichnungen gestalten möchten.
- .entry-details – Dies ist ein allgemeiner Wrapper um jeden einzelnen Eintrag und könnte nützlich sein, wenn Sie für jede Eintragszeile eine andere Hintergrundfarbe wünschen.
- .details – Jede Spalte mit Informationen ist in dieser Klasse verpackt, sodass Sie zusätzliche Formatierungen wie Schriftgröße, Farbe usw. hinzufügen können.
Sie können den folgenden CSS-Code verwenden, um einige Standardformatierungen für Ihre Nicht-Tabellenansicht hinzuzufügen.
Für Unterstützung, wie und wo Sie CSS zu Ihrer Website hinzufügen können, lesen Sie bitte dieses Tutorial.
.wrapper {
width: 100%;
clear: both;
display: block;
}

.header-row {
float: left;
width: 100%;
margin-bottom: 20px;
border-top: 1px solid #eee;
padding: 10px 0;
border-bottom: 1px solid #eee;
}

span.details, span.column-label {
display: inline-block;
float: left;
width: 33%;
margin-right: 2px;
text-align: center;
margin: 5px 0;
}

.entries {
display: block;
clear: both;
width: 100%;
}

.header-row span.column-label {
text-transform: uppercase;
letter-spacing: 2px;
}

.entry-details {
border-bottom: 1px solid #ccc;
width: 100%;
display: block;
float: left;
margin: 20px 0;
padding-bottom: 20px;
}
Hinweis: Der oben angezeigte CSS-Code basiert auf der Anzeige von nur 3 Feldern aus Ihrem Eintrag: dem Feld Name, E-Mail und Kommentare. Wenn Sie mehr Felder anzeigen möchten, denken Sie daran, Ihren CSS entsprechend zu aktualisieren.
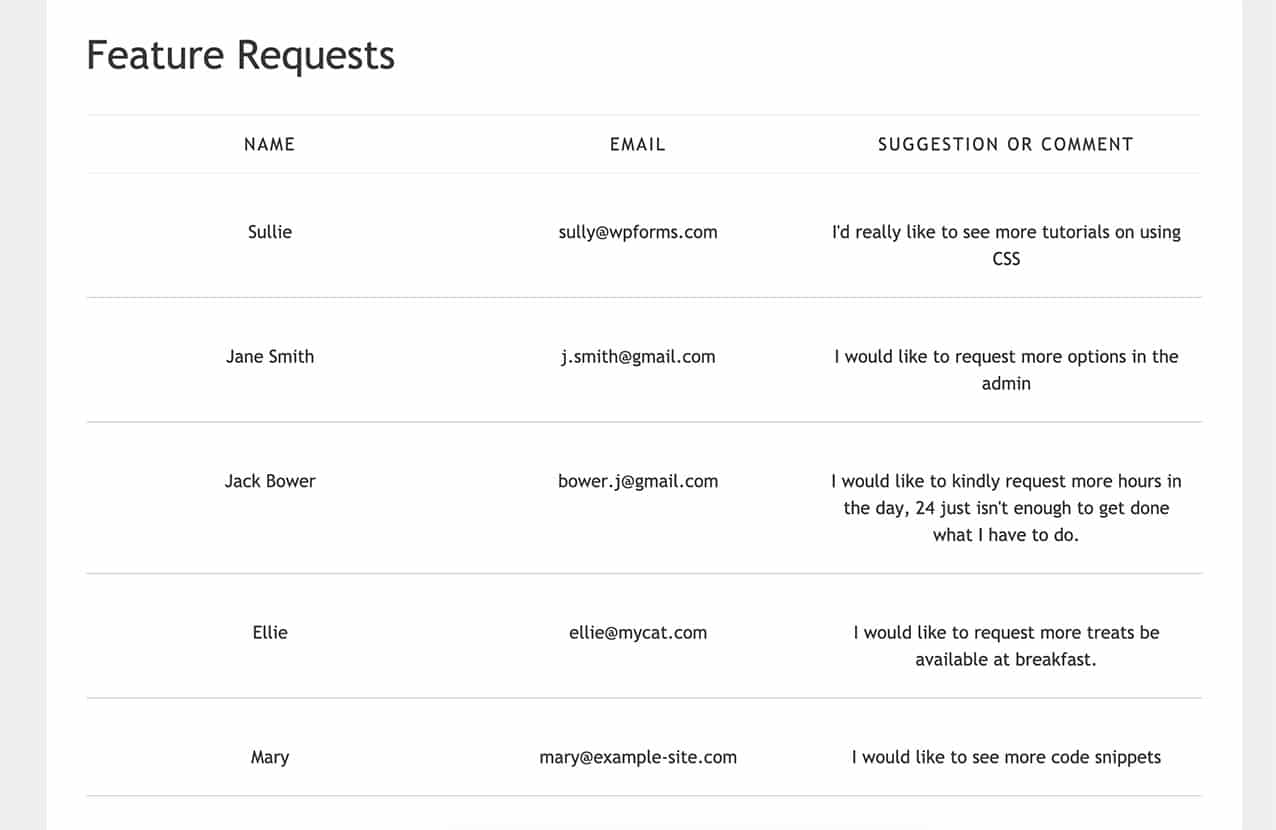
Und das ist alles. Sie haben jetzt einen Shortcode erstellt, der an verschiedenen Stellen auf Ihrer Website hinzugefügt werden kann, um Ihre Formulareinträge für Nicht-Admin-Benutzer anzuzeigen. Möchten Sie auch anzeigen, wie viele Einträge in Ihrem Formular übrig sind, wenn Sie das Form Locker Addon verwenden? Probieren Sie unseren Code-Schnipsel für Anzeigen der verbleibenden Eintragsgrenzennummer.
Referenzfilter
FAQ
Dies sind Antworten auf einige der häufigsten Fragen, die wir zum Anzeigen von Formulareinträgen auf einer Seite oder in einem Beitrag in WordPress erhalten.
F: Wie kann ich nur die Anzahl ungelesener Einträge anzeigen?
A: Sie würden diesen Schnipsel zu Ihrer Website hinzufügen.
<?php
/**
* Custom shortcode to display WPForms form entries count for a form.
*
* Realtime counts could be delayed due to any caching setup on the site
*
* @link https://wpforms.com/developers/how-to-display-form-entries/
*
*/

function wpf_dev_entries_count( $atts ) {

// Pull ID shortcode attributes.
$atts = shortcode_atts(
[
'id'     => '',
'type'   => 'all', // all, unread, read, or starred.
],
$atts
);

if ( empty( $atts['id'] ) ) {
return;
}

$args = [
'form_id' => absint( $atts['id'] ),
];

if ( $atts['type'] === 'unread' ) {
$args['viewed'] = '0';
} elseif( $atts['type'] === 'read' ) {
$args['viewed'] = '1';
} elseif ( $atts['type'] === 'starred' ) {
$args['starred'] = '1';
}

return wpforms()->entry->get_entries( $args, true );

}
add_shortcode( 'wpf_entries_count', 'wpf_dev_entries_count' );
Dann können Sie diesen Shortcode überall auf Ihrer WordPress-Website verwenden, wo Shortcodes akzeptiert werden.
[wpf_entries_count id="13" type="unread"]
Sie können einfach den type auf unread, read oder starred ändern.
F: Warum werden meine neueren Einträge nicht angezeigt?
A: Dies liegt wahrscheinlich am Caching auf Server-, Website- oder Browser-Ebene. Bitte stellen Sie sicher, dass Ihr Cache vollständig geleert ist.
F: Muss ich überhaupt Spalten haben?
A: Nein, überhaupt nicht. Sie können Ihre Einträge anzeigen, indem Sie die Beschriftung vor dem Feldwert platzieren und jedes Feld mit diesem Ausschnitt und CSS in eine separate Zeile stellen.
/**
* Custom shortcode to display WPForms form entries in non-table view.
*
* Basic usage: [wpforms_entries_table id="FORMID"].
*
* Possible shortcode attributes:
* id (required)  Form ID of which to show entries.
* user           User ID, or "current" to default to current logged in user.
* fields         Comma separated list of form field IDs.
* number         Number of entries to show, defaults to 30.
*
* @link https://wpforms.com/developers/how-to-display-form-entries/
*
* Realtime counts could be delayed due to any caching setup on the site
*
* @param array $atts Shortcode attributes.
*
* @return string
*/

function wpf_entries_table( $atts ) {

// Pull ID shortcode attributes.
$atts = shortcode_atts(
[
'id'     => '',
'user'   => '',
'fields' => '',
'number' => '',
'type'   => 'all', // all, unread, read, or starred.
'sort'   => '',
'order'  => 'asc',
],
$atts
);

// Check for an ID attribute (required) and that WPForms is in fact
// installed and activated.
if ( empty( $atts['id'] ) || ! function_exists( 'wpforms' ) ) {
return;
}

// Get the form, from the ID provided in the shortcode.
$form = wpforms()->form->get( absint( $atts['id'] ) );

// If the form doesn't exist, abort.
if ( empty( $form ) ) {
return;
}

// Pull and format the form data out of the form object.
$form_data = ! empty( $form->post_content ) ? wpforms_decode( $form->post_content ) : '';

// Check to see if we are showing all allowed fields, or only specific ones.
$form_field_ids = isset( $atts['fields'] ) && $atts['fields'] !== '' ? explode( ',', str_replace( ' ', '', $atts['fields'] ) ) : [];

// Setup the form fields.
if ( empty( $form_field_ids ) ) {
$form_fields = $form_data['fields'];
} else {
$form_fields = [];
foreach ( $form_field_ids as $field_id ) {
if ( isset( $form_data['fields'][$field_id] ) ) {
$form_fields[$field_id] = $form_data['fields'][$field_id];
}
}
}

if ( empty( $form_fields ) ) {
return;
}

// Here we define what the types of form fields we do NOT want to include,
// instead they should be ignored entirely.
$form_fields_disallow = apply_filters( 'wpforms_frontend_entries_table_disallow', [ 'divider', 'html', 'pagebreak', 'captcha' ] );

// Loop through all form fields and remove any field types not allowed.
foreach ( $form_fields as $field_id => $form_field ) {
if ( in_array( $form_field['type'], $form_fields_disallow, true ) ) {
unset( $form_fields[$field_id] );
}
}

$entries_args = [
'form_id' => absint( $atts['id'] ),
];

// Narrow entries by user if user_id shortcode attribute was used.
if ( ! empty( $atts['user'] ) ) {
if ( $atts['user'] === 'current' && is_user_logged_in() ) {
$entries_args['user_id'] = get_current_user_id();
} else {
$entries_args['user_id'] = absint( $atts['user'] );
}
}

// Number of entries to show. If empty, defaults to 30.
if ( ! empty( $atts['number'] ) ) {
$entries_args['number'] = absint( $atts['number'] );
}

// Filter the type of entries: all, unread, read, or starred
if ( $atts['type'] === 'unread' ) {
$entries_args['viewed'] = '0';
} elseif( $atts['type'] === 'read' ) {
$entries_args['viewed'] = '1';
} elseif ( $atts['type'] === 'starred' ) {
$entries_args['starred'] = '1';
}

// Get all entries for the form, according to arguments defined.
// There are many options available to query entries. To see more, check out
// the get_entries() function inside class-entry.php (https://a.cl.ly/bLuGnkGx).
$entries = json_decode(json_encode(wpforms()->entry->get_entries( $entries_args )), true);

if ( empty( $entries ) ) {
return '<p>No entries found.</p>';
}

foreach($entries as $key => $entry) {
$entries[$key]['fields'] = json_decode($entry['fields'], true);
$entries[$key]['meta'] = json_decode($entry['meta'], true);
}

if ( !empty($atts['sort']) && isset($entries[0]['fields'][$atts['sort']] ) ) {
if ( strtolower($atts['order']) == 'asc' ) {
usort($entries, function ($entry1, $entry2) use ($atts) {
return strcmp($entry1['fields'][$atts['sort']]['value'], $entry2['fields'][$atts['sort']]['value']);
});
} elseif ( strtolower($atts['order']) == 'desc' ) {
usort($entries, function ($entry1, $entry2) use ($atts) {
return strcmp($entry2['fields'][$atts['sort']]['value'], $entry1['fields'][$atts['sort']]['value']);
});
}
}

ob_start();

echo '<div class="wrapper">';
echo '<div class="entries">';

// Now, loop through all the form entries.
foreach ( $entries as $entry ) {

echo '<div class="entry-details">';

$entry_fields = $entry['fields'];

foreach ( $form_fields as $form_field ) {

echo '<span class="details">';
echo '<span class="label">' . esc_html( sanitize_text_field( $form_field['label'] ) ) . ':</span>';

foreach ( $entry_fields as $entry_field ) {
if ( absint( $entry_field['id'] ) === absint( $form_field['id'] ) ) {
echo apply_filters( 'wpforms_html_field_value', wp_strip_all_tags( $entry_field['value'] ), $entry_field, $form_data, 'entry-frontend-table' );
break;
}
}

echo '</span>';
}

echo '</div>';
}

echo '</div>';
echo '</div>';

$output = ob_get_clean();

return $output;
}

add_shortcode( 'wpforms_entries_table', 'wpf_entries_table' );
Verwenden Sie das folgende CSS für die Formatierung der Nicht-Tabellenansicht.
Für Unterstützung, wie und wo Sie CSS zu Ihrer Website hinzufügen können, lesen Sie bitte dieses Tutorial.
.wrapper {
width: 100%;
clear: both;
display: block;
}

span.details {
display: block;
margin-right: 2px;
margin: 5px 0;
}

.entries {
display: block;
clear: both;
width: 100%;
}

.entry-details {
border-bottom: 1px solid #ccc;
width: 100%;
display: block;
margin: 20px 0;
padding-bottom: 20px;
}

span.label {
font-weight: bold;
margin-right: 5px;
}