AIサマリー
各フォームエントリに固有の ID を作成したいですか?各フォームエントリにユニークな参照番号を与えることで、後で参照したい内部機能を簡単に追跡できるようになります。PHPとWPFormsのスマートタグを使えば、これを簡単に実現できます。このチュートリアルでは、各ステップを説明します。
WPFormsには一意な値を生成するデフォルトのスマートタグがすでにあります。しかし、このチュートリアルの目的は、数値のみに制限したり、ユニークIDの前に接頭辞を追加したりなど、ユニーク値を制御することです。ユニーク値スマートタグの詳細については、こちらのガイドを参照してください。
このチュートリアルでは、訪問者のためのサポートフォームを作成します。各サポート投稿には一意のIDが割り当てられます。これはサポートチケット番号となります。この番号を隠しフィールドのエントリに格納します。
ユニークIDの作成
通常、チュートリアルはフォームの作成から始めます。しかし、今回はフォームビルダーの中でこのスマートタグを使いたいので、まずコードスニペットをサイトに追加することから始めます。コードスニペットをサイトに追加する際にサポートが必要な場合は、こちらのチュートリアルをお読みください。
/*
 * Create a unique_id Smart Tag and assign it to each form submission.
 *
 * @link https://wpforms.com/developers/how-to-create-a-unique-id-for-each-form-entry/
 */

// Generate Unique ID Smart Tag for WPForms
function wpf_dev_register_smarttag( $tags ) {

    // Key is the tag, item is the tag name.
    $tags['unique_id'] = 'Unique ID';

    return $tags;
}

add_filter( 'wpforms_smart_tags', 'wpf_dev_register_smarttag' );

// Generate Unique ID value
function wpf_dev_process_smarttag( $content, $tag, $form_data, $fields, $entry_id ) {

    // Only run if it is our desired tag.
    if ( 'unique_id' === $tag && !$entry_id ) {

        // Replace the tag with our Unique ID that will be prefixed with wpf.
        $content = str_replace( '{unique_id}', uniqid( 'wpf', true ), $content );
    } elseif ( 'unique_id' === $tag && $entry_id ) {

        foreach ( $form_data['fields'] as $field ) {

            if ( preg_match( '/\b{unique_id}\b/', $field['default_value'] ) ) {
                $field_id = $field['id'];
                break;
            }
        }

        $content = str_replace( '{unique_id}', $fields[$field_id]['value'], $content );
    }

    return $content;
}

add_filter( 'wpforms_smart_tag_process', 'wpf_dev_process_smarttag', 10, 5 );
このスニペットは、フォーム送信ごとにユニークなIDを作成するために必要なコードを作成するだけでなく、この番号をスマートタグとして使用し、フォームエントリに添付できるようにします。
フォームの作成
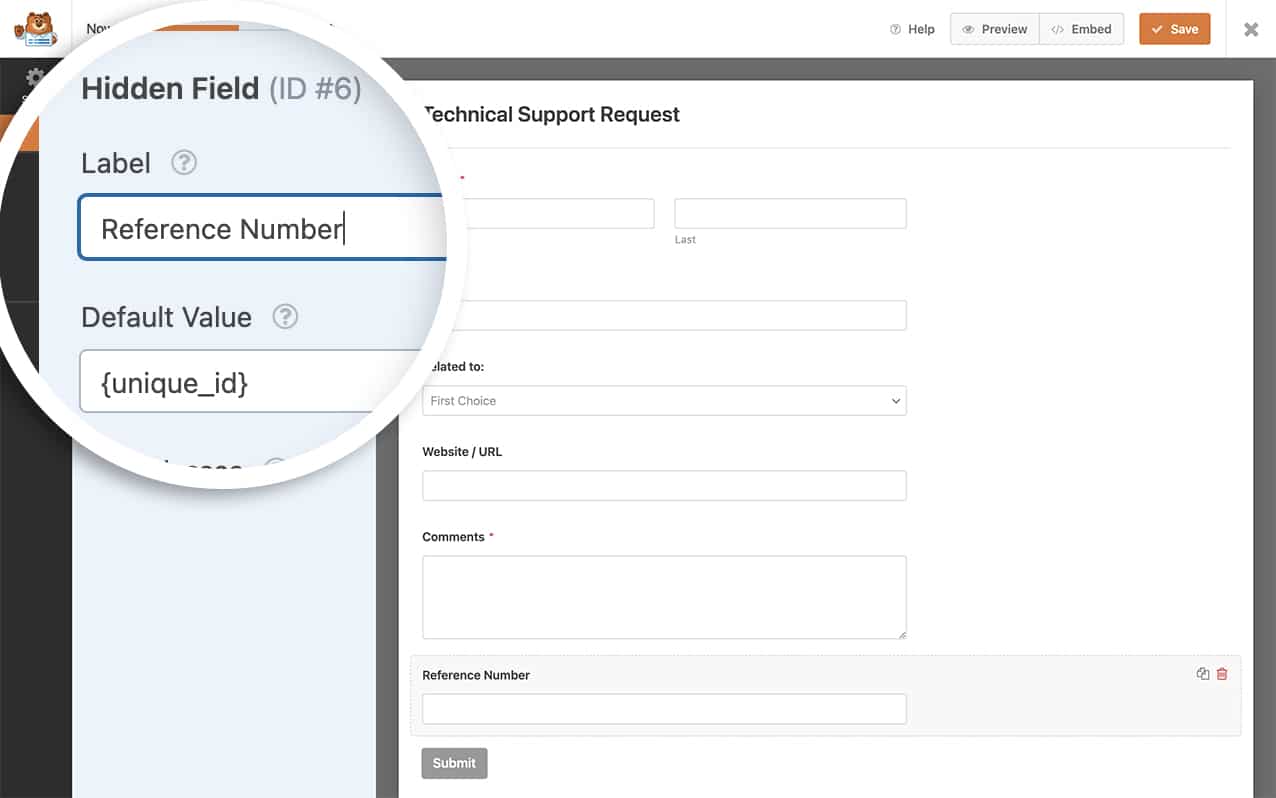
次に、サポートフォームを作成します。このフォームには、名前、メールアドレス、問題をキャプチャするためのドロップダウンフィールド、そして最後に、訪問者が求めているサポートに関する詳細情報を入力できるようにするための段落テキストフォームフィールドが含まれます。しかし、この番号をエントリの一部として保存したいので、一意のID番号を保存するための隠しフィールドも追加します。
隠しフィールドを追加したら、それをクリックしてフィールドオプションパネルを開きます。そして、Advanced Optionsセクションに進みます。
デフォルト値には、スマートタグ{unique_id}を追加します。

確認メッセージへの固有IDの追加
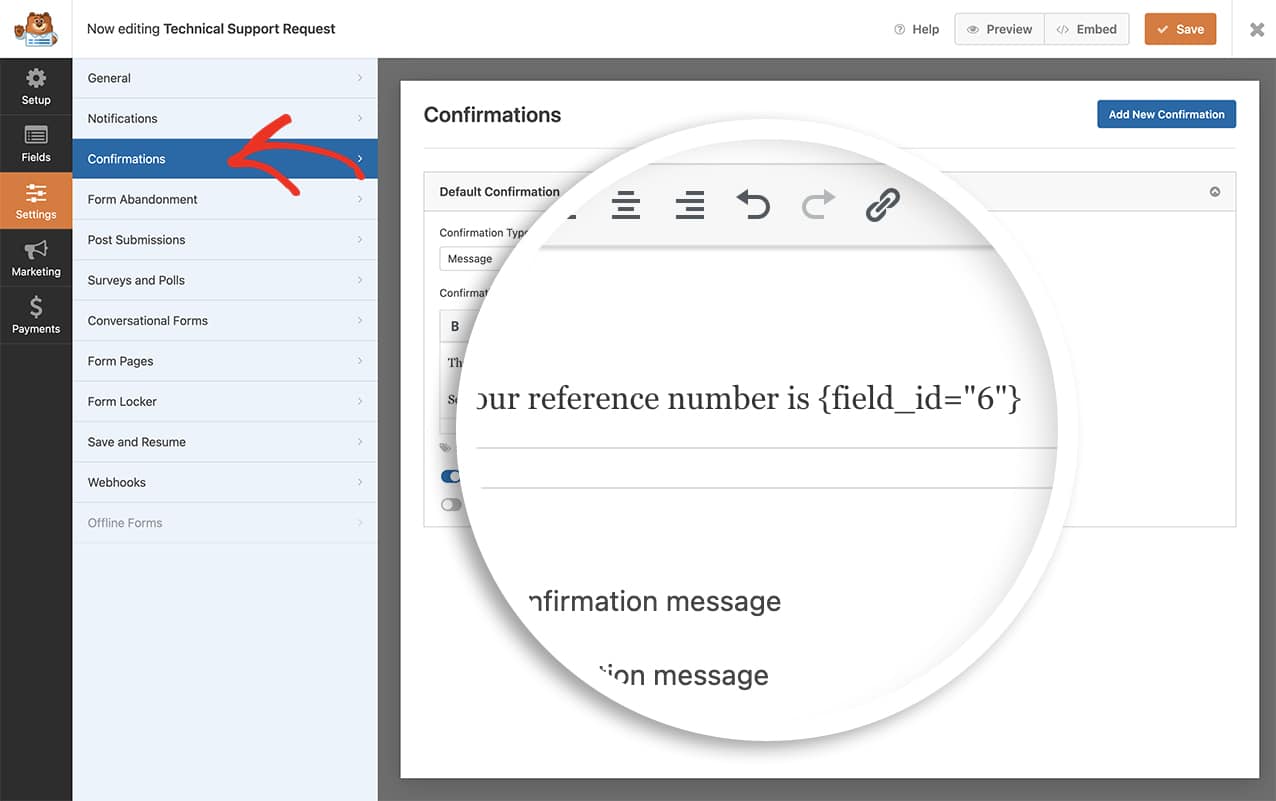
確認メッセージに固有のIDを追加したい場合は、フォームが送信されたときにHidden Fieldに格納されている値を配置する必要があります。
私たちのフォームでは、前の画像でわかるように、フィールドIDは6でした。そこで、確認メッセージにこれを追加して、まったく同じ値を取り込むようにします。
{field_id="6"}

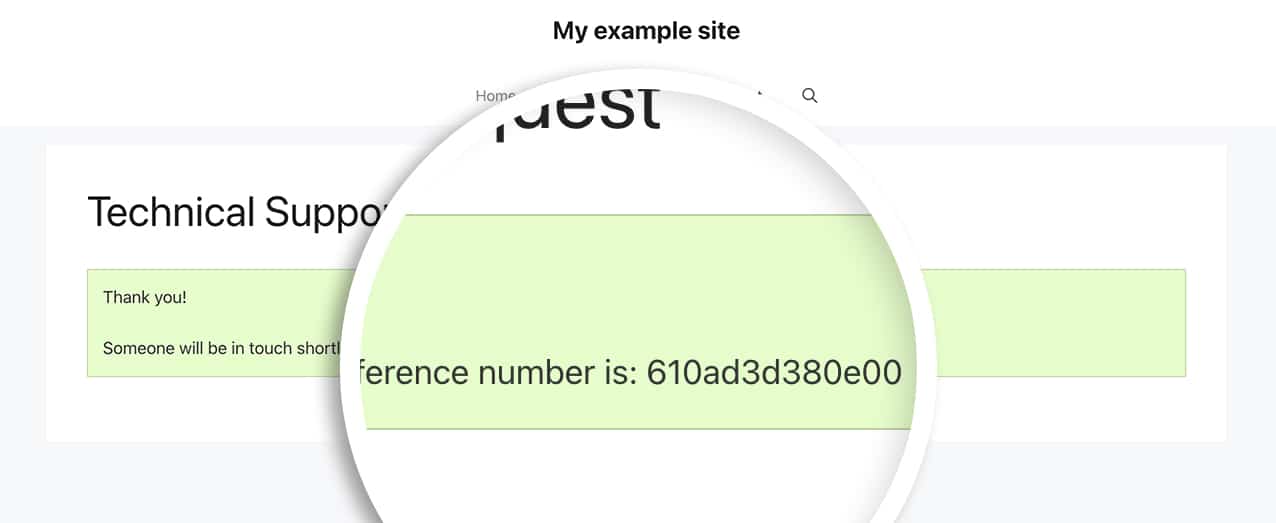
これで、フォームが送信されると、訪問者にユニークIDが表示され、フォームの隠しフィールドに記録されます。

よくあるご質問
Q: 固有IDの文字数を指定したい場合はどうすればよいですか?
A:以下の例では、6桁(16進数のみ)のユニークIDしか提供されないことがわかります。
/*
 * Create a unique ID with a specific number of characters and assign it to each form submission.
 *
 * @link https://wpforms.com/developers/how-to-create-a-unique-id-for-each-form-entry/
 */

// Generate Unique ID Smart Tag for WPForms
function wpf_dev_register_smarttag( $tags ) {

    // Key is the tag, item is the tag name.
    $tags['unique_id'] = 'Unique ID';

    return $tags;
}

add_filter( 'wpforms_smart_tags', 'wpf_dev_register_smarttag' );

// Generate Unique ID value
function wpf_dev_process_smarttag( $content, $tag, $form_data, $fields, $entry_id ) {

    // Only run if it is our desired tag.
    if ( 'unique_id' === $tag && !$entry_id ) {

        // Generate a hexadecimal string based on the time to ensure uniqueness
        // Reduce the string to 6 characters
        $uuid = substr( md5( time() ), 0, 6 );

        // Replace the tag with our Unique ID.
        $content = str_replace( '{unique_id}', $uuid, $content );

    } elseif ( 'unique_id' === $tag && $entry_id ) {

        foreach ( $form_data['fields'] as $field ) {

            if ( preg_match( '/\b{unique_id}\b/', $field['default_value'] ) ) {
                $field_id = $field['id'];
                break;
            }
        }

        $content = str_replace( '{unique_id}', $fields[$field_id]['value'], $content );
    }

    return $content;
}

add_filter( 'wpforms_smart_tag_process', 'wpf_dev_process_smarttag', 10, 5 );
このスニペットは現在時刻を取得し、それを16進文字列に変換して6文字の数字に制限する。
Q: このスニペットで数値のみの値を取得できますか?
A: もちろんだ!このスニペットを使えば、1~5,000,000,000の間でユニークな数値を返すことができます。この数値範囲を使用すると、1~10桁のユニークな数値が得られることになります。もし、生成される桁数を減らしたいのであれば、その旨を rand(1, 5000000000).
/*
 * Create a unique_id numeric-only Smart Tag and assign it to each form submission.
 *
 * @link https://wpforms.com/developers/how-to-create-a-unique-id-for-each-form-entry/
 */

// Generate Unique ID Smart Tag for WPForms
function wpf_dev_register_smarttag( $tags ) {

    // Key is the tag, item is the tag name.
    $tags['unique_number_id'] = 'Unique Number ID';

    return $tags;
}

add_filter( 'wpforms_smart_tags', 'wpf_dev_register_smarttag' );

// Generate Unique ID value
function wpf_dev_process_smarttag( $content, $tag, $form_data, $fields, $entry_id ) {

    // Only run if it is our desired tag.
    if ( 'unique_number_id' === $tag && !$entry_id ) {

        // Generate a random numeric ID between 1 and 5,000,000,000
        $unique_id = rand(1, 5000000000);

        // Replace the tag with our Unique ID.
        $content = str_replace( '{unique_number_id}', $unique_id, $content );

    } elseif ( 'unique_number_id' === $tag && $entry_id ) {

        foreach ( $form_data['fields'] as $field ) {

            if ( preg_match( '/\b{unique_number_id}\b/', $field['default_value'] ) ) {
                $field_id = $field['id'];
                break;
            }
        }

        $content = str_replace( '{unique_number_id}', $fields[$field_id]['value'], $content );
    }

    return $content;
}

add_filter( 'wpforms_smart_tag_process', 'wpf_dev_process_smarttag', 10, 5 );
Q: ユニークIDをプレフィックスにすることはできますか?
A:もちろんです。プレフィックスを追加したい場合は、以下のスニペットをご利用ください。
/*
 * Create a unique ID and add a prefix.
 *
 * @link https://wpforms.com/developers/how-to-create-a-unique-id-for-each-form-entry/
 */

// Generate Unique ID Smart Tag for WPForms
function wpf_dev_register_smarttag( $tags ) {

    // Key is the tag, item is the tag name.
    $tags['my_unique_id'] = 'My Unique ID';

    return $tags;
}

add_filter( 'wpforms_smart_tags', 'wpf_dev_register_smarttag' );

// Generate Unique ID value
function wpf_dev_process_smarttag( $content, $tag, $form_data, $fields, $entry_id ) {

    // Only run if it is our desired tag.
    if ( 'my_unique_id' === $tag && !$entry_id ) {

        // Replace the tag with our Unique ID that will be prefixed with "WPF-".
        $content = str_replace( '{my_unique_id}', uniqid('WPF-', true), $content );

    } elseif ( 'my_unique_id' === $tag && $entry_id ) {

        foreach ( $form_data['fields'] as $field ) {

            if ( preg_match( '/\b{my_unique_id}\b/', $field['default_value'] ) ) {
                $field_id = $field['id'];
                break;
            }
        }

        $content = str_replace( '{my_unique_id}', $fields[$field_id]['value'], $content );
    }

    return $content;
}

add_filter( 'wpforms_smart_tag_process', 'wpf_dev_process_smarttag', 10, 5 );
Q: カウントをインクリメントして数字をコントロールすることはできますか?
A:もちろんです。ただし、数字を増やしたい場合は、代わりにこちらの便利なガイドに従うことをお勧めします。
Q: ユニークIDのプレフィックスとしてフォームフィールドの値を使用できますか?
A: はい。以下のスニペットを使用すると、フォームの特定のフィールドをユニークIDのプレフィックスとして使用できます。
/*
 * Create a unique ID and add a prefix based on user submitted data.
 *
 * @link https://wpforms.com/developers/how-to-create-a-unique-id-for-each-form-entry/
 */

// Generate Unique ID on form submission and add to a hidden field
function wpf_dev_generate_unique_id( $fields, $entry, $form_data ) {

    // Replace '5' with the actual field ID of your field
    $field_id = 5;
    // Replace '3' with the actual field ID of your hidden field for unique ID
    $hidden_field_id = 3;

    // Check if the field exists and has a value
    if ( isset( $fields[$field_id]['value'] ) && ! empty( $fields[$field_id]['value'] ) ) {
        // Get the field value
        $field_value = $fields[$field_id]['value'];

        // Sanitize the field value to use as a prefix
        $prefix = preg_replace( '/[^A-Za-z0-9]/', '', $field_value );

        // Generate unique ID with the dropdown value as prefix
        $unique_id = $prefix . '-' . uniqid();

        // Add the unique ID to the hidden field
        foreach ( $fields as &$field ) {
            if ( $field['id'] == $hidden_field_id ) {
                $field['value'] = $unique_id;
                break;
            }
        }
    }

    return $fields;
}
add_filter( 'wpforms_process_filter', 'wpf_dev_generate_unique_id', 10, 3 );

// Register the Unique ID Smart Tag for WPForms
function wpf_dev_register_smarttag( $tags ) {
    // Key is the tag, item is the tag name.
    $tags['my_unique_id'] = 'My Unique ID';
    return $tags;
}
add_filter( 'wpforms_smart_tags', 'wpf_dev_register_smarttag' );

// Process Unique ID Smart Tag to retrieve the value from the hidden field
function wpf_dev_process_smarttag( $content, $tag, $form_data, $fields, $entry_id ) {
    // Only run if it is our desired tag
    if ( 'my_unique_id' === $tag ) {
        // Replace '3' with the actual field ID of your hidden field for unique ID
        $hidden_field_id = 3;
        if ( isset( $fields[$hidden_field_id]['value'] ) ) {
            $content = str_replace( '{my_unique_id}', $fields[$hidden_field_id]['value'], $content );
        }
    }
    return $content;
}
add_filter( 'wpforms_smart_tag_process', 'wpf_dev_process_smarttag', 10, 5 );
の値を置き換える必要がある。 $field_id 変数を、プレフィックスに使いたい特定のフォームフィールドの ID で置き換えます。また $hidden_field_id 変数に、フォーム上のユニークIDスマートタグを持つ隠しフィールドのIDを指定します。
これだけで、フォーム送信ごとに一意のIDを作成できます。チェックボックスフィールドラベル内でスマートタグを処理したいですか?チェックボックスラベル内でスマートタグを処理する方法のチュートリアルをお試しください。
