AIサマリー
はじめに
スマートタグのサイトURLを作成したいですか?このスマートタグをメール通知や確認メッセージで再利用したいですか?このチュートリアルでは、サイトURL用のスマートタグを作成する方法と、通知内のどこにどのように配置するかをご紹介します。
スニペットの追加
まずはじめに、スニペットをサイトに追加します。スニペットを追加する方法や場所についてヘルプが必要な場合は、こちらのドキュメントを参照してください。
/**
 * Process the Smart Tag.
 *
 * @link   https://wpforms.com/developers/how-to-create-a-smart-tag-for-site-url/
 */

function wpf_dev_register_site_smarttag( $tags ) {

    // Key is the tag, item is the tag name.
    $tags[ 'site_url' ] = 'Site URL';

    return $tags;
}
add_filter( 'wpforms_smart_tags', 'wpf_dev_register_site_smarttag', 10, 1 );

/**
 * Process the Smart Tag.
 *
 * @link   https://wpforms.com/developers/how-to-create-a-smart-tag-for-site-url/
 */

function wpf_dev_process_site_url_smarttag( $content, $tag ) {

    // Only run if it is our desired tag.
    if ( 'site_url' === $tag ) {

        // Assign the site URL to the $url variable
        $url = get_site_url();

        // Replace the tag with our link.
        $content = str_replace( '{site_url}', $url, $content );

    }

    return $content;
}
add_filter( 'wpforms_smart_tag_process', 'wpf_dev_process_site_url_smarttag', 10, 2 );
このスニペットには2つの機能があります。1つ目は、site_urlというスマートタグを作成することを登録するだけですが、このスマートタグのフォームビルダー内に表示されるテキストはSite URLです。
2つ目の関数は、WordPressの関数get_site_url();で現在のサイトのURLを探し、それを関数内に渡してスマートタグ内の変数$urlに代入します。
スマートタグの使用
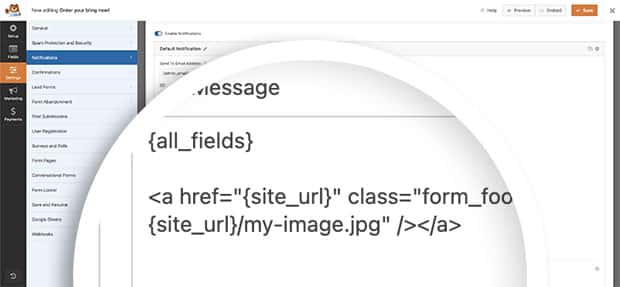
このドキュメントでは、フォームへの入力が完了した後に訪問者に送信される各メール通知の中に、お礼の画像を配置します。これを行うには、通知タブを開き、通知メッセージの{all_fields}スマートタグの後にこれを追加します。
HTMLリンクと画像ソースを「通知」タブの「メールメッセージ」に追加するだけです。
<a href="{site_url}" class="form_footer_logo"><img src="{site_url}/my-image.jpg" /></a>

それで終わりです!WPFormsのスマートタグでできることはたくさんあります。カスタムスマートタグを作成するには、カスタムスマートタグの作成方法のチュートリアルをご覧ください。
よくあるご質問
Q: これをHTMLのフォームフィールドやラベルの中で使いたい場合はどうすればいいですか?
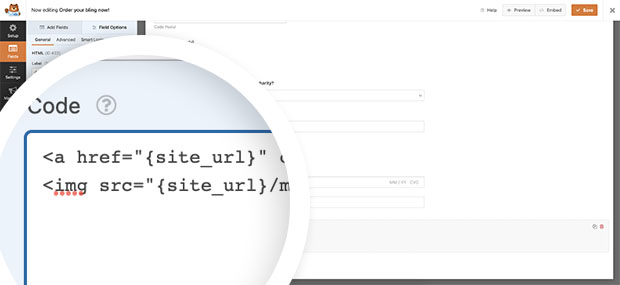
A:スマートタグは、確認メッセージ、メール通知、特定のフォームフィールドのデフォルト値など、デフォルトで多くの分野で使用できます。ただし、スマートタグをフィールドラベルやHTMLフォームフィールドで使用したい場合は、追加のスニペットが必要になります。
<a href="{site_url}" class="form_footer_logo"><img src="{site_url}/my-image.jpg" /></a>

HTMLフォームフィールド内のスマートタグを処理するために必要なスニペットについての詳細は、こちらのチュートリアルをご覧ください。
スマートタグをフィールドラベルの中で処理したい場合は、こちらのチュートリアルをご覧ください。
チェックボックスフィールドのオプションとしてスマートタグを使うこともできることをご存知ですか?こちらのチュートリアルをご覧ください。
Q: URLを切り捨てることは可能ですか?
A:もちろんです!現在の投稿やページのパーマリンクを使ってフィールドに入力したい場合は、代わりにこのスニペットを利用できます。
/**
 * Process the Smart Tag.
 *
 * @link   https://wpforms.com/developers/how-to-create-a-smart-tag-for-site-url/
 */

function wpf_dev_register_site_smarttag( $tags ) {

    // Key is the tag, item is the tag name.
    $tags[ 'permalink' ] = 'Permalink';

    return $tags;
}
add_filter( 'wpforms_smart_tags', 'wpf_dev_register_site_smarttag', 10, 1 );

/**
 * Process the Smart Tag.
 *
 * @link   https://wpforms.com/developers/how-to-create-a-smart-tag-for-site-url/
 */

function wpf_dev_process_site_url_smarttag( $content, $tag ) {

    // Only run if it is our desired tag.
    if ( 'permalink' === $tag ) {

        // Assign the site URL to the $url variable
	$url = substr( get_permalink(), strlen( home_url('/') ) );

        // Replace the tag with our link.
        $content = str_replace( '{permalink}', $url, $content );

    }

    return $content;
}
add_filter( 'wpforms_smart_tag_process', 'wpf_dev_process_site_url_smarttag', 10, 2 );
関連
フィルター参照:
