### [Klaviyo Addon](https://wpforms.com/docs/klaviyo-addon/)
**Published:** May 12, 2026
**Author:** Umair Majeed
**Excerpt:** Learn how to connect WPForms with Klaviyo to easily sync form submissions with your profiles and email marketing lists.
**Content:**
Klaviyo Addon is a Plus Feature
Unlock Klaviyo Addon and other powerful features to grow your business.
[ Get WPForms Plus ](https://wpforms.com/pricing/)
Would you like to send your form submissions to Klaviyo? With the WPForms Klaviyo addon, you can create or update Klaviyo profiles, subscribe contacts to email marketing, and manage list membership directly from your forms.
This tutorial will show you how to install and configure the Klaviyo addon in WPForms.
- [Connecting WPForms to Klaviyo](#aioseo-connecting-wpforms-to-klaviyo-11)
- [Generating Your Klaviyo API Key](#aioseo-generating-your-klaviyo-api-key-22)
- [Finishing the Connection in WPForms](#aioseo-finishing-the-connection-in-wpforms-38)
- [Adding a Klaviyo Integration to Your Form](#aioseo-adding-a-klaviyo-integration-to-your-form-45)
- [Frequently Asked Questions](#faq)
**Requirements:**
- Ensure that you’ve installed WPForms version 1.10.0.5 or higher to meet the [minimum required version](https://wpforms.com/docs/why-you-should-always-use-the-latest-version-of-wpforms/#version-requirements) for the Klaviyo addon.
- You will need an [Plus license level](https://wpforms.com/pricing/) or higher to access the Klaviyo addon
- An active Klaviyo account
---
Before you get started, be sure WPForms is [installed and activated](https://wpforms.com/docs/install-wpforms-plugin/) on your WordPress site, and that you’ve [verified your license](https://wpforms.com/docs/verify-wpforms-license/). Then, go ahead and [install and activate the Klaviyo addon](https://wpforms.com/docs/install-activate-wpforms-addons/).
## Connecting WPForms to Klaviyo
Once the Klaviyo addon is installed and activated, you’ll need to connect your Klaviyo account to WPForms.
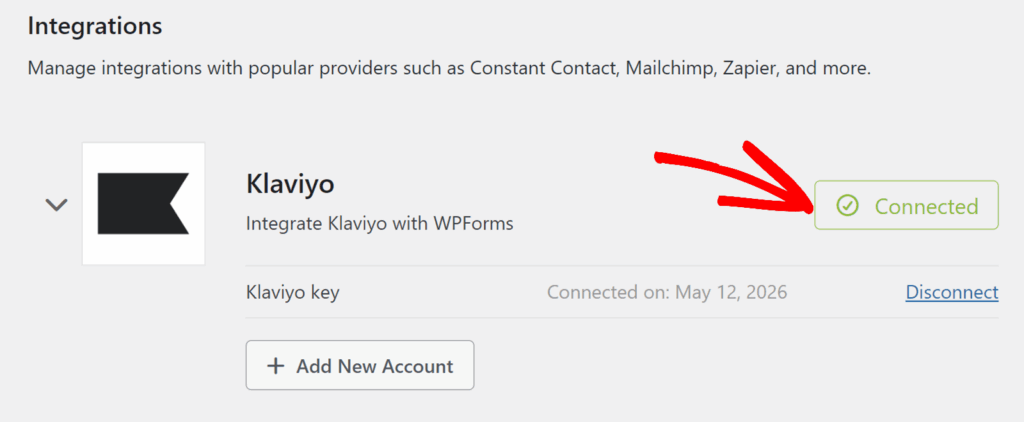
To do this, go to **WPForms » Settings** and click on the **Integrations** tab.
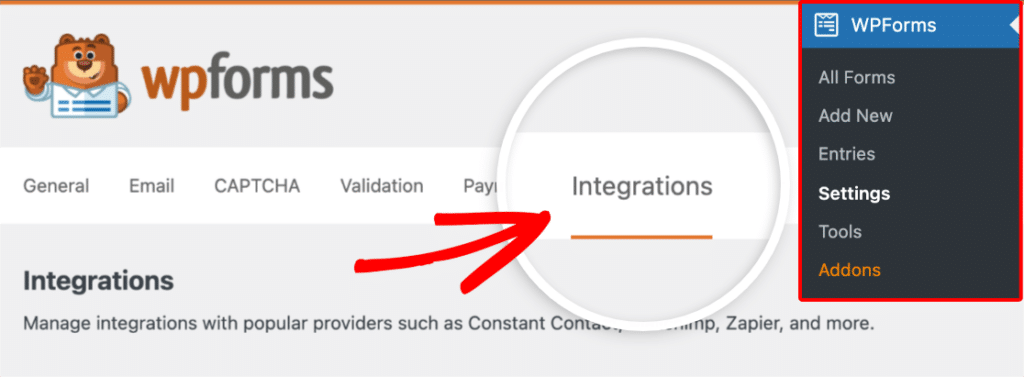Next, click on the **Klaviyo** integration to expand its settings, then click the **Add New Account** button.
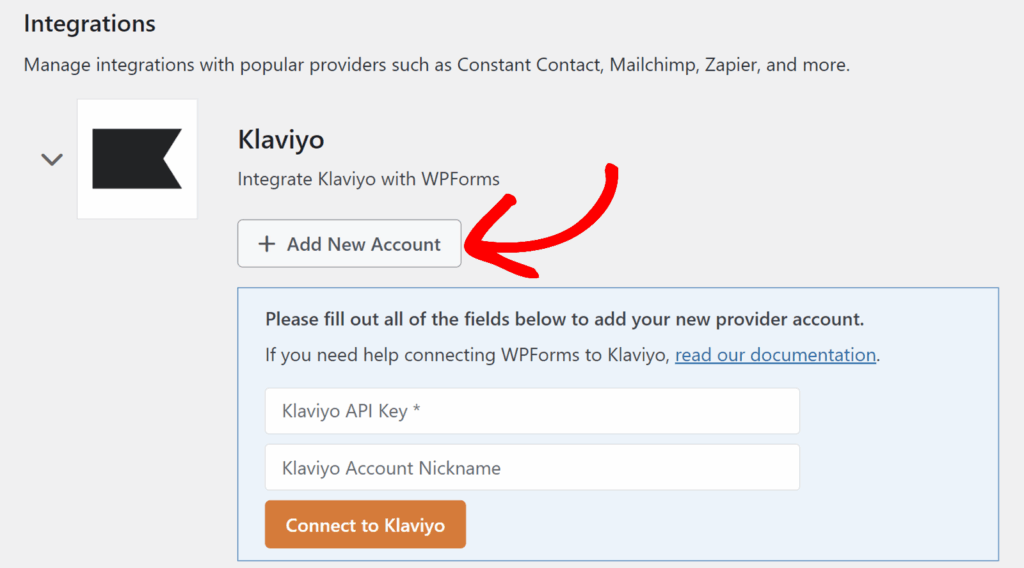A connection form will appear with two fields:
- **Klaviyo API Key:** A private API key generated in your Klaviyo account.
- **Klaviyo Account Nickname:** A label to identify the account later, especially when connecting more than one.
Before filling these in, you’ll need to generate a private API key from your Klaviyo account. We’ll walk through that next, then come back to finish the connection.
### Generating Your Klaviyo API Key
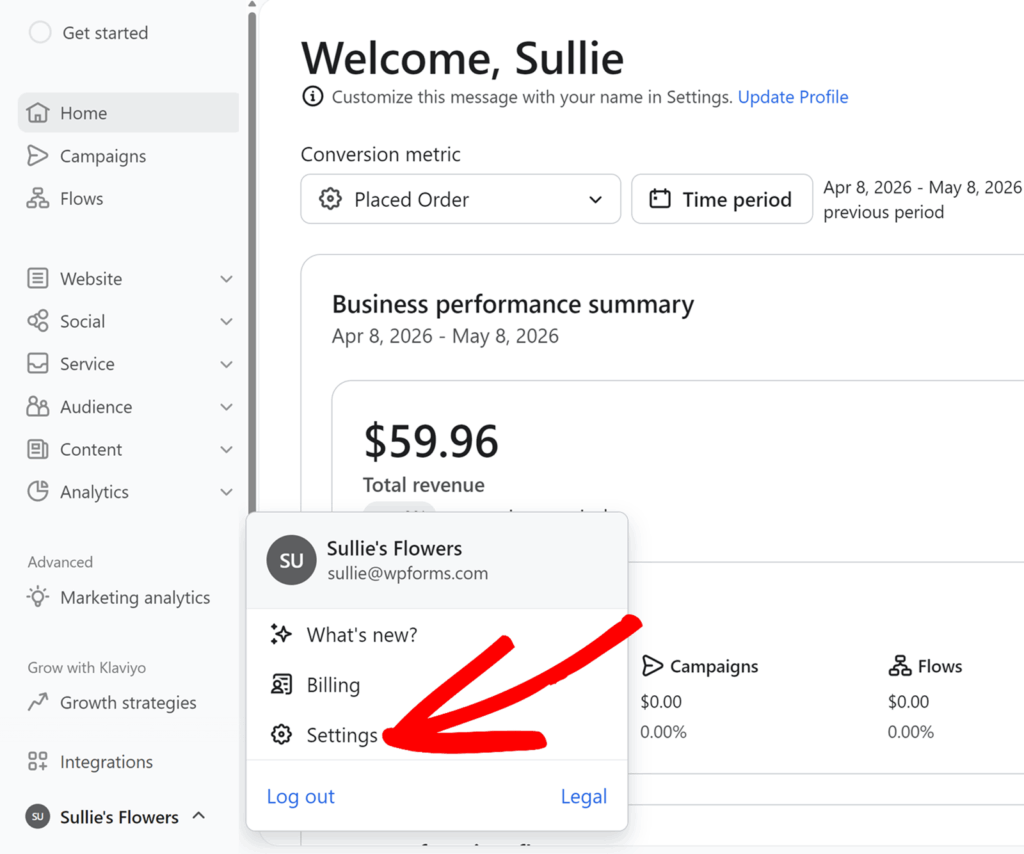
To get started, sign in to your [Klaviyo dashboard](https://www.klaviyo.com/dashboard). Then, in the bottom-left corner, click your account name and select **Settings** from the menu that opens.
**Note:** To skip the navigation, head straight to the [Klaviyo API Keys page](https://www.klaviyo.com/settings/account/api-keys), then jump down to [creating the API key](#create-api-key).
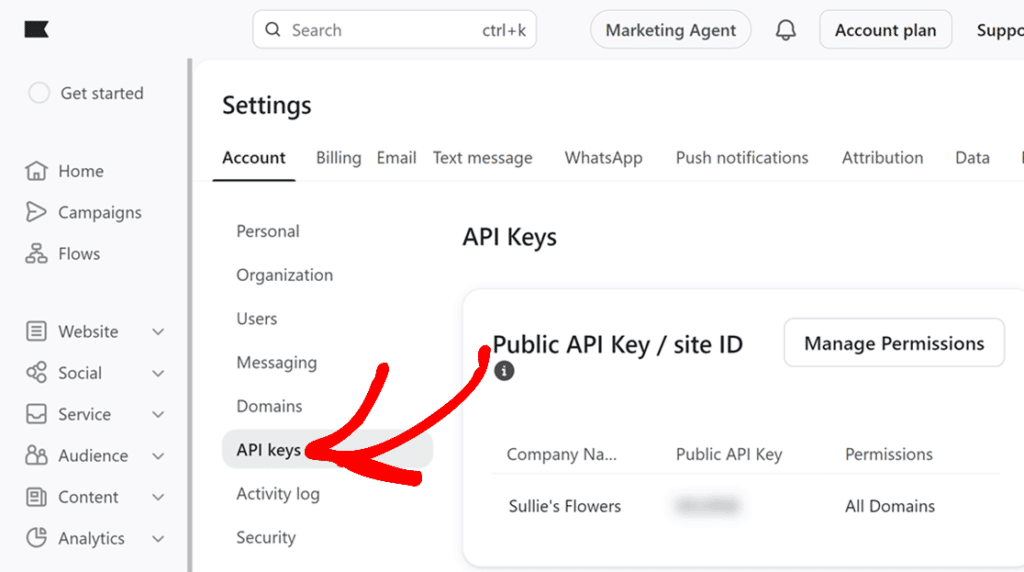
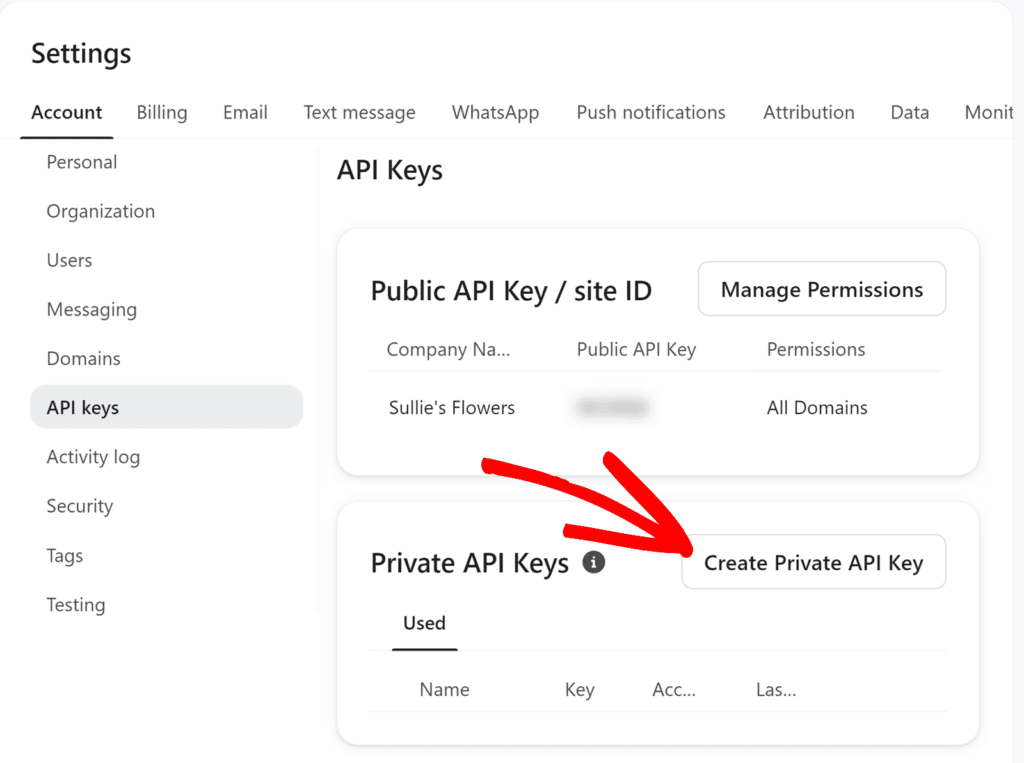
Then, click **API keys** in the left sidebar.
On the API Keys page, click **Create Private API Key** to open the new key form.
On the new key form that opens, give the key a descriptive name in the **Private API Key Name** field so it’s easy to recognize later. Then, under **Select Access Level**, choose **Full Access Key**.
Once the form is configured, click **Create** in the top right.
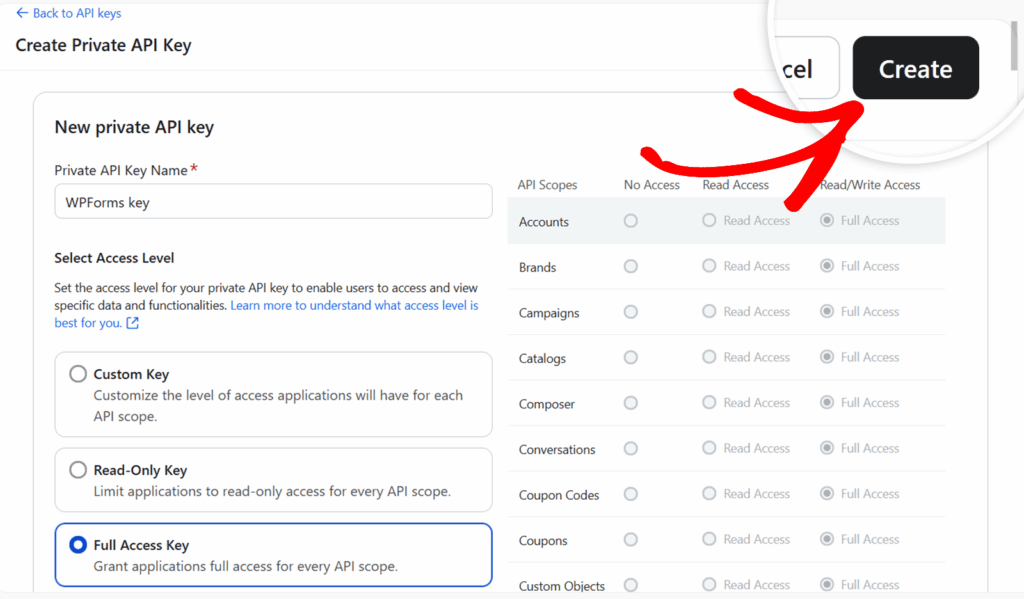**Note:** To scope the key more tightly, choose **Custom Key** instead and grant Read/Write access to Lists, Profiles, and Subscriptions. The integration will not work without all three.
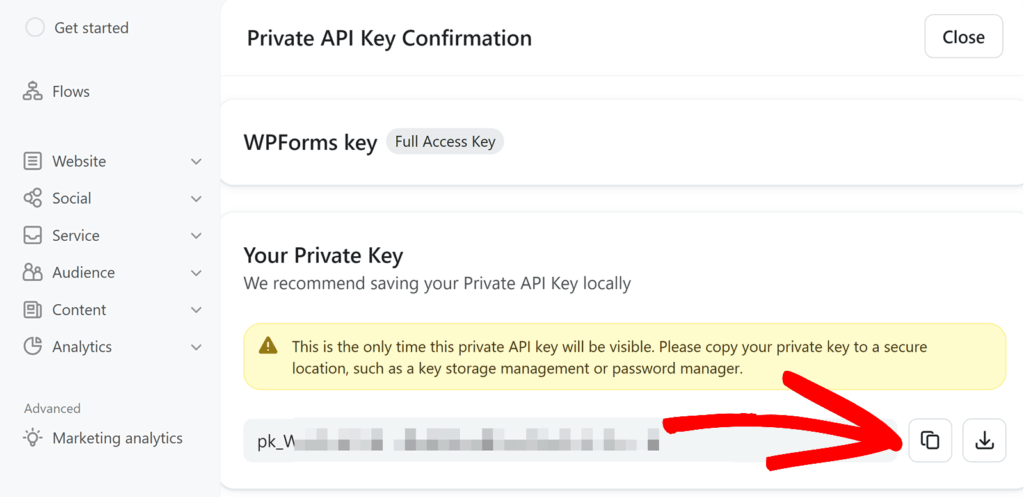
Klaviyo will display the new private API key. Click the copy icon to copy it, since you’ll need it in the next step.
### Finishing the Connection in WPForms
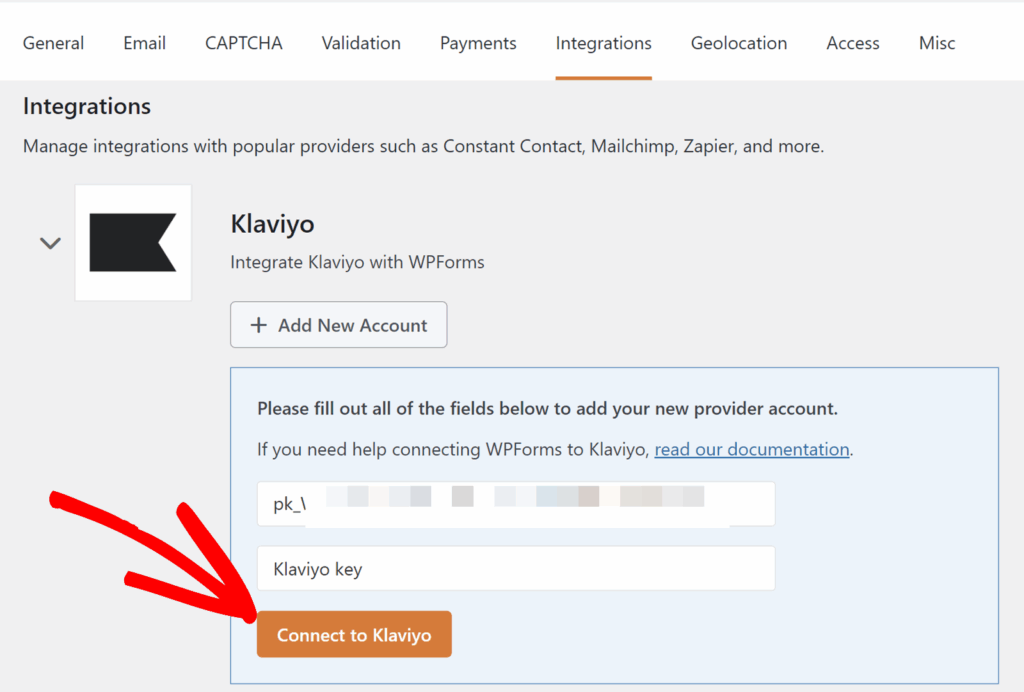
With your API key copied, switch back to the WPForms tab where the connection form is still open.
Paste the key into the **Klaviyo API Key** field, then add a nickname for the account in the **Klaviyo Account Nickname** field. The nickname is just a label to help you identify this account later, especially when connecting more than one.
When both fields are filled in, click **Connect to Klaviyo**.
If the API key is valid, the form will close and the Klaviyo account will appear in the integrations list with a green **Connected** status.
## Adding a Klaviyo Integration to Your Form
With your Klaviyo account connected, the next step is to set up Klaviyo on a form.
To get started, [create a new form](https://wpforms.com/docs/creating-first-form/) or open an existing one for editing. Make sure the form contains at least one **Email** field, since every Klaviyo action requires it.
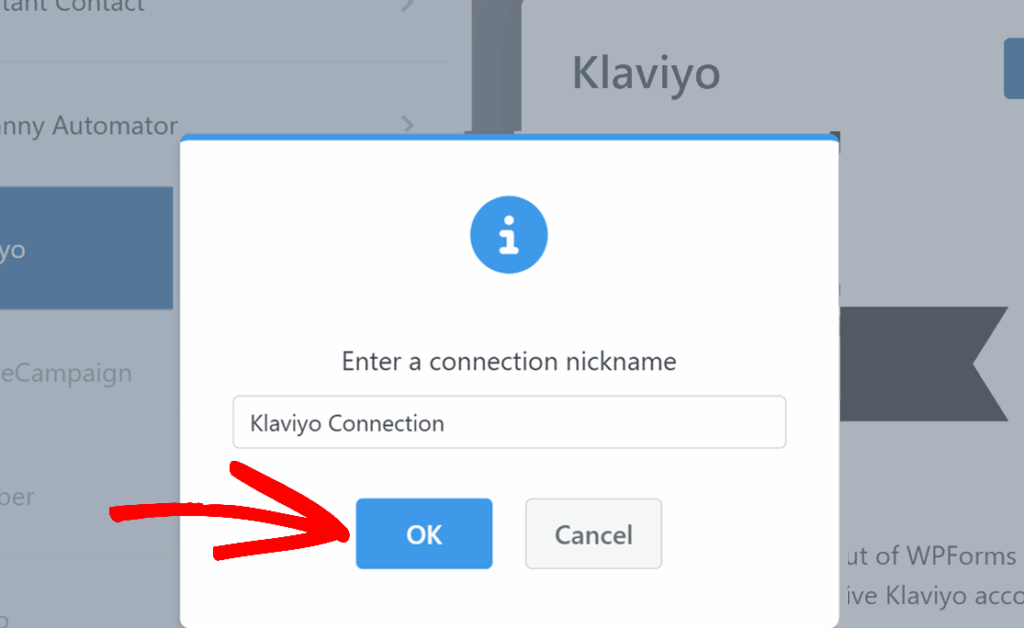
In the form builder, open the **Marketing** tab and select **Klaviyo**. Then click **Add New Connection** in the top right.
A popup will appear asking you to enter a connection nickname. This is for your internal reference only and won’t be visible to users. After entering the nickname, click **OK**.
The Klaviyo Connection settings panel will open. The first field, **Select Account**, is a dropdown of every Klaviyo account you’ve connected to WPForms. Choose the account this connection should use from the dropdown.
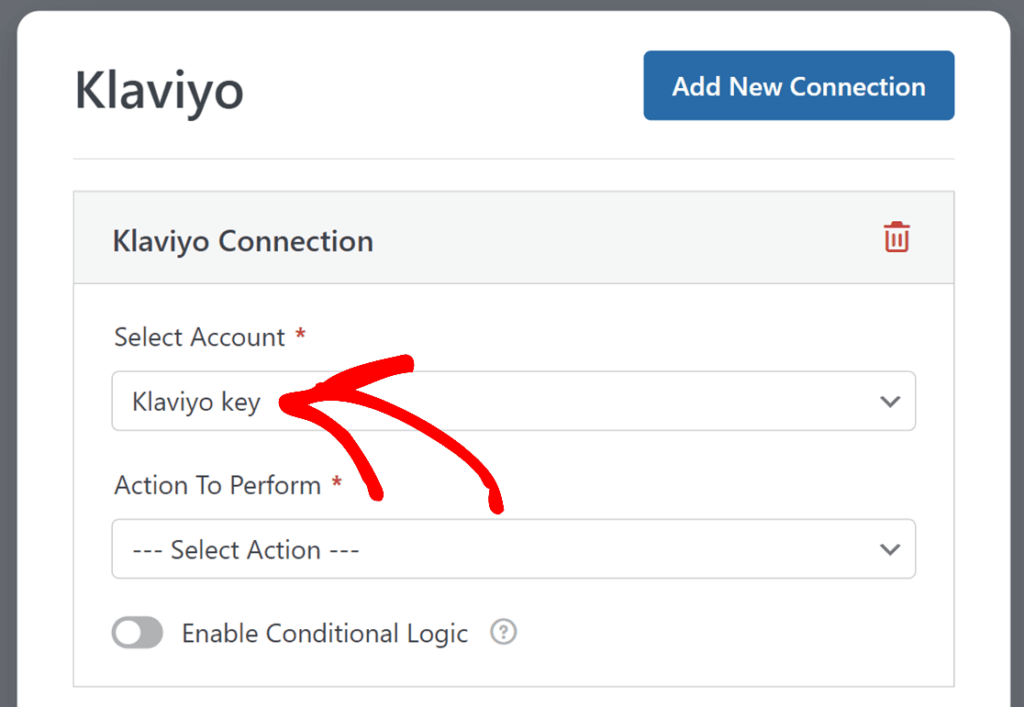The next field is **Action To Perform**. From this dropdown, choose what should happen in Klaviyo when the form is submitted. There are three options:
- [Create / Update Profile](#create-update-profile)
- [Unsubscribe](#unsubscribe)
- [Remove from List](#remove-from-list)
We’ll go through each one below.
### Create / Update Profile
The Create / Update Profile action creates a new Klaviyo profile from a form submission, or updates an existing profile when one with the same email already exists. Beyond updating profile data, this action can also subscribe a contact to email marketing or add them to a specific list.
When updating an existing profile, only the fields included in the submission are changed. Empty fields leave existing values intact, so a partial update never wipes out data already on the profile.
After selecting Create / Update Profile from the Action To Perform dropdown, several configuration fields will appear.
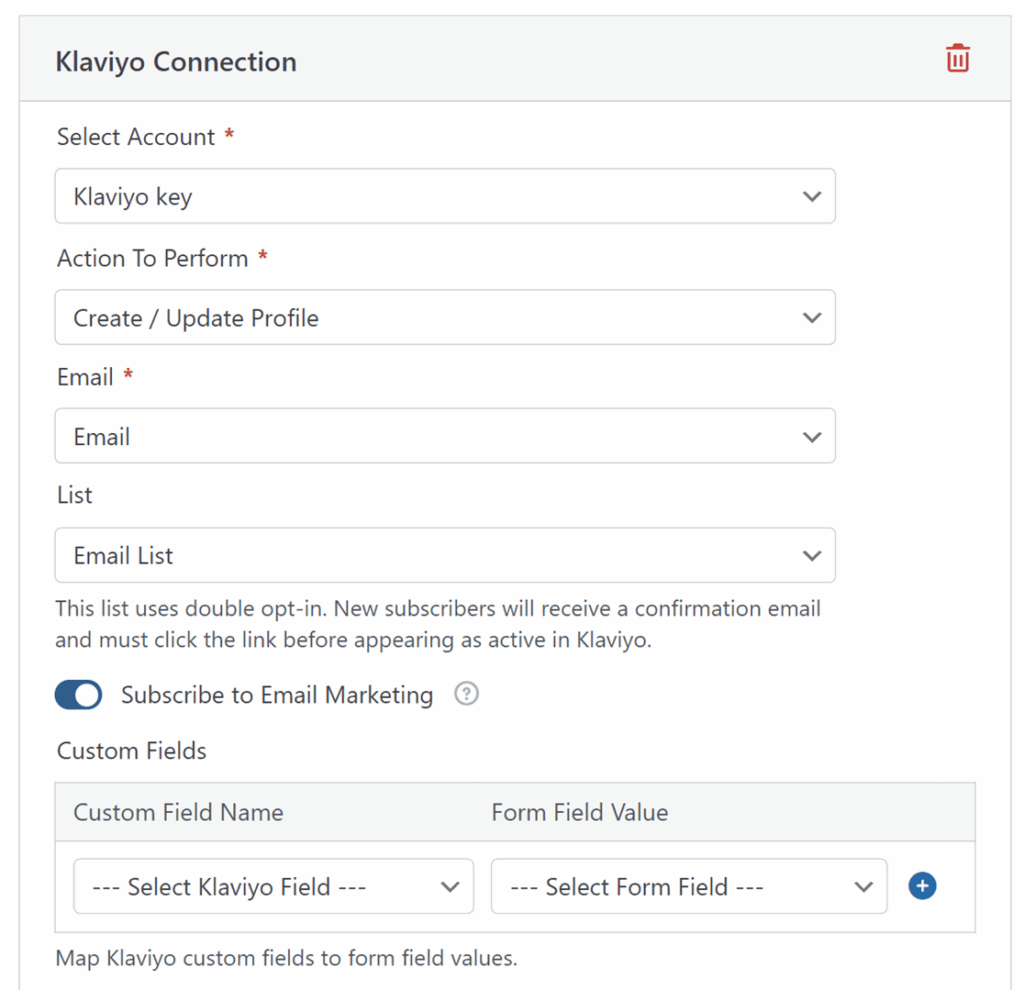#### Email
The Email field is required. Map it to your form’s Email field so Klaviyo knows which contact to create or update.
#### List
The List field is optional. Its dropdown is populated with every list in your connected Klaviyo account, so you can add the contact to whichever list fits the form’s purpose.
To create or update a profile without adding it to any list, leave this dropdown set to the default option.
If you select a list configured for [double opt-in](https://help.klaviyo.com/hc/en-us/articles/115005251108) in Klaviyo, a notice will appear under the dropdown reminding you that new subscribers must confirm their subscription before being added to the list.
#### Subscribe to Email Marketing
The Subscribe to Email Marketing toggle controls whether the profile’s *global* email marketing consent is set to Subscribed in Klaviyo. Without it, a profile can be added to a list as a member but will not receive any marketing emails.
When you select a list, this toggle automatically turns on, since that’s the most common flow. To manage list membership only without changing consent, turn the toggle off manually.
#### Custom Fields
The Custom Fields section is where you map Klaviyo profile properties to your form fields.
In the **Custom Field Name** dropdown, choose a built-in Klaviyo property such as First Name, Last Name, or Phone Number. Then, in the **Form Field Value** dropdown, pick the form field that should populate it.
To add another mapping, click the blue **+** button.
To map to a custom property that doesn’t appear in the dropdown, choose **New Custom Field** from the dropdown. The field will switch to a text input where you can type a property name. If the property doesn’t already exist on your Klaviyo profiles, Klaviyo will create it automatically when the form is submitted.
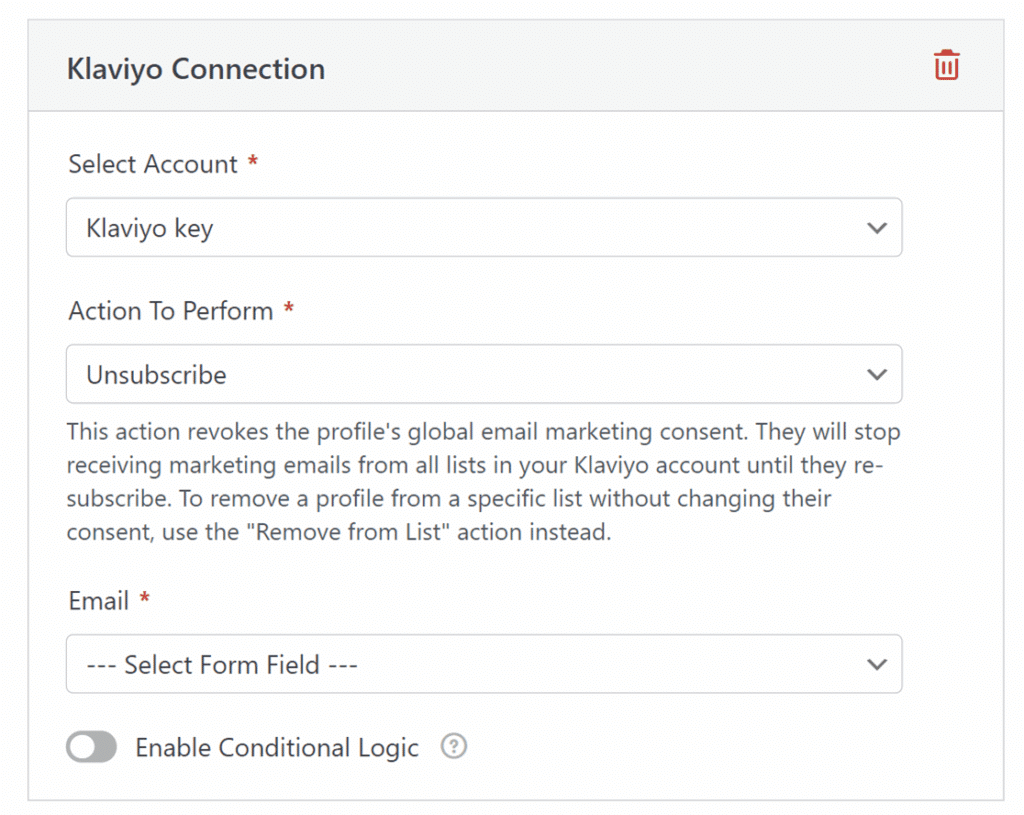
### Unsubscribe
The Unsubscribe action revokes a profile’s global email marketing consent. Once unsubscribed, the profile will stop receiving marketing emails from every list in your Klaviyo account until they subscribe again.
The only required field for this action is **Email**, which you map to your form’s Email field. After saving, any submission to the form will unsubscribe the profile that matches the submitted email address.
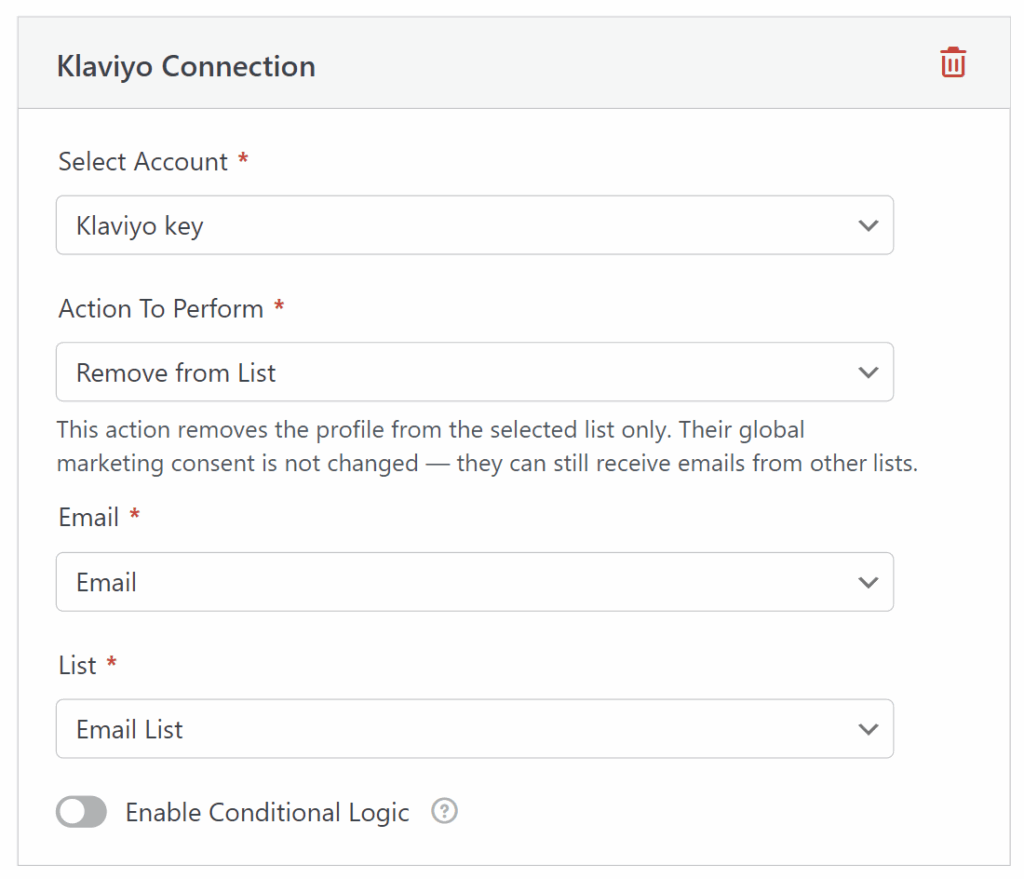
### Remove from List
The Remove from List action removes a profile from a specific Klaviyo list. The profile’s global marketing consent is not changed, so they will continue to receive emails from any other lists they belong to.
This action requires two fields:
- **Email:** Map this to your form’s Email field.
- **List:** Choose the Klaviyo list to remove the profile from.
## Frequently Asked Questions
Below, we’ve addressed some of the most common questions about using the Klaviyo addon.
#### Why didn’t Klaviyo send a confirmation email when I selected a double opt-in list?
Confirmation emails are only triggered when **Subscribe to Email Marketing** is on. By Klaviyo’s API design, adding a profile to a list with the toggle off skips opt-in enforcement entirely. To fire the double opt-in flow, turn the toggle on before saving the form.
#### Why aren’t my phone numbers saving to Klaviyo?
Klaviyo only accepts phone numbers in [international format](https://help.klaviyo.com/hc/en-us/articles/360046055671), meaning every number needs a country code (like +1 for US numbers). WPForms automatically adds +1 to 10-digit US numbers, but for international numbers, the form submission has to include the country code already. Numbers without a valid format are dropped silently and never reach Klaviyo. To avoid this, use a Phone field configured for the country your audience submits from, or remind users to include their country code in the form’s instructions.
---
That’s it! Klaviyo is now connected to WPForms, ready to capture profiles, manage subscriptions, and update list membership from any form on your site.
Next, would you like to control where users land after submitting your form? Take a look at our [tutorial on form confirmation messages and redirects](https://wpforms.com/docs/setup-form-confirmation-wpforms/) for more details.
**Categories:** Marketing Integrations, Addons
---