### [How to Create an Online Event Registration Form [+Template]](https://wpforms.com/how-to-make-an-event-registration-form-in-wordpress/)
**Published:** September 3, 2018
**Author:** Kacie Cooper
**Excerpt:** Got an event coming up? If so, you might want to add a WordPress event registration form to your site.
A form is a great way to sell tickets to your event and skyrocket sales and attendance.
In this tutorial, we'll walk you through how to make a simple event registration for in WordPress.
**Content:**
An online event registration form is a web form that lets visitors sign up for your event, select tickets, and optionally pay — all directly from your WordPress site, no third-party ticketing platform required.
The fastest way to create one is with WPForms. It comes with a ready-made event registration template that includes all the fields you need (name, email, ticket quantity, date selection), plus built-in payment processing through Stripe, PayPal, or Square if you want to sell tickets.
In this tutorial, I’ll walk you through the whole process: from choosing a template to collecting payments and publishing the form on your site. It only takes about 10 minutes, so let’s go!
[Create Your WordPress Event Registration Form Now](https://wpforms.com/pricing/)
## How to Make a WordPress Event Registration Form Using a Template
- [A Few Things to Get Started](#install)
- [Step 1: Install WPForms + Get the Template](#template)
- [Step 2: Customize Your Online Event Registration Form](#customize)
- [Step 3: Configure Event Registration Form Notifications](#notifications)
- [Step 4: Set Up Notifications & Confirmations](#confirmations)
- [Step 5: Add Your Event Registration Form to Your Site](#embed)
- [FAQs on WordPress Event Registration](#faqs)
Here’s a quick video guide that explains how you can make an online registration form using the WPForms plugin for WordPress:
If you’d rather follow written steps, please go through the tutorial below for creating an event registration form in WordPress. **Please Note:** the written steps will be the most up-to-date.
### A Few Things to Get Started
Before we jump into the steps, let’s check off a few prerequisites from our list.
**What you’ll need:**
- WPForms plugin (for payments field)
- A WordPress site
- ~10 minutes
**What you’ll get:**
- A professional registration form with name, email, ticket quantity, and date/time fields
- Automatic confirmation emails sent to every registrant
- Optional payment collection via Stripe, PayPal, Square, or Authorize.Net
- A form you can embed on any page, post, or sidebar on your site
### Step 1: Install WPForms + Get the Template
[](https://wpforms.com/pricing/)The first thing you’ll need to do before you make an event and start selling tickets online is to install and activate the [WPForms plugin](https://wpforms.com/pricing/).
WPForms is the best WordPress form builder. It makes WordPress event registration extremely easy because it includes a drag-and-drop visual interface that allows you to create full-fledged forms without code.
For more details on getting the plugin set up, see this step-by-step guide on [how to install a WordPress plugin](http://www.wpbeginner.com/beginners-guide/step-by-step-guide-to-install-a-wordpress-plugin-for-beginners/ "Step by step guide on How to Install a WordPress Plugin"). You’ll need to pick the [Pro or Elite license level](https://wpforms.com/pricing/) if you want to take payments.
#### Pro Tip
Before installing, decide whether you’ll need payment processing. The Pro license starts at a higher price point but includes payment gateways, while Lite is free but won’t handle transactions.
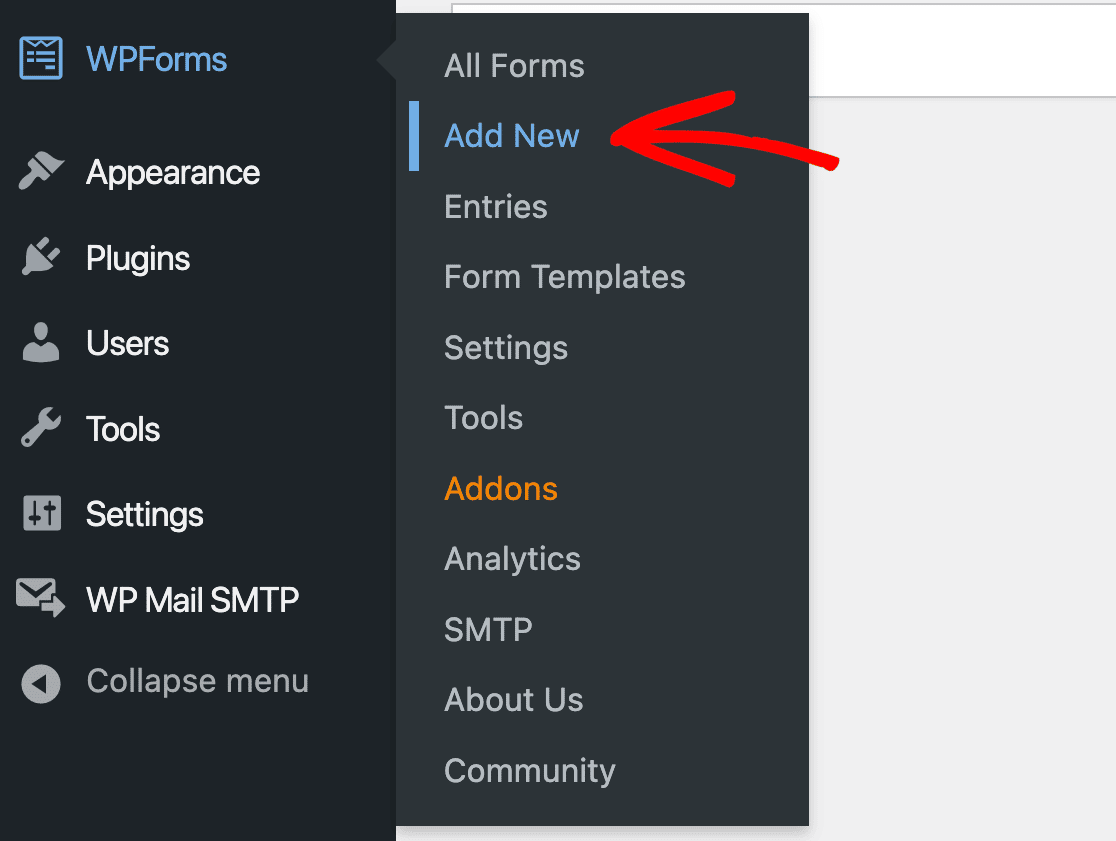
Now, go to **WPForms » Add New** to create a new form.
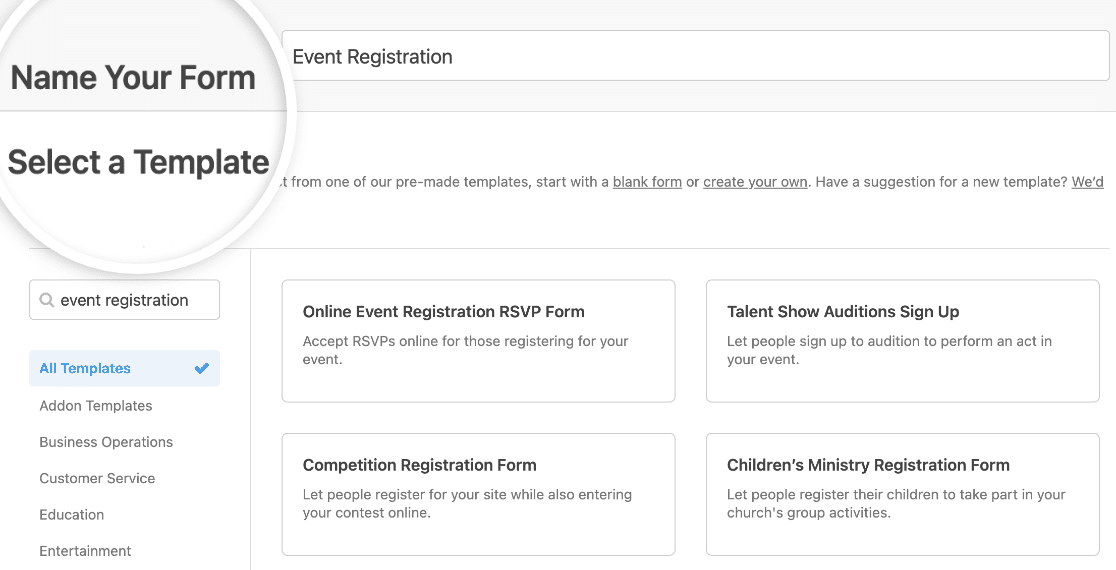
On the setup screen, name your form and scroll down to the templates section.
With WPForms, you can access pre-built [online event planning form templates](https://wpforms.com/templates/category/event-planning/) and [2,100+ industry-specific and niche form templates](https://wpforms.com/templates/) for creating customized forms for your site. This saves you the time needed to add event registration form fields manually.
#### Rather Use AI to Create Your Form?
Form templates are super easy and allow for total customization, but if you’re in a hurry and need a custom form, you might be interested in [WPForms’ AI-powered form creation](https://wpforms.com/the-future-of-forms-is-here-ai-powered-form-creation/). Simply describe what you’re looking for and AI will create it. Review it and tell it any changes you want to make, then load it up in your form builder to publish. [Learn more about WPForms AI Forms](https://wpforms.com/docs/generating-forms-with-wpforms-ai/).
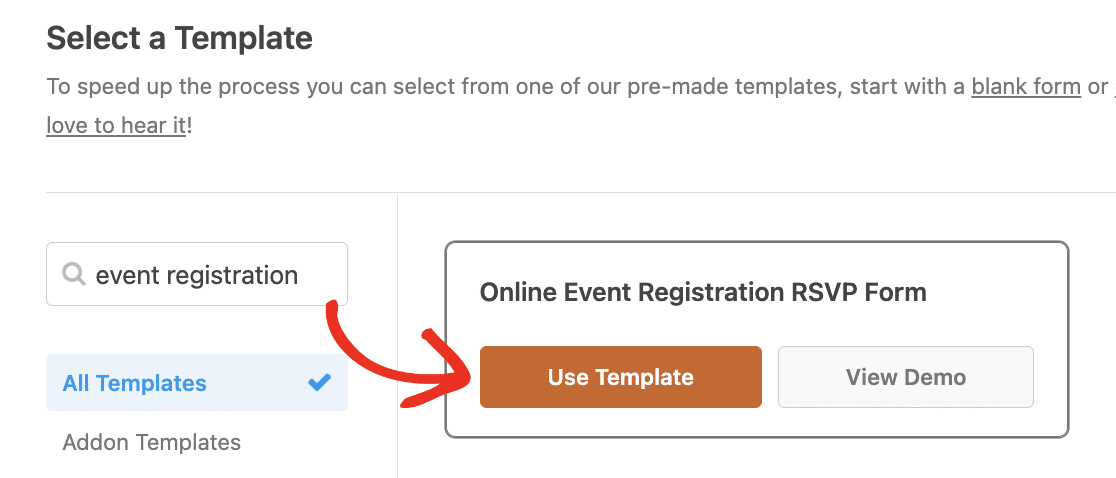
Type “event registration” into the search bar and you’ll see several options for all kinds of events. Click on **Use Template** to load one in the form builder.
Now let’s customize the form our visitors will see on the front end.
### Step 2: Customize Your Online Event Registration Form
You should now see the form builder screen. Many fields from the template will already be included in your form, but you can add, delete, or edit any as you like.
WPForms makes customizing forms easy to do. You’ll see the following form fields on your online event registration form:
- Name
- Email
- Multiple Choice (How did you hear about this event?)
- Single Line Text (If Other)
- Dropdown (Number of tickets needed)
- Date / Time
#### Pro Tip
Don’t overwhelm visitors with too many fields upfront. Stick to essential information for registration (name, email, ticket quantity) and collect additional details through follow-up emails after they’ve committed to attending.
You can even customize the address form field to make event management forms suitable for different countries as media professional Mark Marshall does when he uses [WPForms on client sites](https://wpforms.com/how-mark-marshall-uses-wpforms-to-transform-client-communications/).
If you’re having trouble coming up with multiple choice options or you’re short on time and need to quickly add a list, give [AI Choices](https://wpforms.com/docs/generating-form-choices-with-wpforms-ai/) a try. You can explain what kind of options you want to include for users to select in certain fields, and you’ll get an AI-generated list that you can customize as needed.
You can add more form fields to your event registration form by dragging them from the left-hand panel to the right-hand preview area. You can also customize the fields by clicking on them in the preview and changing the options that appear.
For instance, WPForms makes [collecting payments from your site visitors](https://wpforms.com/how-to-create-a-simple-order-form-in-wordpress/) on your forms easy to do. In fact, WPForms is so flexible, you can collect payments from users right from your forms or wait to collect payments at a later time.
You don’t need to use an eCommerce plugin or make people go through 3rd party checkout.
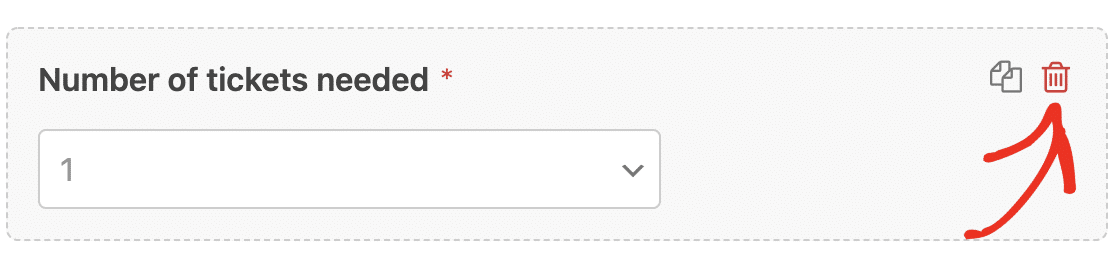
If you want to collect payments for your event, you’ll need to change your Dropdown form field.
To do this, delete the dropdown menu from your form by clicking on the trash icon in the preview area.
Then, scroll down to the **Payment Fields** and add a **Dropdown Items** form field to your form.
Customize the form field, making sure to add the event ticket amounts. If you want to let customers buy more than 3 tickets, simply click on the **plus (+)** button to add another option.
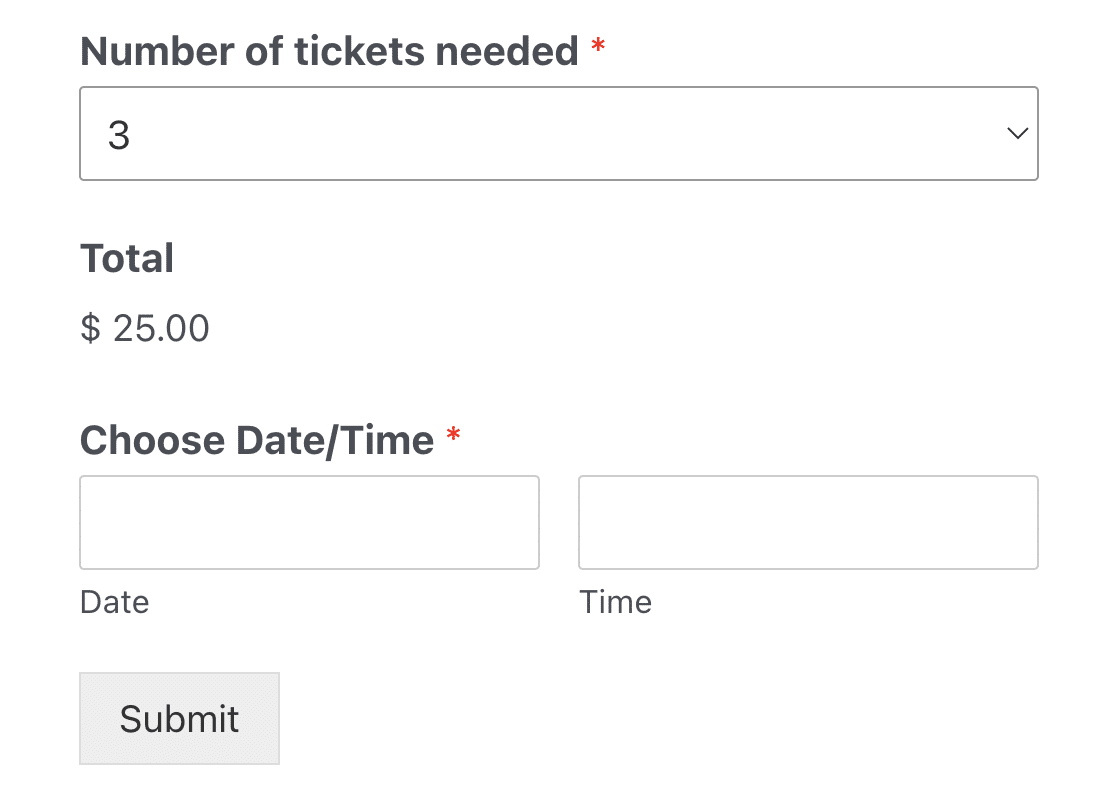
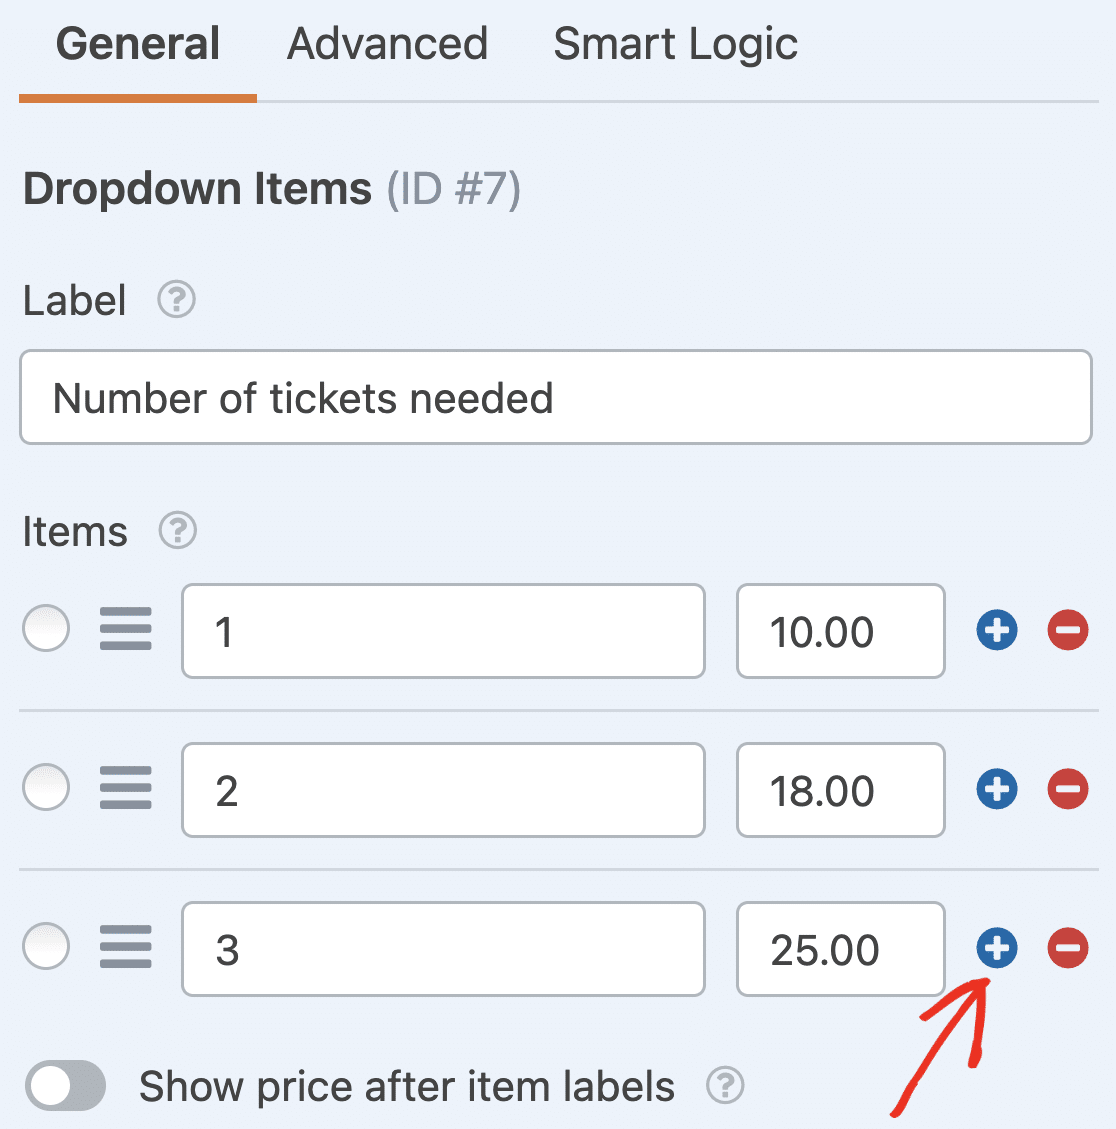If you also add a **Total** field, whenever a site visitor registers for your event and chooses the number of tickets they want to purchase, they’ll see their total.
#### Pro Tip
Always include a “Total” field when using payment dropdowns. This shows users their running total as they select options, reducing cart abandonment and payment confusion.
Then just connect WPForms to your preferred payment gateway. I’ll show you how to do this later in the tutorial.
If you want to bill your attendees at a later date, simply keep the original Dropdown field, let people choose the number of tickets they want to purchase, and send them an invoice after registering for your event.
For help with invoicing your customers, be sure to check out our roundup of the [most affordable invoicing software](https://wpforms.com/the-best-invoicing-software-for-your-wordpress-order-forms/) options available.
When you’re done customizing your event registration form, click **Save**.
### Step 3: Configure Event Registration Form Notifications
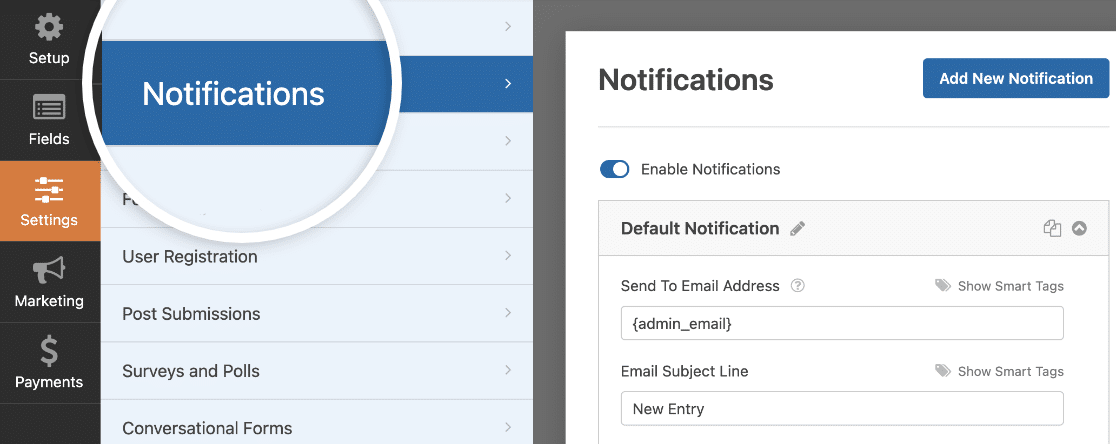
With form email notifications, you can instantly receive an email whenever a new person submits your event registration form.
If you want to change the address where these notifications are sent or edit any part of the email, you can do so from the **Notifications** section in the **Settings** tab.
If you [use Smart Tags](https://wpforms.com/docs/how-to-use-smart-tags-in-wpforms/), you can also send registration confirmation emails using notifications. This lets attendees know you received their registration and ticket purchase and you’ll be in contact shortly.
This assures people their event registration has gone through properly. For help with this step, check out our documentation on [how to set up form notifications in WordPress](https://wpforms.com/docs/setup-form-notification-wpforms/).
#### Pro Tip
Set up automatic confirmation emails to attendees immediately after registration. Include event details, location, and what to expect. This reduces “did my registration work?” support emails and builds confidence.
### Step 4: Set Up Notifications & Confirmations
Form confirmations are messages that display to site visitors once they submit an event registration form on your website. These confirmations give you an opportunity to guide your visitors on what they should expect next.
To edit your confirmations, click on the **Confirmations** tab in the form builder under **Settings**.
The default Confirmation Type is set to Message. You can edit the confirmation message and add more details about the event here. For instance, it might be a good idea to place a Google Maps link to the venue where your event is taking place.
When you’ve customized the confirmation message to your liking, click **Save** at the top of the form builder.
If you want to display different confirmations to registrants based on their behavior, be sure to read up on [how to create conditional form confirmations](https://wpforms.com/docs/how-to-create-conditional-form-confirmations/).
This is useful if you wanted to send site visitors who pre-paid for their tickets to a thank you page and display a confirmation message to those that hadn’t paid yet, informing them that you will be in touch with the next steps.
#### Configure Event Registration Payment Settings (Optional)
If you’re collecting ticket sales from site visitors on your event registration form, you’ll need to configure your form’s payment settings so online payments process the right way.
You can skip this part if you’re collecting an RSVP without payment.
WPForms integrates with [PayPal](https://wpforms.com/addons/paypal-standard-addon/), [Authorize.Net](https://wpforms.com/addons/authorize-net-addon/), [Square](https://wpforms.com/addons/square-addon/), and [Stripe](https://wpforms.com/addons/stripe-addon/) for accepting credit card payments. With PayPal, and Stripe, you can also take payments withVenmo, [Apple Pay](https://wpforms.com/how-to-take-apple-pay-payments-in-wordpress/) and [Google Pay](https://wpforms.com/google-pay-for-wordpress/).
To configure the payment settings on your event registration form, you’ll first have to integrate a payment service with WPForms.
For easy step-by-step instructions, check out our tutorials for payment integrations:
- [Stripe](https://wpforms.com/docs/how-to-install-and-use-the-stripe-addon-with-wpforms/)
- [PayPal Commerce](https://wpforms.com/docs/paypal-commerce-addon/)
- [PayPal Standard](https://wpforms.com/docs/install-use-paypal-addon-wpforms/)
- [Square](https://wpforms.com/docs/how-to-install-and-use-the-square-addon-with-wpforms/)
- [Authorize.Net](https://wpforms.com/docs/how-to-install-and-use-the-authorize-net-addon-with-wpforms/)
Once you’ve done that, click the **Payments** tab in the form builder and select the integration you set up. In our example, we’ll set up Stripe to process orders.
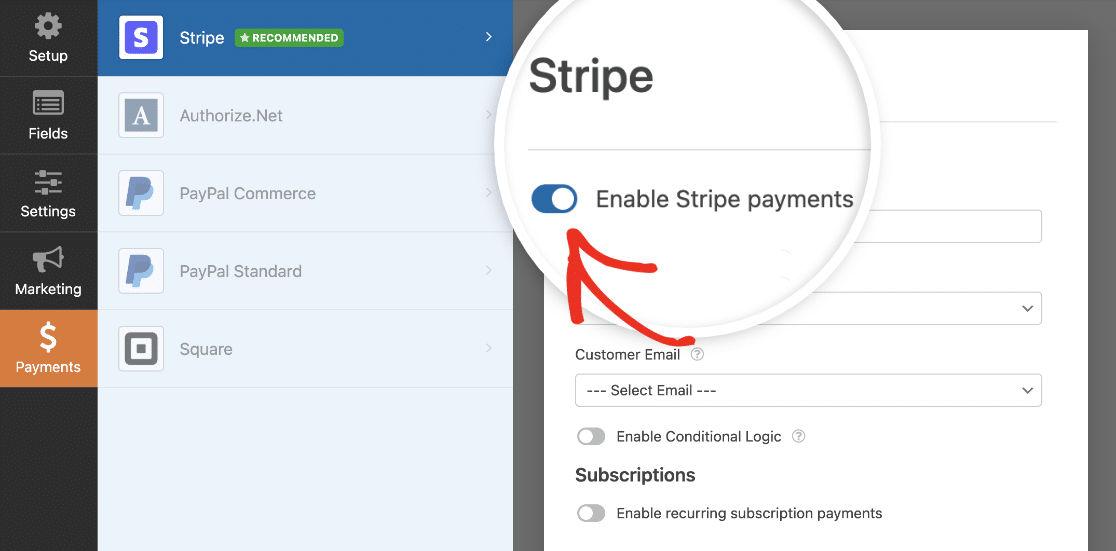Here, you’ll need to enable Stripe payments and fill out some optional but recommended settings such as the Payment Description, Stripe Payment Receipt, and Customer Email. Then, adjust as needed.
After you’re done configuring the payment settings, click **Save** to store your changes.
Be sure to check out our tutorial on [allowing customers to choose their payment method](https://wpforms.com/docs/how-to-allow-users-to-choose-a-payment-method-on-your-form/) if you want to offer different payment options.
Now, you’re ready to add the WordPress event registration form with payment (or without it if you choose) to your site.
While setting up payments is crucial, managing registration ticket sales effectively is equally important. For a comprehensive guide on this topic, be sure to read our article on [managing event ticketing in WordPress](https://wpforms.com/how-to-manage-event-ticketing-in-wordpress/).
### Step 5: Add Your Event Registration Form to Your Site
After you’ve set up an event registration form, you need to embed it on your WordPress site.
Unlike many event management plugins, WPForms lets you [add your forms to multiple locations](https://wpforms.com/how-to-embed-a-form-on-your-website/) on your website, including your blog posts, pages, and even [sidebar widgets](https://wpforms.com/how-to-add-a-contact-form-in-wordpress-sidebar-widget/). No shortcode is required in the block editor!
Let’s take a look at the most common placement option: WordPress page or post embedding.
To begin, create a new page or post in WordPress, or open an existing one for editing.
After that, click on the **plus (+)** icon to add a new block. Then select the WPForms block.
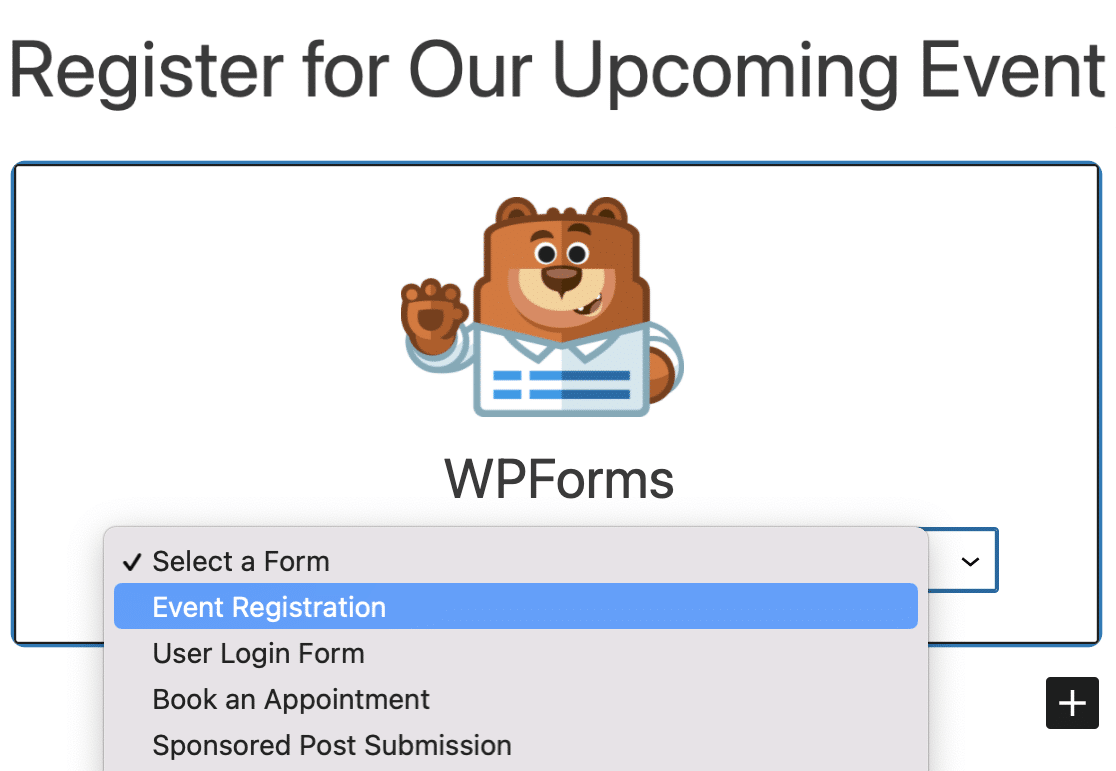
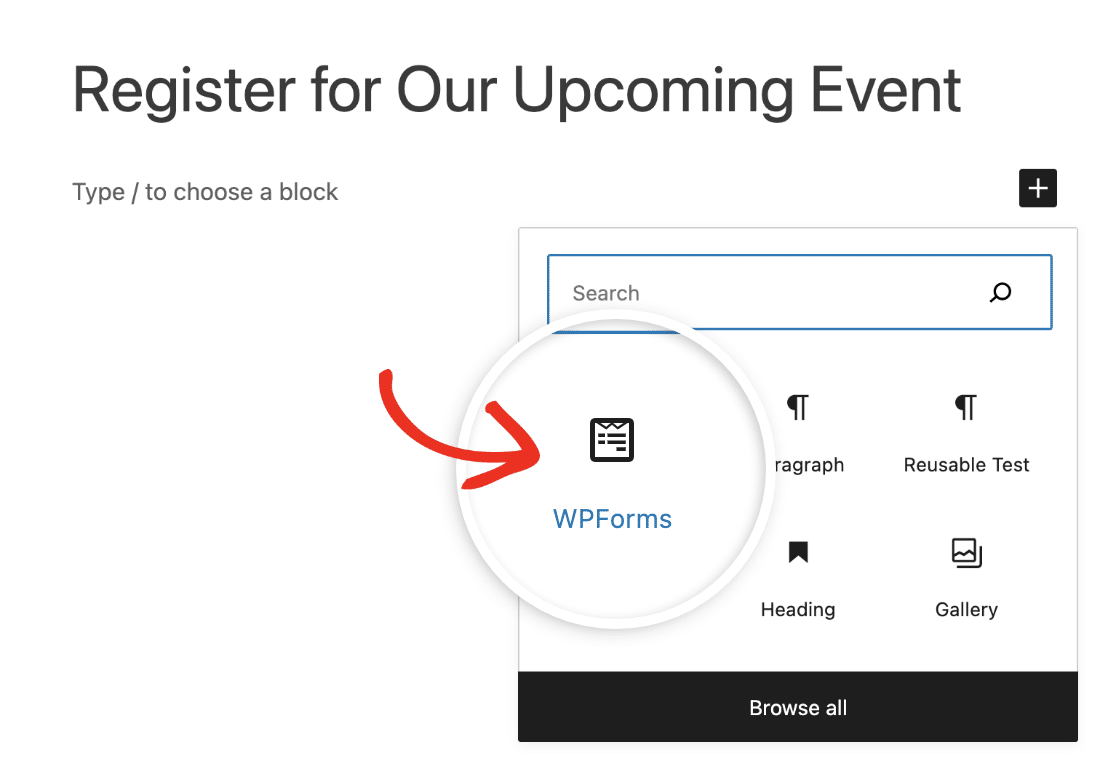The handy WPForms widget will appear inside your block. Click on the dropdown and select your Event Registration Form.
#### Pro Tip
Create a dedicated event page rather than embedding the form in a blog post. This gives you better control over SEO, sharing, and provides a professional landing experience for potential attendees.
You’ll want to add your event information to the page here. You might also want to optimize your event page for SEO to get more traffic.
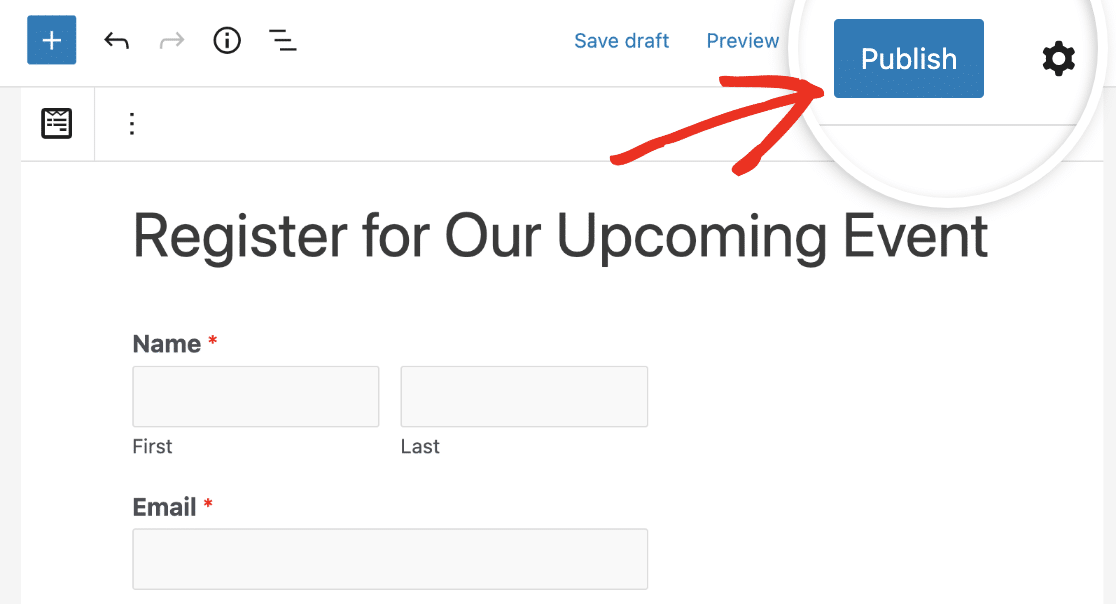
Then, publish or update your post or page so your online event registration and ticketing form will appear on your website and start accepting submissions.
And there you have it! You now know how to create an online event registration form and can start selling tickets and promoting your events online.
[Create Your WordPress Event Registration Form Now](https://wpforms.com/pricing/)
### FAQs on WordPress Event Registration
Here are some questions we frequently receive from visitors about event registration in WordPress:
#### Why Do I Need an Event Registration Form in WordPress?
An event registration form on your WordPress website allows you to manage attendees and save their information right in your WordPress dashboard.
This involves accepting payments for your event tickets with the same form to expedite the registration process.
In contrast, using social media and other platforms for event management can be restrictive. You can’t freely promote your event or create a signup process that’s completely to your liking.
Ideally, you should add an event management form to your WordPress site so that you can oversee everything related to your event in a single place.
#### What Should Be Included in an Event Registration Form?
An event registration form should include fields for collecting contact information and allow visitors to request tickets or passes for the event.
These fields are enabled by default if you use the WPForms event registration form template. Plus, you can customize any of these fields to match the specifications of your particular event.
Ultimately, the goal is to allow visitors to register for your event as effortlessly as possible.
#### How Do You Ask Someone to Register for an Event?
An event registration form is the best way to ask people to register for your event. However, it’s important to promote your event registration form so the maximum number of people can learn about your event and register for it.
You can promote your event on your social media and also by sending email newsletters. Make sure to include a link to your event registration form in your emails and social media posts so that people can easily find your form and register through it.
#### How Do I Show Events in WordPress?
You can show upcoming events on your WordPress site using The Events Calendar plugin. Apart from displaying events, this plugin can also integrate with WPForms and [accept user-submitted events](https://wpforms.com/create-a-user-submitted-events-calendar-in-wordpress/) from the frontend of your website.
This is really useful if you’re a community-centered site and want to invite people to add events to your site directly by using a form.
#### Can I Limit How Many People Can Register for My Event?
Yes, you can. WPForms offers a [Form Locker addon](https://wpforms.com/features/form-locker-addon/) that lets you cap the total number of submissions a form will accept. This is helpful if you’re hosting a limited-seating event.
Just note that this type of limit applies to individual form entries — so if one person registers multiple attendees within the same form, those extra spots won’t be counted unless you track them manually or set up advanced logic.
### Next, Automatically Send Receipts to Your Attendees
Want to learn more about what you can do with the best form builder plugin for WordPress? If you’d like to automatically open and close event registrations on a certain date, check out this guide to setting a [form expiration date](https://wpforms.com/how-to-enable-wordpress-form-scheduling-step-by-step/).
You can also create a [group registration form](https://wpforms.com/how-to-make-a-group-registration-form-using-wpforms/) for your attendees using repeatable fields. With the repeater field, your website visitors can add and remove fields as needed allowing you to seamlessly collect data of multiple attendees at once..
And be sure to check out our tutorial on [how to automatically send a WordPress order form email receipt](https://wpforms.com/how-to-automatically-send-a-wordpress-order-form-email-receipt/) so you can give attendees who have pre-paid for your event proof that they paid.
[Build Your WordPress Form Now](https://wpforms.com/pricing/)
Ready to build your form? Get started today with the easiest WordPress form builder plugin. [WPForms Pro](https://wpforms.com/pricing) includes lots of free templates and offers a 14-day money-back guarantee.
If this article helped you out, please follow us on [Facebook](https://facebook.com/wpforms) and [Twitter](https://twitter.com/easywpforms) for more free WordPress tutorials and guides.
**Categories:** WordPress Tutorials
**Tags:** events, online event registration, registration, user registration forms, wordpress form
---