### [How to Configure Your WordPress Email Settings (The RIGHT Way)](https://wpforms.com/how-to-configure-your-wordpress-email-settings-the-right-way/)
**Published:** June 10, 2022
**Author:** Osama Tahir
**Excerpt:** Do you want to configure your WordPress email settings?
If your WordPress emails aren't reaching recipients or landing in spam, it's because WordPress uses an unreliable method called PHP mail() leads to deliverability problems.
Email providers like Gmail don't trust these unauthenticated messages, so they block or spam them. The solution is SMTP (Simple Mail Transfer Protocol).
In this post, I'll show you how to configure your WordPress email settings correctly to ensure swift and reliable delivery at all times. The entire setup takes 15-20 minutes, and you'll fix delivery issues permanently.
**Content:**
Do you want to configure your WordPress email settings?
If your WordPress emails aren’t reaching recipients or landing in spam, it’s because WordPress uses an unreliable method called PHP mail() leads to deliverability problems.
Email providers like Gmail don’t trust these unauthenticated messages, so they block or spam them. The solution is SMTP (Simple Mail Transfer Protocol).
In this post, I’ll show you how to configure your WordPress email settings correctly to ensure swift and reliable delivery at all times. The entire setup takes 15-20 minutes, and you’ll fix delivery issues permanently.
- [How to Configure Your WordPress Email Settings](#aioseo-how-to-configure-your-wordpress-email-settings-5)
- [Step 1: Choose an Email Provider](#step-1-choose-an-email-provider)
- [Step 2: Authorize Your WordPress Domain](#step-2-authorize-your-wordpress-domain)
- [Step 3: Connect Your WordPress Site to SMTP](#step-3-connect-your-wordpress-site-to-smtp)
- [Step 4: Choose From Email & From Name (Sender Details)](#step-4-choose-from-email-from-name-sender-details)
- [Step 5: Complete Your Email Setup](#step-5-complete-your-email-setup)
- [Step 6: Test Your WordPress Emails](#step-6-test-your-wordpress-emails)
Configuring email settings in WordPress is much more straightforward when you understand why it goes wrong in the first place.
So before we touch the plugin, let’s walk through what’s actually broken with the default setup. Then we’ll fix it for good with a proper SMTP configuration.
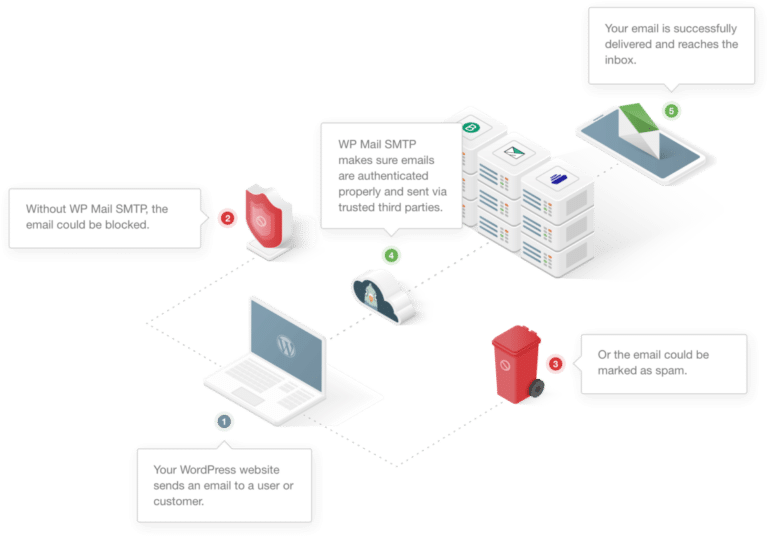
### Why WordPress Emails Fail by Default
WordPress ships with the PHP `mail()` function as its built-in email mechanism. It works in theory, but it fails in practice for three reasons.
- First, the messages it sends carry no authentication. They have no SPF, DKIM, or DMARC signing, which are the records modern email providers check before accepting a message. Without those, an email looks exactly like a forged message from a spammer.
- Second, most shared WordPress hosting uses IP addresses that are shared across hundreds of other sites. If one of those sites sends spam, the reputation hit is on the whole IP. Your honest password reset email gets blocked for someone else’s behavior.
- Third, the `mail()` function provides no error reporting and no delivery logs. When emails fail, you have no way to know they failed, who didn’t receive them, or why. You only find out when a customer complains that they never got their order confirmation.
The fix is to stop using PHP `mail()` altogether and route every WordPress email through an authenticated SMTP service instead. That’s what the rest of this guide walks you through.
### How SMTP Fixes WordPress Email Deliverability
SMTP stands for Simple Mail Transfer Protocol. It’s the same standard your regular email account uses, and it requires your messages to be authenticated before they’re sent. When you switch your WordPress site to SMTP, three things happen.
- Every email gets cryptographically signed with DKIM, which proves the message came from your domain.
- Your domain’s SPF record tells receiving servers that the SMTP service is allowed to send on your behalf.
- And your DMARC policy tells them what to do with anything that fails those checks.
To make this happen on your WordPress site, you need two things. First, an SMTP service (sometimes called a transactional email service or a mailer).
Second, a plugin like WP Mail SMTP that hands every outgoing WordPress email to that service instead of to PHP `mail()`. The next sections cover both, starting with the mailer.
## How to Configure Your WordPress Email Settings
Configuring WordPress email settings is really easy if you already have your domain connected with a mailer. If not, follow the step-by-step tutorial below to complete your WordPress email configuration using WP Mail SMTP.
### Step 1: Choose an Email Provider
First, you’ll need to create an account with an email provider to handle your emails. Think of this like an email account that’s solely dedicated to sending emails from your site.
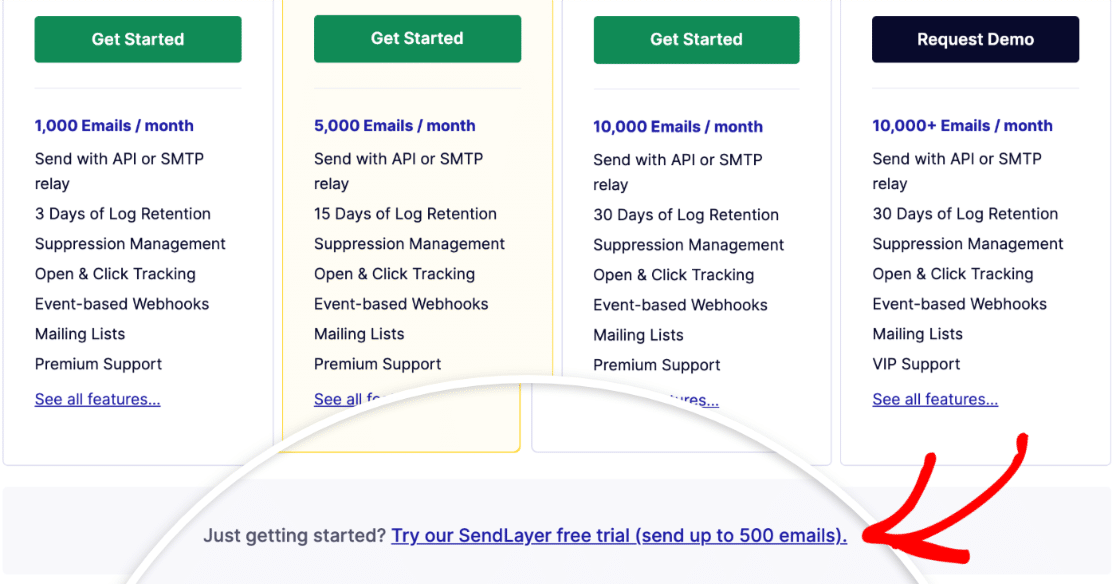
SendLayer is our top recommended mailer service. Here’s our detailed[ SendLayer review](https://wpforms.com/sendlayer-review/) if you want to know why we recommend it.
To start creating your account, visit the [SendLayer pricing page](https://sendlayer.com/pricing/) and and choose a plan based on your monthly email volume.
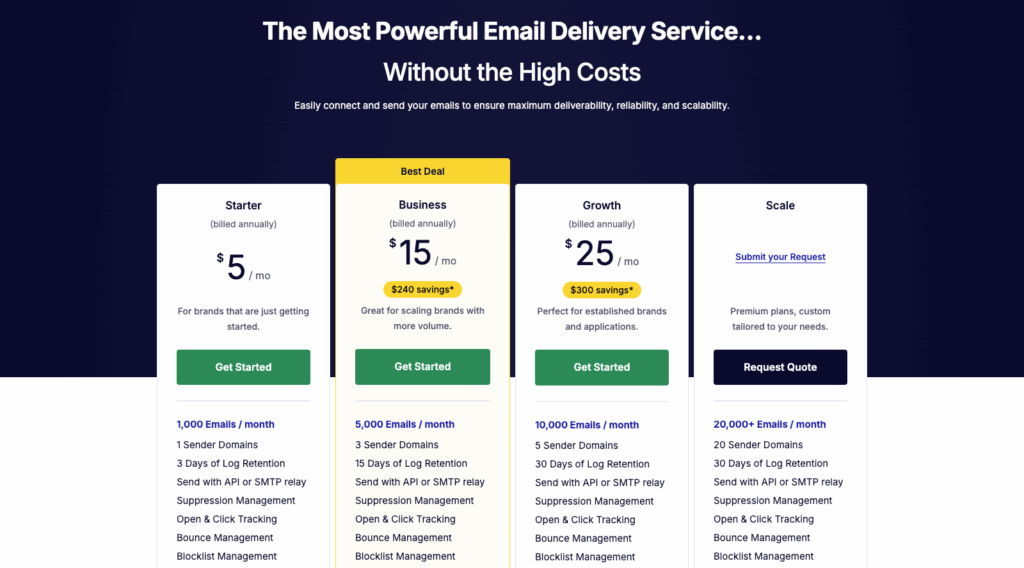If you’re just starting out or want to test SendLayer first, click the Free Trial link. The free trial lets you send emails immediately without payment information.
Next, provide your name, email, and credit card information as requested. When the account signup is complete, click on **Continue To Dashboard**.
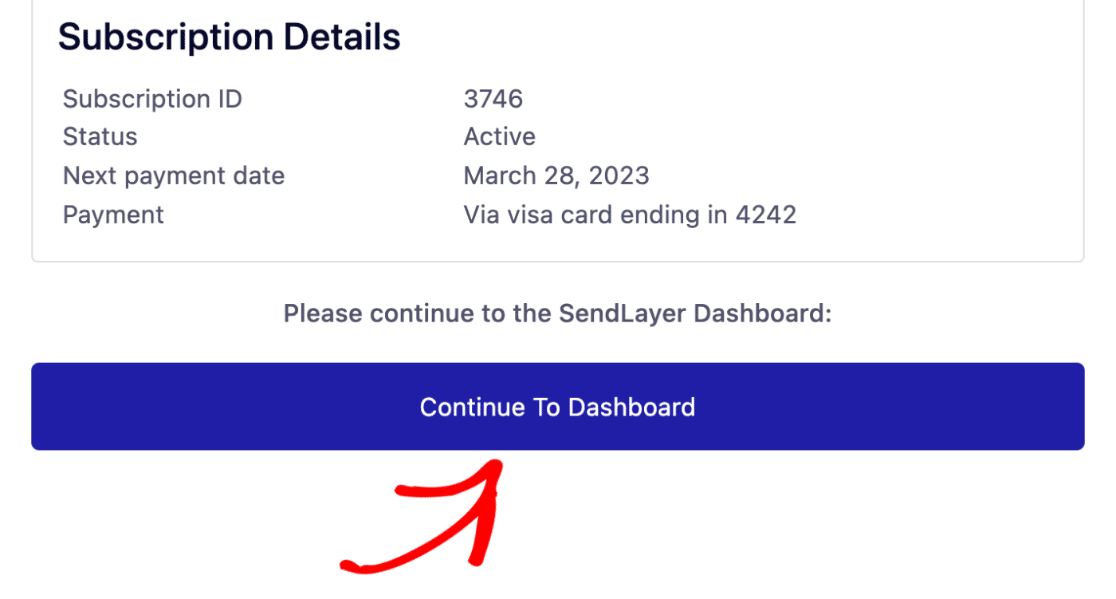Great! You’ve just set up your SendLayer mailer account. Next, we’re going to add your domain to your SendLayer account.
##### Pro Tip
Estimate how many emails your WordPress site sends monthly before choosing a plan. Form notifications, user registrations, password resets, comment notifications, and WooCommerce orders all count.
A typical small business site sends 500-2,000 emails per month. Choose a plan slightly above your estimate to avoid missed form notifications and angry customers.
### Step 2: Authorize Your WordPress Domain
Domain authorization is important to ensure reliable email sending from your WordPress site. Authorizing your domain allows email servers to recognize you as a verified sender.
The authorization process involves adding DNS records (technical identifiers) to your domain that email servers check before accepting your messages.
Once these records are in place, email providers like Gmail trust your emails and deliver them to inboxes instead of spam folders.
To authorize your domain with SendLayer, go to your SendLayer account dashboard and click on **Add Domain.**
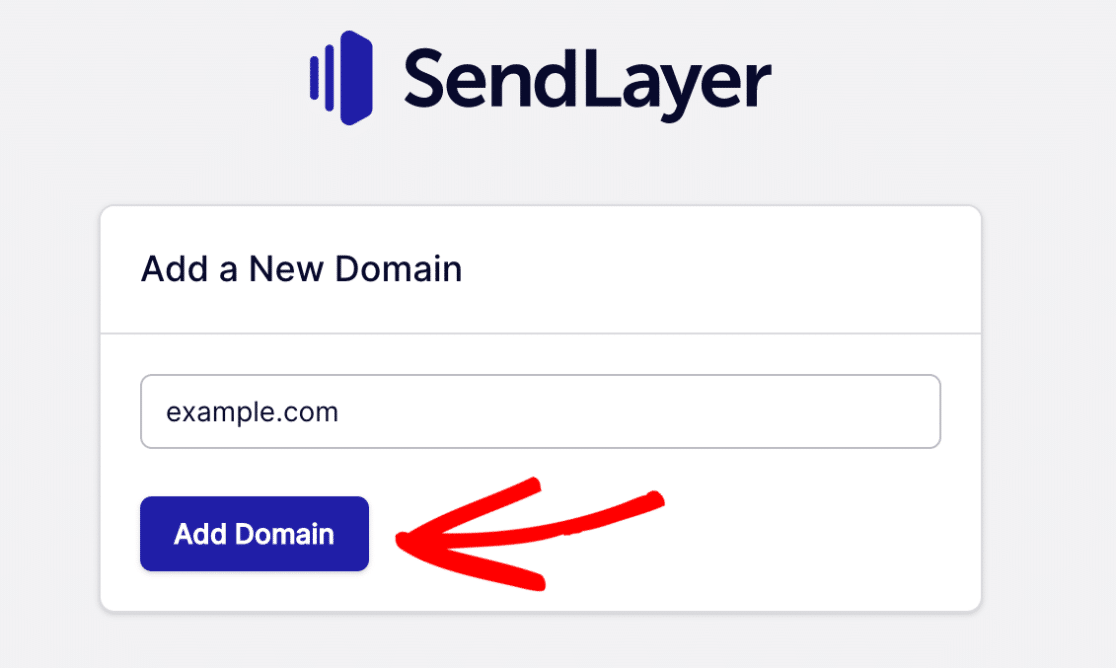
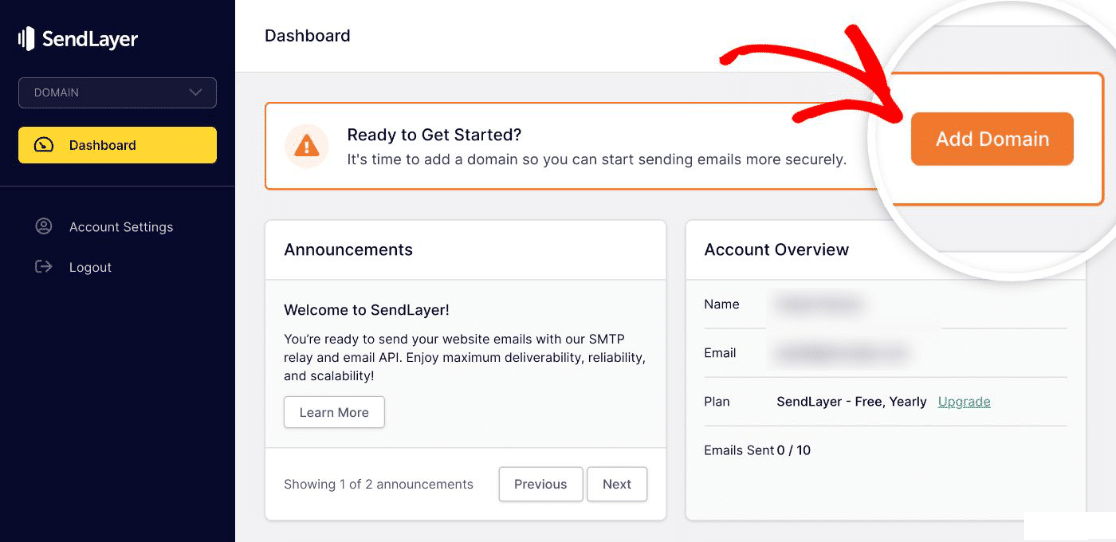Enter the domain name of the email address (example: yourbusiness.com) that you want to set up as your sender. Then click on **Add Domain**.
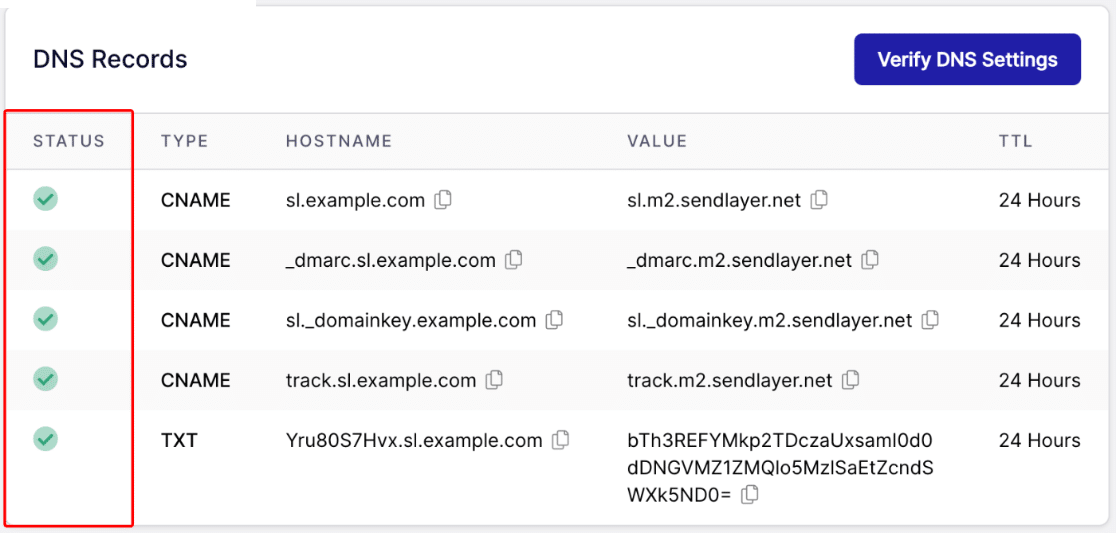
SendLayer automatically generates 5 DNS records for your domain. These records authenticate your emails and improve deliverability.
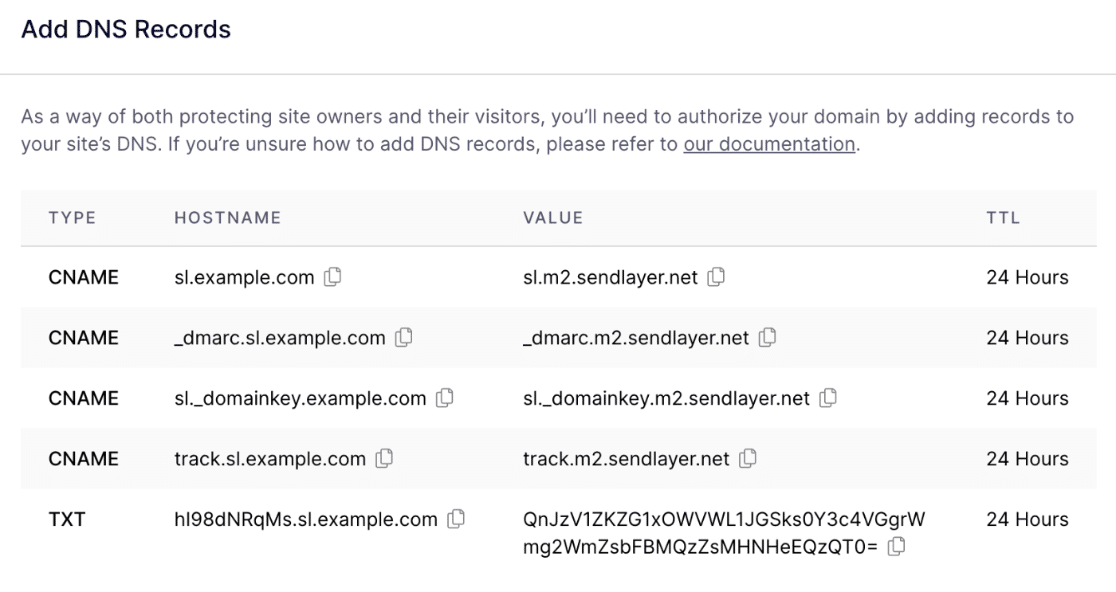Copy these records and paste them into your website’s DNS settings one by one. You’ll usually find these DNS settings in the WordPress hosting account for your site.
Once you’ve added the required DNS records, checkmark the box next to the text **I have added these DNS records and am ready to proceed.** Then, press the **Verify DNS Records** button.
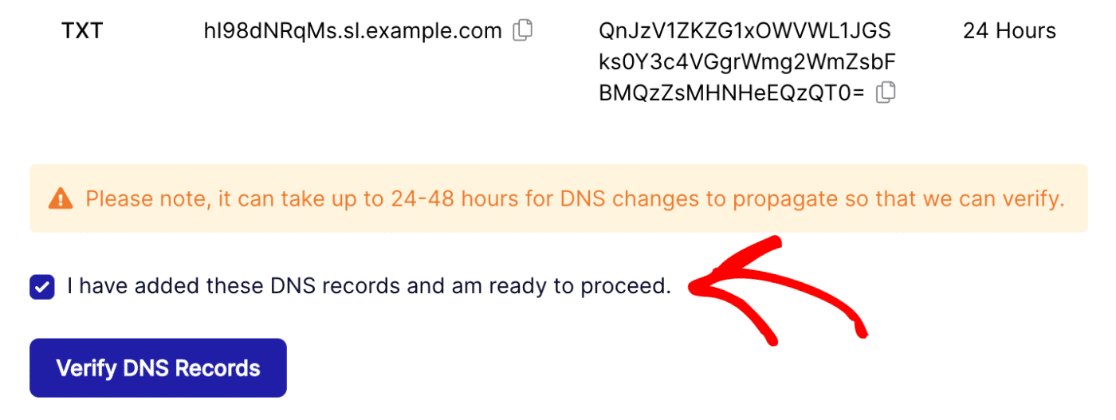Keep in mind that it may take up to 48 hours for the DNS changes to take effect, though most complete within 1-2 hours.
To check your domain authorization status, return to your SendLayer dashboard and click on **Settings** from the vertical navigation on the left.
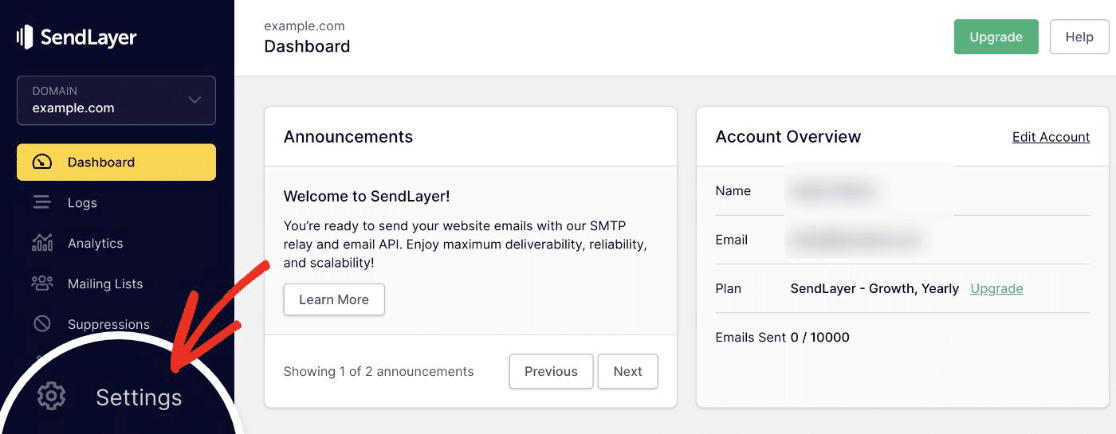Now, click on the **DNS Record & Settings** tab from the horizontal navigation bar on the top of the page.
If the DNS settings have been successfully verified, you’ll see a green symbol under the **Status** column for each type of DNS record.
If you need help changing DNS settings of your site, check out this guide on [adding DNS records for your site](https://wpmailsmtp.com/docs/how-to-add-dns-records-for-wp-mail-smtp-setup/).
##### Important
Some users skip this step thinking the API connection is enough. Without domain authorization, email providers see your messages as coming from an unverified source and automatically route them to spam.
The DNS records prove domain ownership and enable SPF, DKIM, and DMARC authentication, which determine whether your emails reach inboxes.
### Step 3: Connect Your WordPress Site to SMTP
WordPress doesn’t allow you to use SMTP or an external mailing service. We can fix that with a plugin. We’re going to set up WP Mail SMTP in WordPress so we can connect your site to SendLayer.
If you haven’t already got an email plugin, [install and activate the WP Mail SMTP plugin](https://wpmailsmtp.com/docs/how-to-install-the-wp-mail-smtp-plugin/) on your site. WP Mail SMTP is the most reliable plugin for replacing WordPress’s broken PHP mail() function with proper SMTP delivery.
Once WP Mail SMTP is installed and activated, click on **WP Mail SMTP » Settings** from your WordPress admin area.
This settings page is where you’ll configure all your email options. The next three steps walk you through each section.
##### Note
WP Mail SMTP is the most actively maintained SMTP plugin with over 3 million installations. Other SMTP plugins often conflict with contact form plugins, have outdated code that causes compatibility issues, or lack proper support.
WP Mail SMTP is built by the WPForms team and integrates seamlessly with all major form plugins, email services, and WordPress features. If you’ve tried other SMTP plugins that didn’t work, uninstall them completely before installing WP Mail SMTP to avoid conflicts.
### Step 4: Choose From Email & From Name (Sender Details)
The From Email is the email address that all of your website’s emails are going to be sent from. This email address should use the same domain that you just authorized with SendLayer.
If you have a [business email address](https://wpforms.com/how-to-setup-a-free-business-email-address/), it will look like `you@example.com`. Scroll down the settings page to the mail section. Then, enter your email address within the **From Email** field.
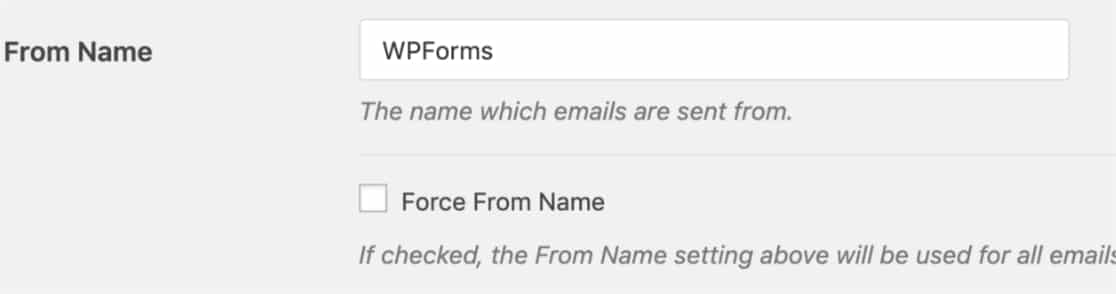
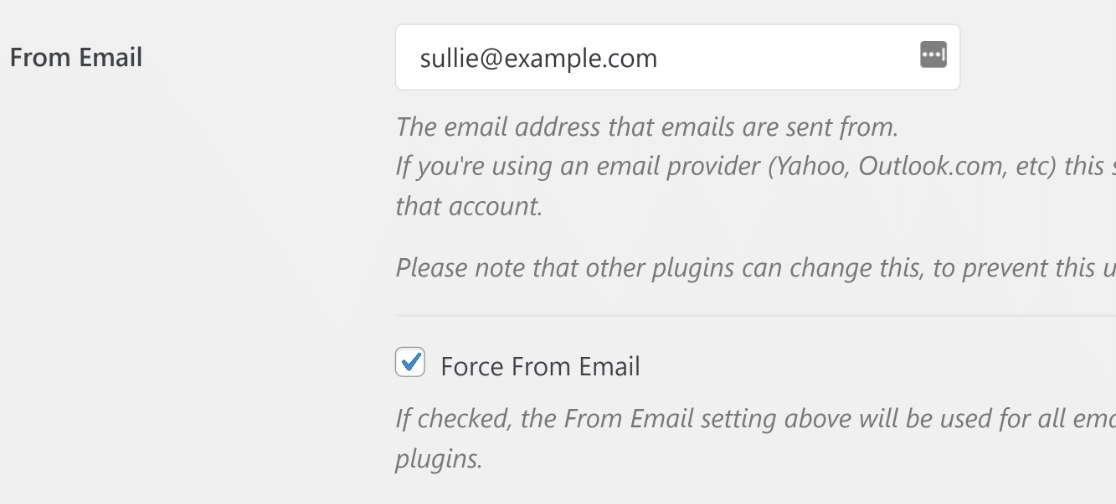If you’d like the From Email to be the same across your entire site, you can check the box labeled **Force From Email**, as shown in the screenshot above.
This will save you the trouble of editing the email settings throughout your site (in all form emails, etc). We strongly recommend you check this box.
Moving on, the From Name is set to the site name by default. But you can change this to any text you’d like. You can also check the box next to **Force From Name** to apply this setting to all of your emails across your site.
Your sender details are now configured. Next, you’ll connect WP Mail SMTP to your SendLayer account.
##### Pro Tip
Many sites use noreply@domain.com as their From Email thinking it discourages replies. This actually hurts deliverability. Email providers penalize noreply addresses because they signal low-quality automated emails.
Use a real monitored address like support@domain.com or hello@domain.com instead. You’ll get better inbox placement rates, and customers appreciate being able to reply if they have questions about form confirmations or account notifications.
### Step 5: Complete Your Email Setup
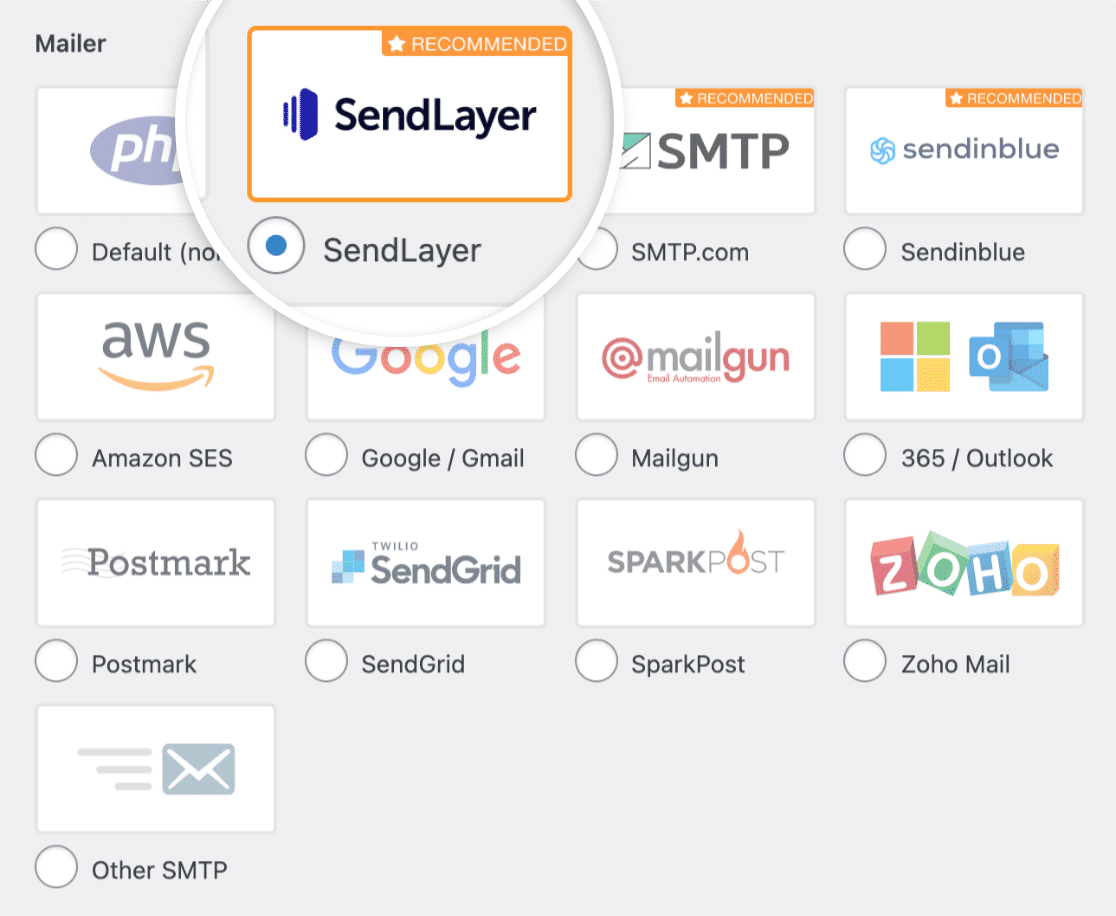
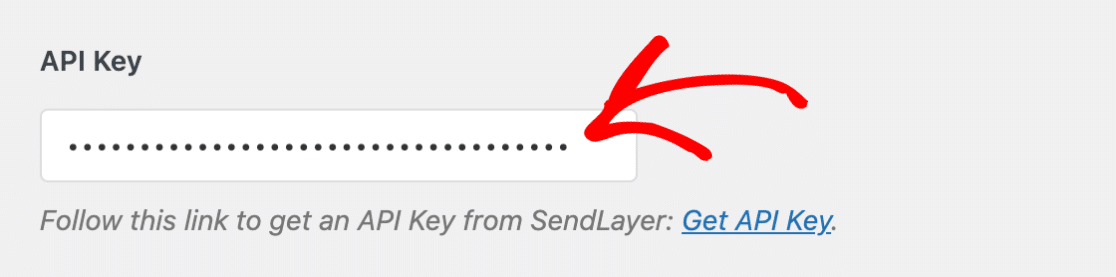
Now you’ll connect WP Mail SMTP to SendLayer using an API key. This key allows the plugin to send emails through SendLayer’s servers. In the **Mailer** section, select **SendLayer**.
Then you’ll want to fill in the API Key. To locate the API Key for your SendLayer account, click on the **Get API Key** link.
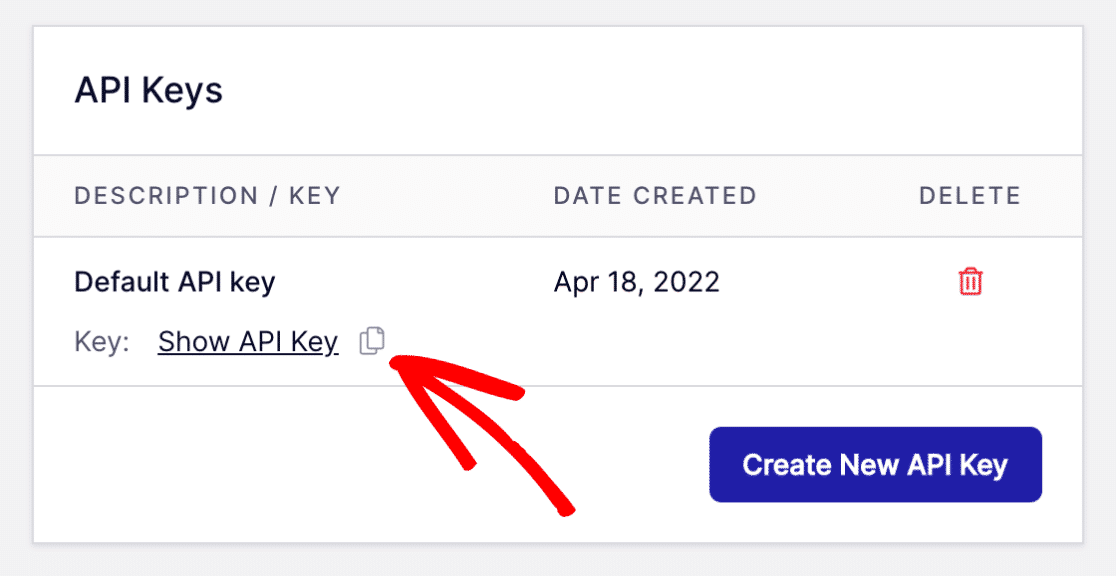
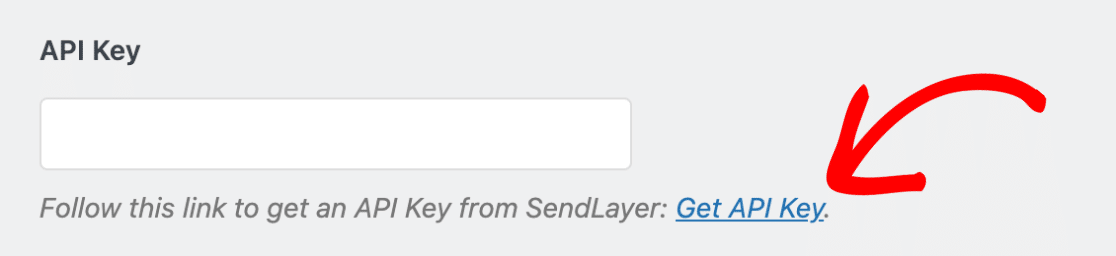The link will take you to your account’s Domain Settings page. You’ll find your API Key here.
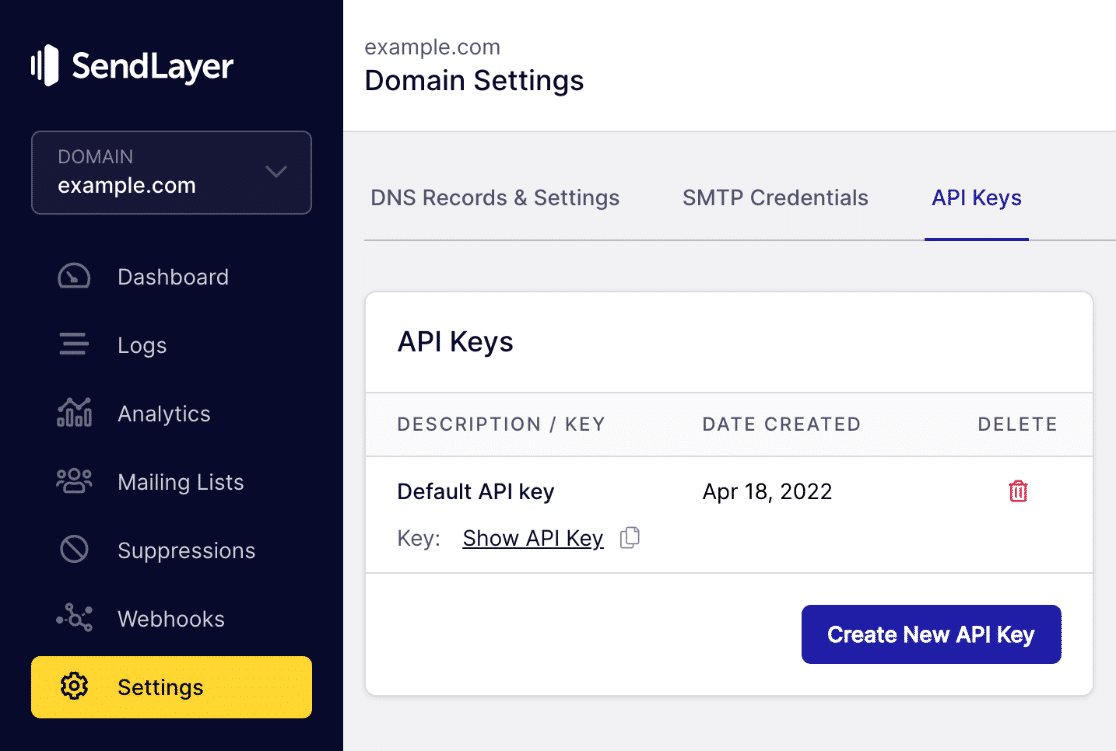Click on the copy icon next to Show API Key to copy it into your clipboard.
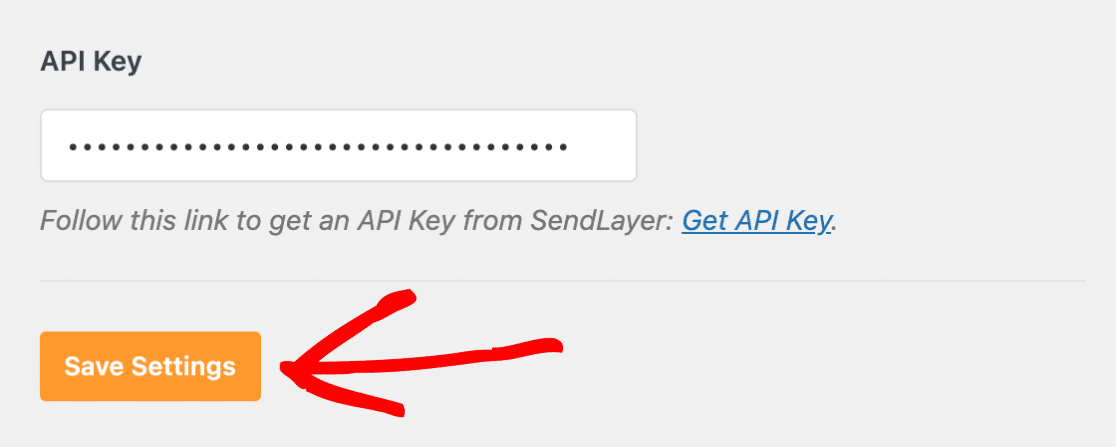
Return to your WP Mail SMTP Settings page and paste your SendLayer API Key in the relevant field.
Click the **Save Settings** button to save changes.
You’re almost there! We just need to test now that everything is functioning nice and smooth.
##### Important
Your API key gives full access to send emails from your SendLayer account. Never share it publicly or commit it to public code repositories like GitHub.
If you suspect your API key has been compromised (site hack, accidental exposure), regenerate a new key immediately in SendLayer’s Domain Settings.
The old key stops working instantly, and you’ll just need to paste the new key into WP Mail SMTP. Compromised API keys can be used to send spam from your domain, damaging your sender reputation.
### Step 6: Test Your WordPress Emails
After configuring your settings, you need to verify that WordPress is actually sending emails and they’re reaching inboxes.
So, let’s send a test email to confirm your SMTP connection, domain authorization, and sender settings all work correctly. Click on the **Email Test** tab.
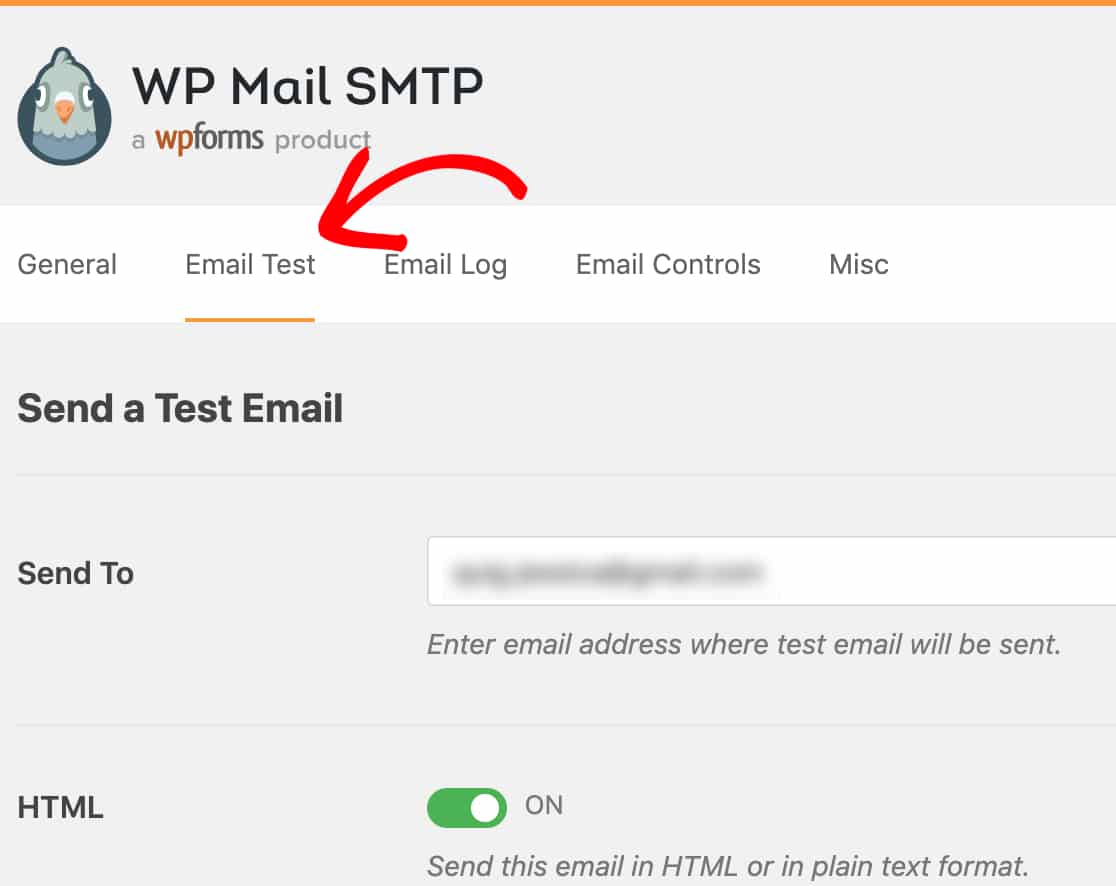On this tab, you can enter any email accounts that you have access to in the **Send To** field. Then, click the **Send Email** button.
Once the email has processed, you’ll most likely see a success message.
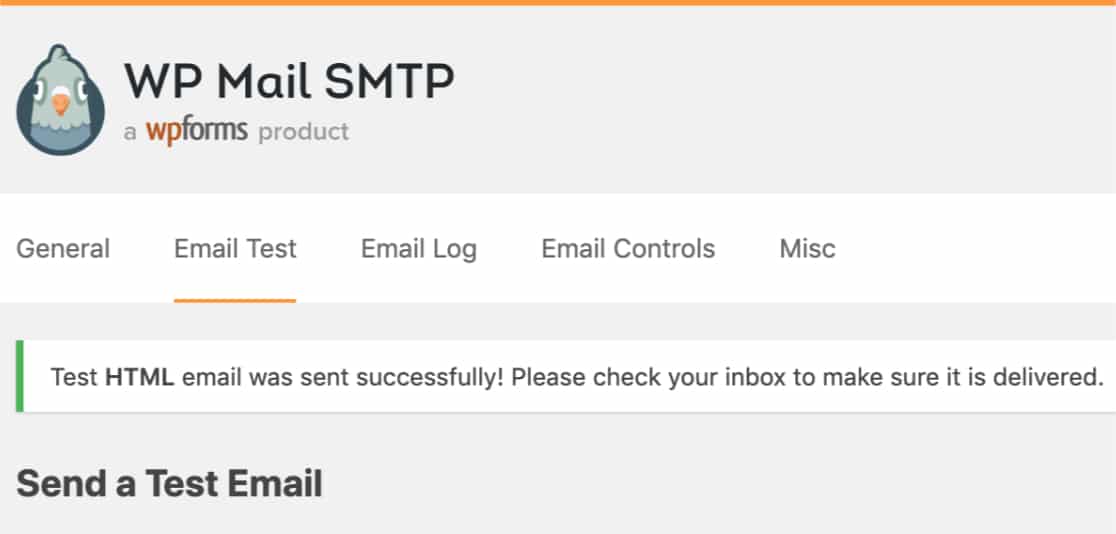Check the inbox for the email address you entered. The test email should arrive within 1-2 minutes. Check both your inbox and spam folder.
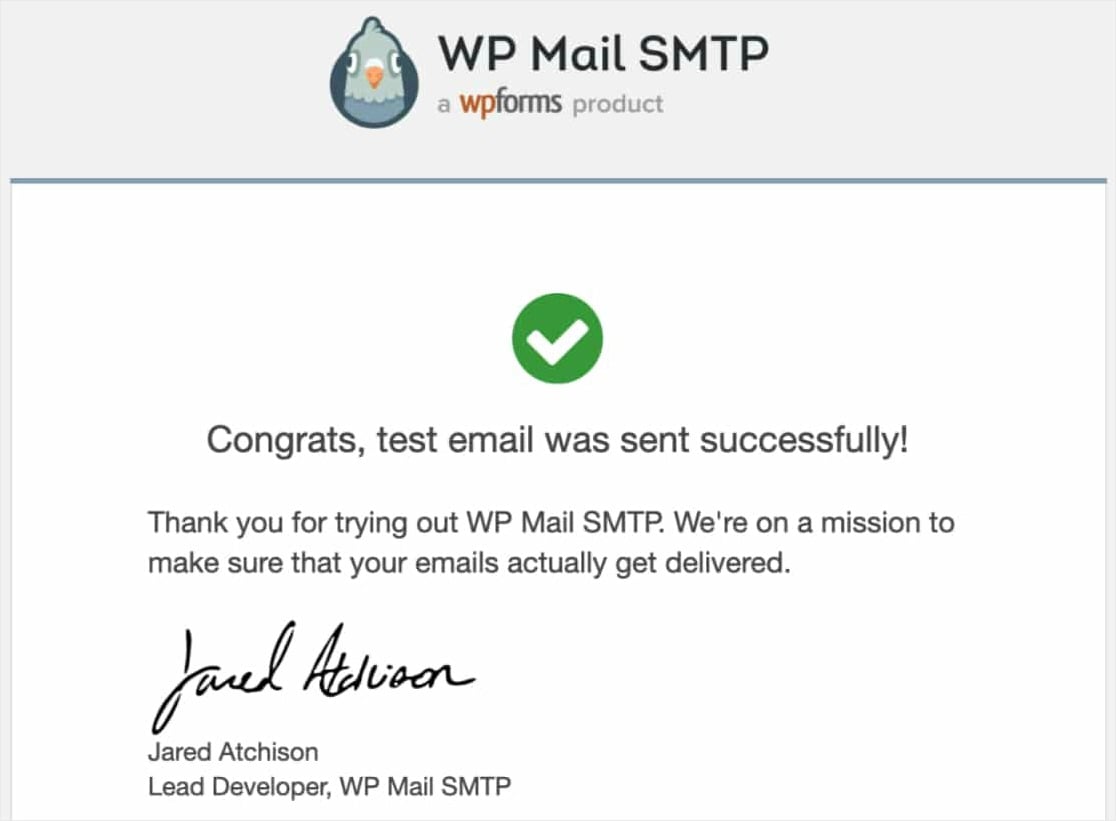If the email arrived in your inbox (not spam), your WordPress email settings are configured correctly. All WordPress emails like form notifications, password resets, user registrations will now deliver reliably.
### FAQs on WordPress Email Settings
Here are answers to the questions WordPress site owners ask most often about configuring email settings, switching to SMTP, and troubleshooting deliverability.
#### Why can’t I use the default email settings in WordPress?
By default, WordPress uses the PHP Mail to send emails like [form notifications](https://wpforms.com/docs/setup-form-notification-wpforms/), user activation, lost password, and others.
Unfortunately, WordPress is notorious for email delivery issues. Commonly, these issues arise because your [WordPress hosting](https://www.wpbeginner.com/wordpress-hosting/) server is not properly configured to use the PHP Mail function.
Besides, PHP Mail doesn’t add any authenticating elements to your email messages. This means that your emails are very likely to be treated as spam and never reach your recipient’s inbox.
[Email deliverability problems are common for Gmail users](https://wpforms.com/wpforms-not-sending-email-to-gmail/) because Google has very strict rules against spam.
#### How does SMTP fix WordPress emails?
SMTP stands for Simple Mail Transfer Protocol. It’s one of the most reliable ways to send emails on the internet.
With SMTP, you get high deliverability rates, avoid the spam folder, and your emails reach recipients almost instantly.
So, to fix email issues on your WordPress site, you need to replace PHP Mail with SMTP. The easiest way to do that is by using a plugin called [WP Mail SMTP](http://wpmailsmtp.com).
It’s used by so many websites for a reason — it lets even non-technical people set up their WordPress email settings to use SMTP instead of the default PHP mail() function.
#### What are WordPress SMTP settings and where do I find them?
WordPress doesn’t have built-in SMTP settings. You need to install the WP Mail SMTP plugin to add SMTP functionality. Once installed, go to **WP Mail SMTP » Settings** in your WordPress dashboard.
Here you’ll configure your From Email, From Name, choose your mailer, and enter your SMTP credentials (usually an API key). The plugin replaces WordPress’s default PHP mail() function with proper SMTP delivery.
#### How do I set up email on my WordPress website?
Install the WP Mail SMTP plugin, sign up for an email service provider like SendLayer, authorize your domain by adding DNS records to your hosting account, then configure WP Mail SMTP with your provider’s API key and sender details.
#### What’s the best email service for WordPress?
SendLayer is our top recommendation because it’s built specifically for WordPress users, offers excellent deliverability rates, includes detailed sending logs, and provides responsive support. Other solid options include SendGrid, Mailgun, or Amazon SES, though these require more technical configuration.
Avoid using generic email accounts (like your personal Gmail) for WordPress sending. They have strict daily sending limits (usually 500 emails) and will block your account if you exceed them.
#### Can I use my Gmail account to send WordPress emails?
Technically yes, but it’s not recommended for production sites. Gmail limits sending to 500 emails per day, and exceeding this gets your account temporarily blocked.
Gmail also requires OAuth authentication setup which is more complex than API-based services. Use Gmail only for testing or very low-volume personal sites.
For business websites, use a dedicated SMTP service like SendLayer that’s designed for transactional email and doesn’t have restrictive sending limits.
#### How do I check if WordPress is sending emails?
Install WP Mail SMTP and go to **Settings » Email Test**. Send a test email to your personal email address. If it arrives in your inbox within 2 minutes, WordPress is sending correctly.
If it doesn’t arrive or lands in spam, your email configuration needs fixing. You can also check **WP Mail SMTP » Email Log** (Pro feature) to see a history of all emails WordPress attempted to send and their delivery status.
#### What are DNS records and why do I need them for WordPress email?
DNS records are text entries in your domain settings that prove you own your domain and authorize email sending.
The five DNS records SendLayer provides include SPF (lists approved sending servers), DKIM (adds encrypted signature to emails), and DMARC (tells providers how to handle failed authentication).
Email providers check these records before delivering your mail. Without them, your emails look like forgeries and get blocked or sent to spam, even if your SMTP connection works.
#### Can I send WordPress emails without SMTP?
You can try using WordPress’s default PHP mail() function, but it’s unreliable and fails frequently. Most hosting providers don’t properly configure PHP mail(), and even when it works technically, emails lack authentication and go to spam.
### Next, Fix Email Notification Issues for Specific Form Plugins
If you’re running a contact form plugin other than WPForms and emails still aren’t sending, the same SMTP setup applies, but you may need plugin-specific tuning.
We have guides on fixing [Formidable Forms email notification problems](https://wpforms.com/how-to-formidable-forms-not-sending-email/) and [Ninja Forms not sending email](https://wpforms.com/how-to-fix-ninja-forms-not-sending-email/), both of which walk through the same SMTP configuration with form-specific gotchas.
If you’re considering a pirated copy of WP Mail SMTP Pro to skip the license cost, read our piece on why you should [never use nulled WP Mail SMTP Pro plugins](https://wpforms.com/wp-mail-smtp-pro-nulled/) first.
[Build Your WordPress Form Now](https://wpforms.com/pricing/)
Ready to fix your WordPress emails for good? Get started today with [WP Mail SMTP Pro](https://wpmailsmtp.com/pricing/), the most reliable SMTP plugin for WordPress with built-in mailer integrations, detailed email logs, and a 14-day money-back guarantee.
If this guide helped you out, please follow us on [Facebook](https://facebook.com/wpforms) and [Twitter](https://twitter.com/easywpforms) for more free WordPress tutorials and guides.
**Categories:** WordPress Tutorials
**Tags:** email notification, smtp, wordpress email, wordpress smtp, WP Mail SMTP
---