### [What Is a WPForms Hidden Field? (Discover Hidden User Data)](https://wpforms.com/wpforms-hidden-field/)
**Published:** October 24, 2022
**Author:** Hamza Shahid
**Excerpt:** Psst. Do you know about the WPForms Hidden field? Few things in life are as exciting as discovering secrets. And, WPForms has a secret field of its own.
It's largely ignored by new users because they're not sure if it serves any purpose at all. If that sounds like you, then I must say – you're missing out!
The WPForms hidden field is invisible to visitors, but it can be incredibly valuable by letting you collect useful metadata with a user's entry.
You can set up the hidden input field to collect information like locations, IP addresses, referrer URLs, and all kinds of fun stuff from people who fill out forms on your website.
In this post, I want to share some common ways that you can use the Hidden field to gather useful information, all without affecting user experience.
**Content:**
Psst. Do you know about the WPForms Hidden field? Few things in life are as exciting as discovering secrets. And, WPForms has a secret field of its own.
It’s largely ignored by new users because they’re not sure if it serves any purpose at all. If that sounds like you, then I must say – you’re missing out!
The WPForms hidden field is invisible to visitors, but it can be incredibly valuable by letting you collect useful metadata with a user’s entry.
You can set up the hidden input field to collect information like locations, IP addresses, referrer URLs, and all kinds of fun stuff from people who fill out forms on your website.
In this post, I want to share some common ways that you can use the Hidden field to gather useful information, all without affecting user experience.
[Unlock the Hidden Field Now!](https://wpforms.com/pricing/)
## What Is a WPForms Hidden Field?
Ready to jump in? Like I said, I’ll show you some of the most common ways that you can use the Hidden field in your own forms. Let’s get into it.
### What Is the Purpose of the Hidden Field?
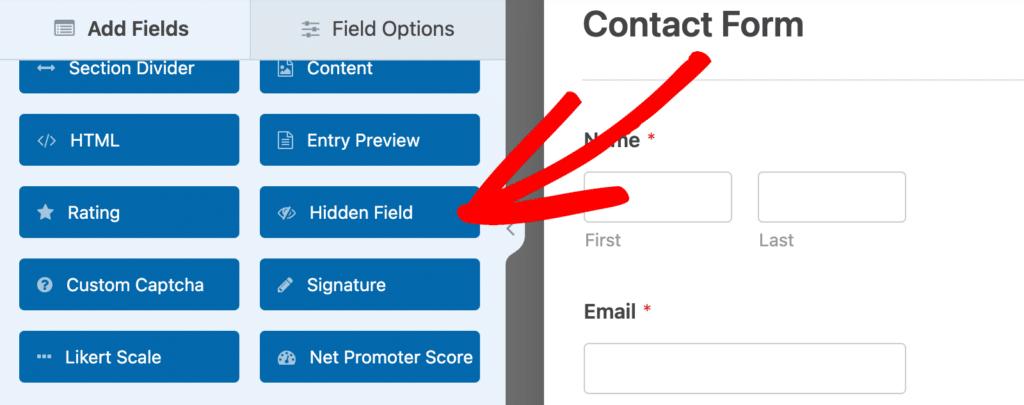
A hidden form field is a field that you can add to your forms without making it visible to users. In WPForms, this field is simply called the Hidden Field.
This hidden field can capture information using WPForms’ [Smart Tags](https://wpforms.com/docs/how-to-use-smart-tags-in-wpforms/) without them being able to edit or see it at all, while working invisibly in the background of your form.
**Why would you want to use a WPForms Hidden Field?**
Smart Tags collect information that may be useful for you to see in an entry, but would likely be confusing to a visitor if they could see that field while filling out the form.
Embedding Smart tags in hidden fields allows you to offer the best user experience while getting the information you need. It may not make sense for your visitor to provide this information directly to you, but you can still capture it.
### WPForms Hidden Input Field Hacks
So, now that you know what a WPForms Hidden Field is, here are some awesome ways to use it:
- [1. Find User IP Addresses](#1-find-user-ip-addresses)
- [2. See How People Found You](#2-see-how-people-found-you)
- [3. Track Campaigns With Custom Links](#3-track-campaigns-with-custom-links)
- [4. Find User Locations](#4-find-user-locations)
- [5. Assign User IDs](#5-assign-user-ids)
- [6. Track Form Submissions by Page](#6-track-form-submissions-by-page)
- [7. Block Specific Email Addresses](#7-block-specific-email-addresses)
- [8. See the Pages Driving Form Conversions](#8-see-the-pages-driving-form-conversions)
#### 1. Find User IP Addresses
Every user has a unique IP address. Capturing IP Addresses can be especially helpful for [fighting form spam](https://wpforms.com/how-to-build-spam-free-wordpress-contact-forms-the-ultimate-guide/).
When you see which IP Address is sending you spam, you can block that address from accessing your site through your hosting company or a [security plugin](https://wpforms.com/best-wordpress-security-plugins/).
To capture the IP address of a user submitting an entry, add the **Hidden Field** to your form, then click on it to open its **Field Options**.
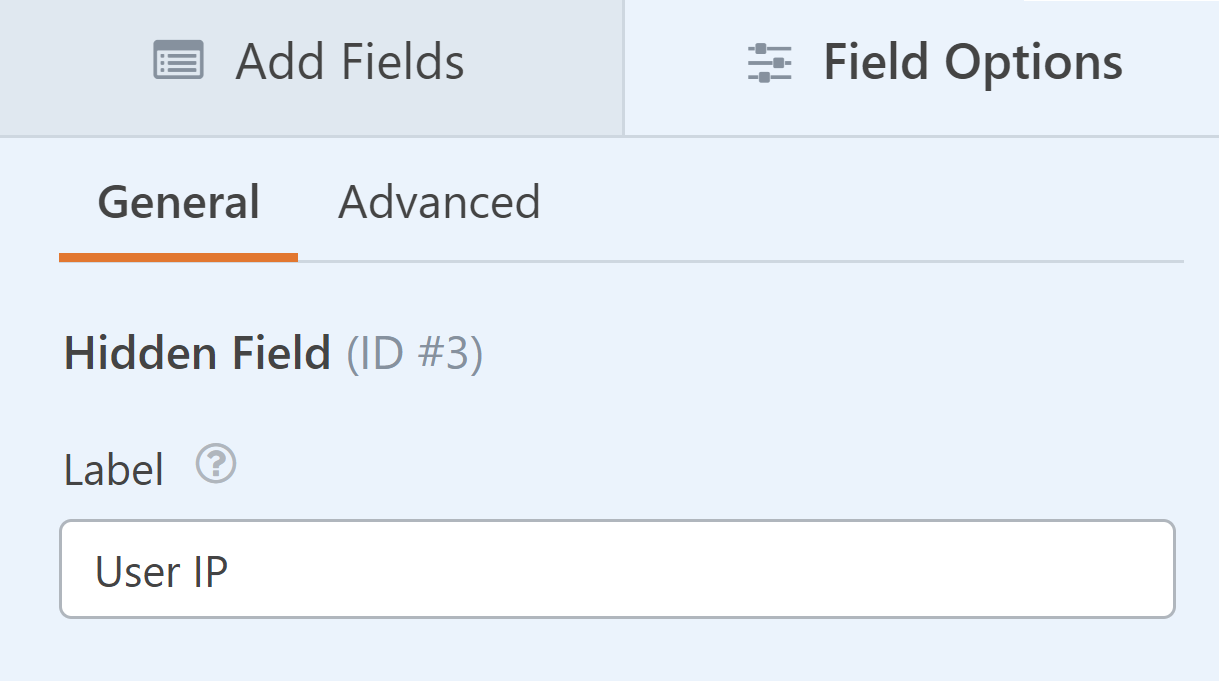
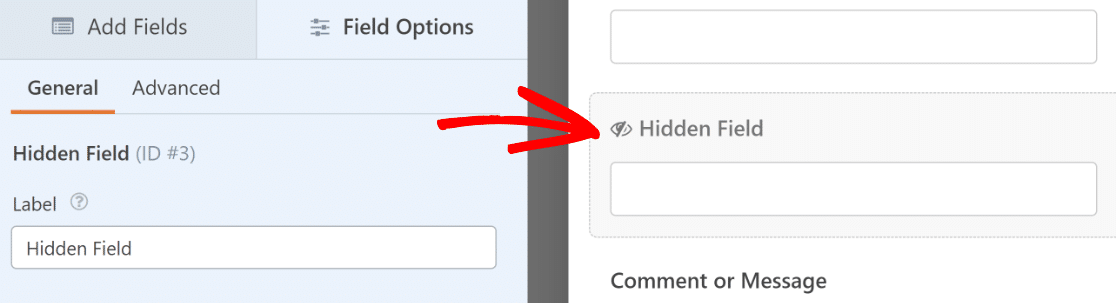It can be helpful to rename the Hidden Field, so there isn’t any confusion later about what information this field contains. So feel free to change the Hidden Field label.
Then, click on the **Advanced** tab to open further options. Now, the Hidden Field needs to be given a default value.
To do this, you can use Smart Tags so that the default value is dynamically updated depending on each individual user.
Click on the **Show Smart Tags** link to the right of the **Default Value** box.
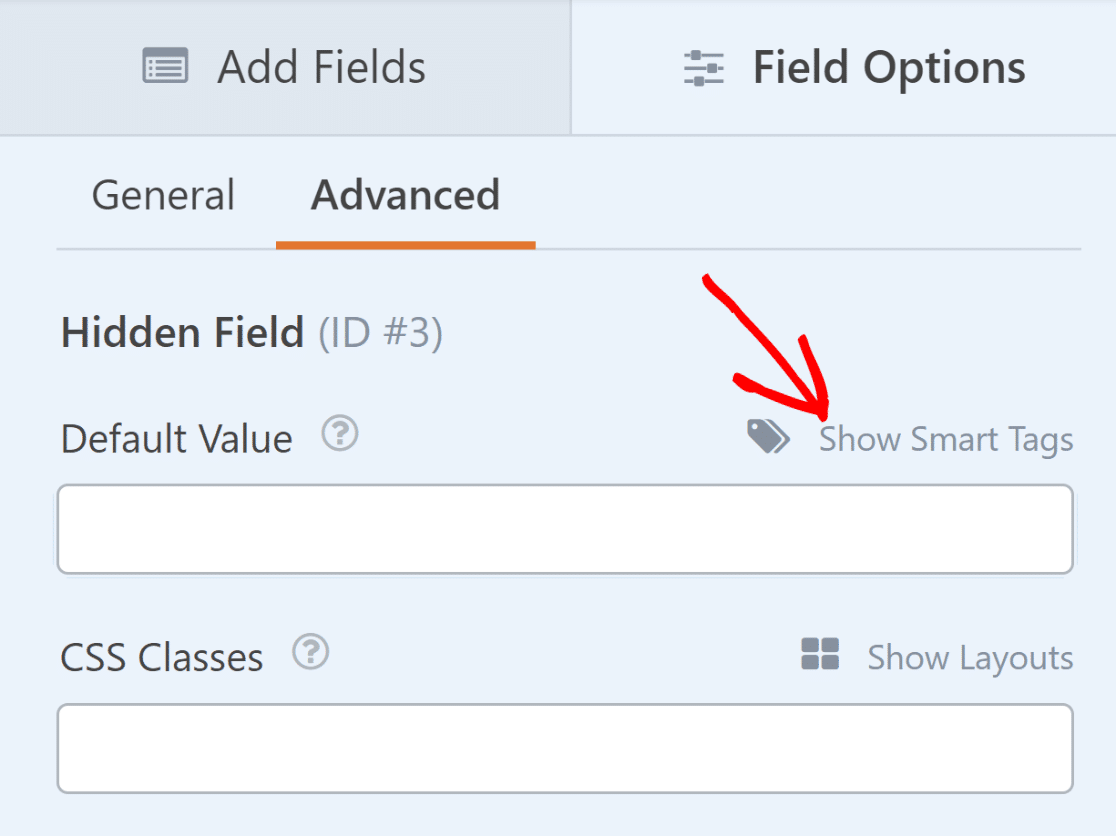You’ll see a bunch of available Smart Tags that you can use. Because we want to capture the IP address information, click on **User IP Address** from the list.
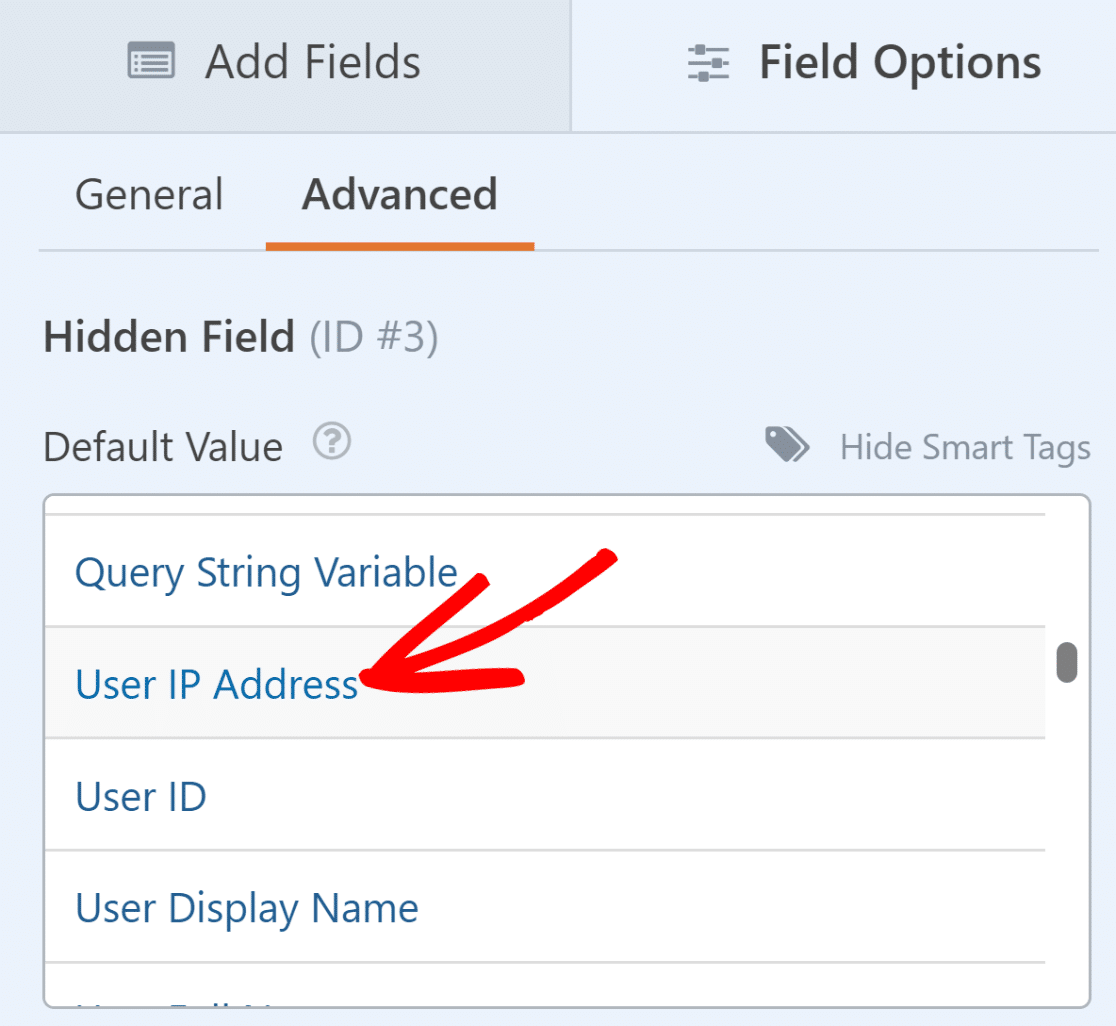With the User IP Address smart tag in the Hidden Field, you’ll be able to see the IP address of the visitor in their form entry.
#### 2. See How People Found You
Understanding how visitors find your website is crucial for measuring your marketing efforts. Hidden fields can automatically track which traffic sources are bringing users to your forms.
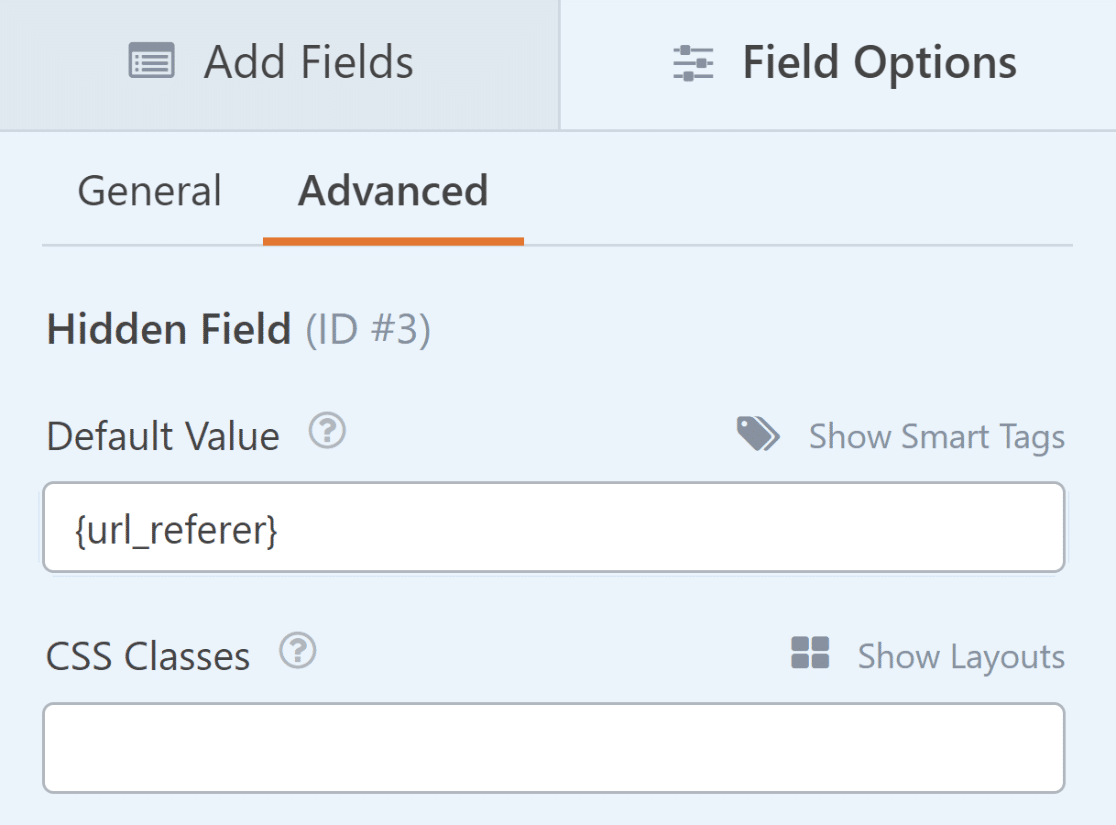
To track how people found your site, add a **Hidden Field** to your form and open its **Field Options.** Next, click on the **Advanced** tab and look for the **Default Value** setting.
From the Smart Tags list, select **Referrer URL**. The `{url_referer}` Smart Tag will capture the page address that referred the user to your form.
For example, if a user was on your home page and then navigated to your contact page before filling out your form, the `{url_referer}` Smart Tag would show you the URL of your home page.
This is a great way to add traffic source details to every entry, allowing you to learn more about how people are discovering your forms.
If you want to see just the domain name instead of the full URL, you can use the **Referrer Domain** Smart Tag instead. You can use this information to make better optimization decisions for your site and boost form conversions.
## Pro Tip:
This information helps you understand which websites are sending you traffic. For example, you might discover that a particular social media platform or blog mention is driving more form submissions than you realized.
#### 3. Track Campaigns With Custom Links
Custom campaign links help you understand which specific marketing efforts are driving form submissions. You can use hidden fields to track referrals from external sources or a specific marketing campaign.
Start by adding a **Hidden Field** to your form and opening its **Field Options**. Name it something clear like “Campaign Source” or “UTM Campaign.”
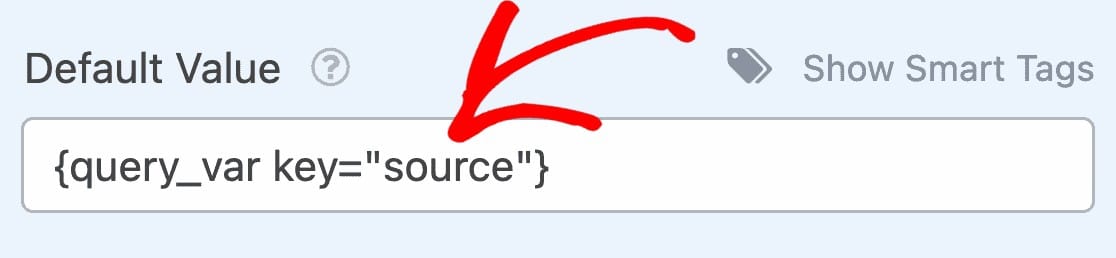
Click the **Advanced** tab and find the **Default Value** setting. Select **Show Smart Tags** to see your options. Then, add a **Query String Variable** Smart Tag to the Default Value box of your Hidden Field.
You should now see the `{query_var key=""}` added to the **Default Value** box. To properly set up this tag, you’ll have to enter a key representing the traffic or campaign source you want to track.
For this, it’s **important to modify the URL of the page** where you’re embedding the form. For example, let’s assume that your form page URL is `yoursite.com/contact/`.
Now, if you want to promote the contact form from your Facebook page, you can use a modified link that looks something like this: `yoursite.com/contact/?source=facebook.`
As you can see, this link uses the standard URL of your form page and adds something extra to help track the source easily. Using this example URL, the query string key we need to enter between the quotation marks is “source”.
However, depending on your specific URL tracking conventions, you’re free to use a different query string key.
When a user visits your form by clicking any one of the example links below, the form will capture the source as defined by your URL.
- **Facebook** — yoursite.com/page/?source=facebook
- **Twitter** — yoursite.com/page/?source=twitter
- **Email Newsletter** — yoursite.com/page/?source=newsletter
This way, you can easily track a campaign or any specific external source. In fact, it might be a good idea to receive entry notifications with link tracking information.
To set that up go to **Settings » Notifications**. From there, scroll down to the section labeled **Email Address,** then click on **Show Smart Tags** at the top right of the message box.
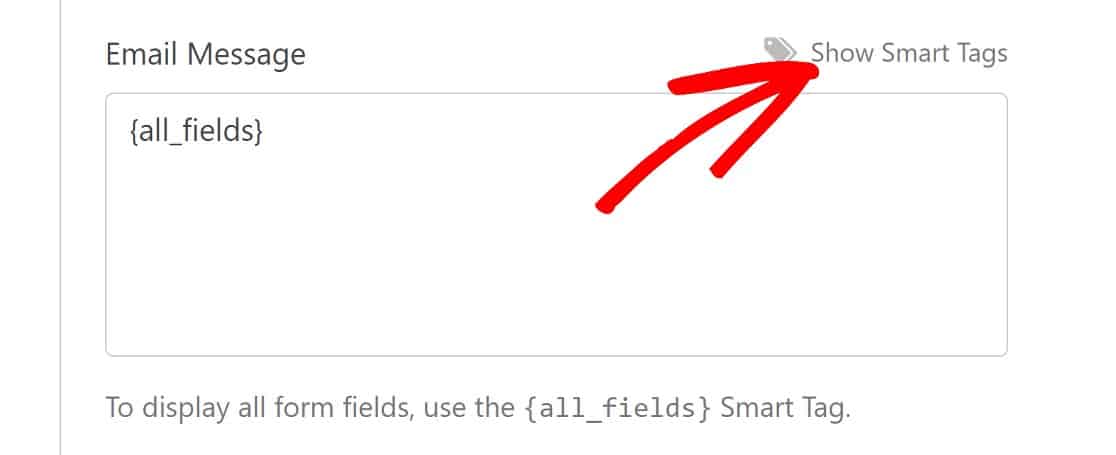Select your **Hidden Field** label from the Available Fields list. I’ve labeled my Hidden Field as “Source”, so that’s what I’ll be selecting in this example.
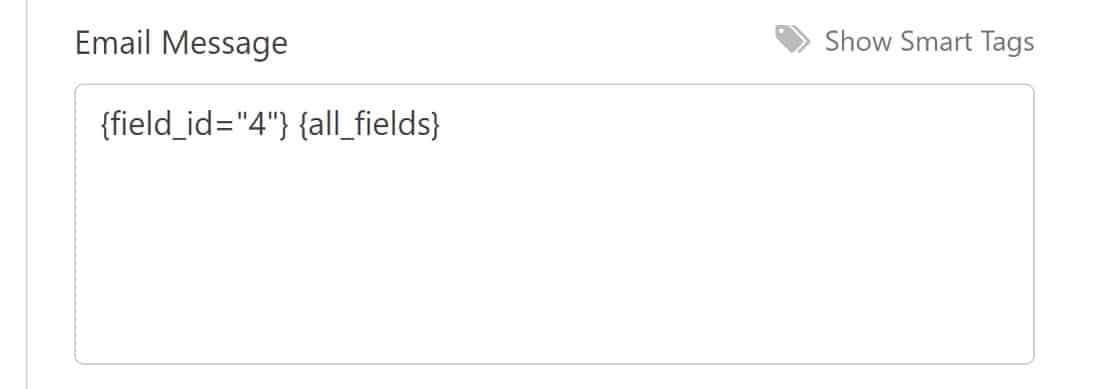
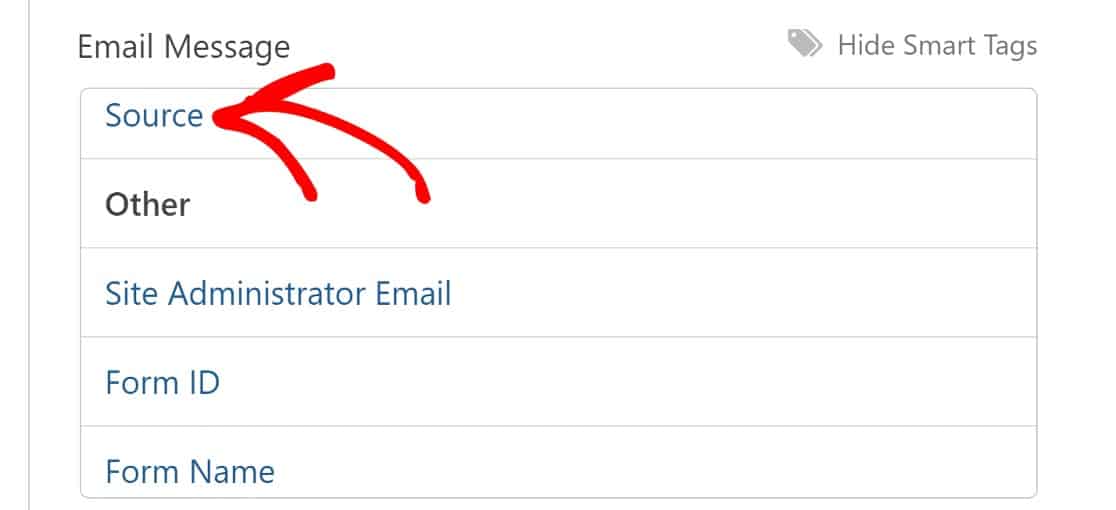It will add some code to your notification that looks like `{field_id="#"}` with a number.
Click **Save** and your form is ready to be published on a post or page.The final step for this tip is to share the link to the page that contains this form.
For each platform you share the link on (Facebook, Twitter, etc.), you’ll want to add the source to the end of the link. That way, WPForms can recognize it and correctly pull the source information with each entry.
## Pro Tip:
You can track multiple UTM parameters by adding separate hidden fields for:
- Campaign source: `{query_var key="source"}`
- Campaign medium: `{query_var key="medium"}`
- Campaign name: `{query_var key="campaign"}`
- Campaign term: `{query_var key="term"}`
- Campaign content: `{query_var key="content"}`
#### 4. Find User Locations
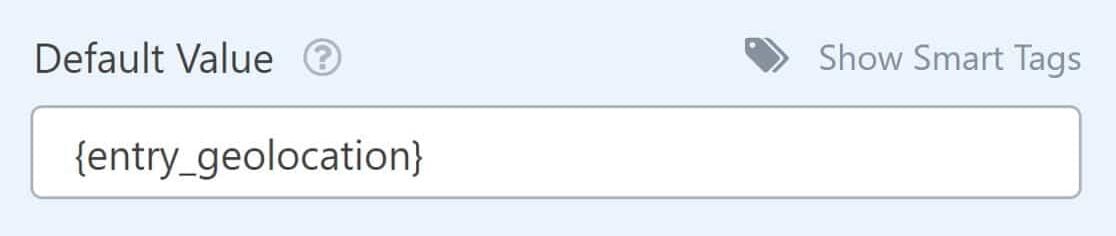
If you’re already loving the [Geolocation addon](https://wpforms.com/addons/geolocation-addon/) that lets you see where your users are located, you might want to consider using the entry geolocation Smart Tag in a Hidden field.
Just open the options for your Hidden field and select the **Entry Geolocation** Smart Tag from the options for the Default Value.
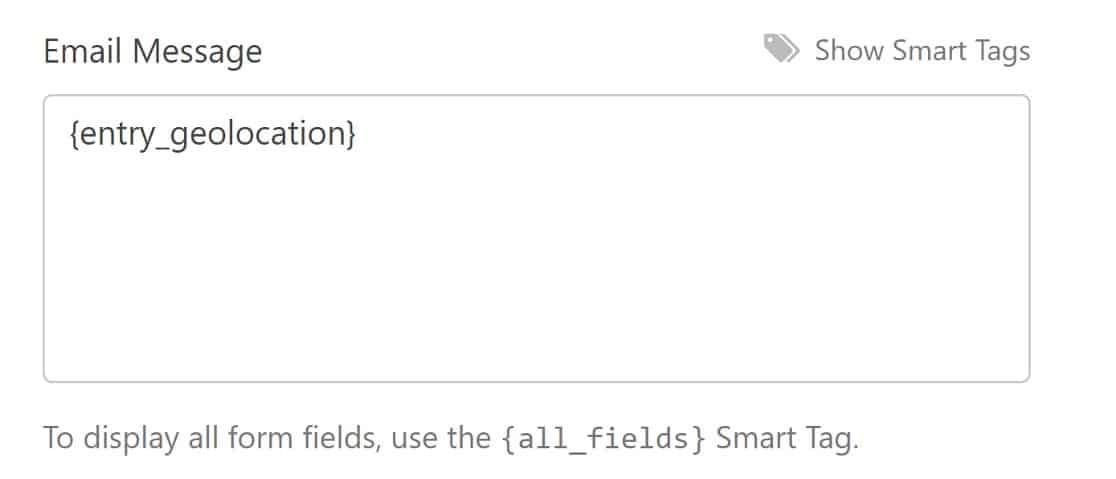
You can also add this Smart Tag in a [notification email](https://wpforms.com/docs/setup-form-notification-wpforms/) so you don’t have to sign in to your dashboard and form entry to find it.
This can be particularly useful if you need to know users’ time zones for phone calls. Just open the Smart Tags list for your email notification message and choose **Entry Geolocation**.
Did you know that the Geolocation addon has another purpose? It can also be used for address autocomplete on your forms!
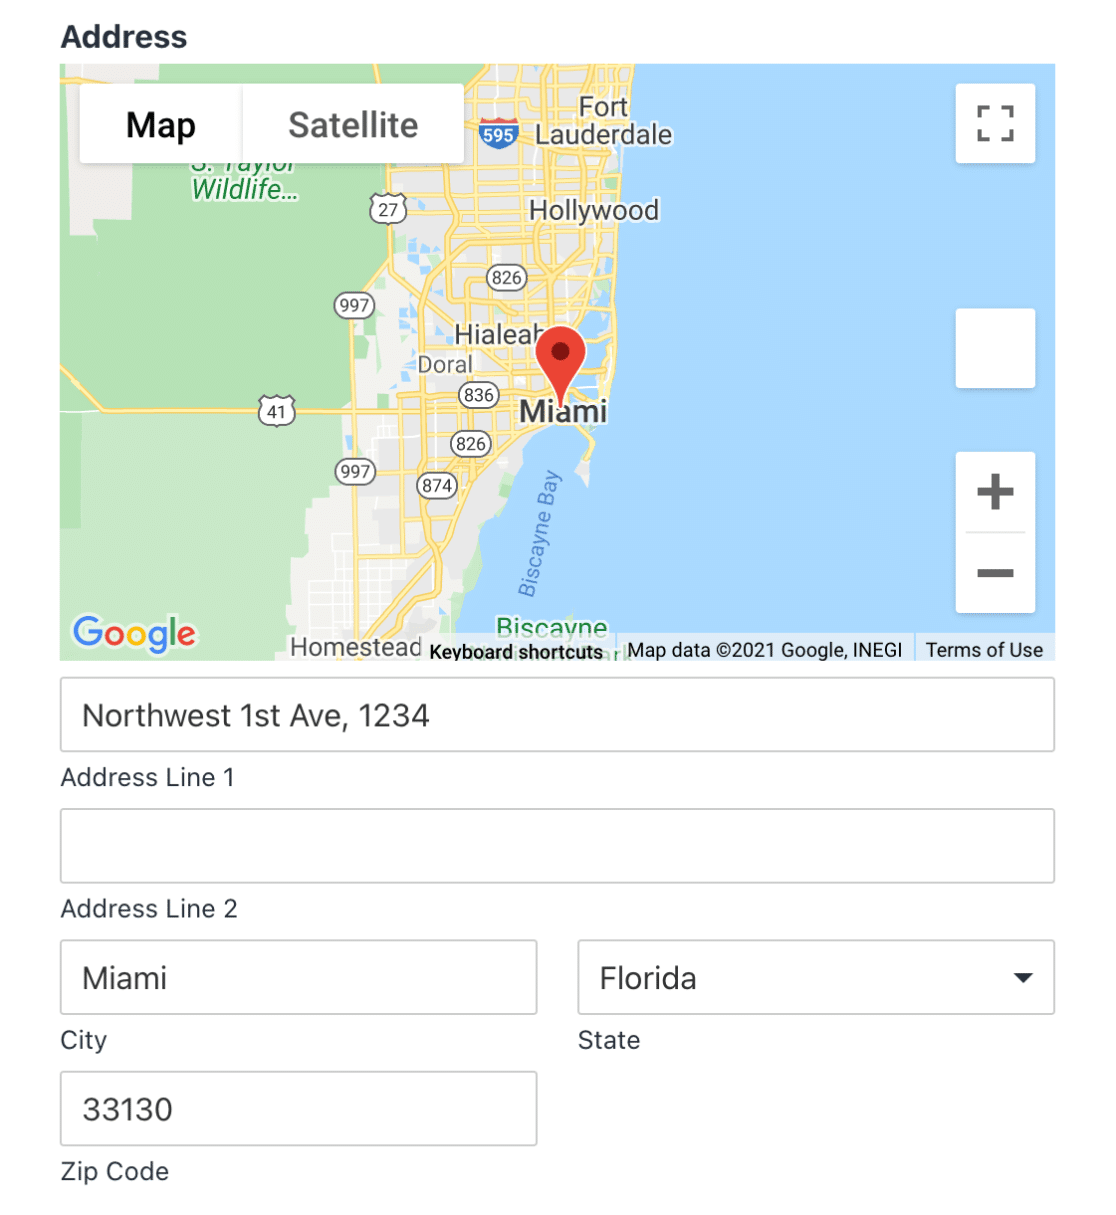Just connect it to Google Places or Mapbox and you’ll be able to turn on address autocomplete for any form. You can even add an interactive map to your forms so users can drop a pin to choose their locations.
## Note:
Remember that location accuracy depends on the user’s IP address and internet connection, but it’s generally reliable for understanding broad geographic patterns.
#### 5. Assign User IDs
Assigning unique IDs to form submissions helps you track and organize entries, especially when you’re dealing with multiple submissions from the same users or integrating with other systems.
To set up user ID tracking, add a **Hidden Field** to your form and open its **Field Options**. Name it something clear like “User ID” or “Submission ID.”
Click the **Advanced** tab to access the **Default Value** settings. Click **Show Smart Tags** to see your options. Then, select the User ID smart tag.
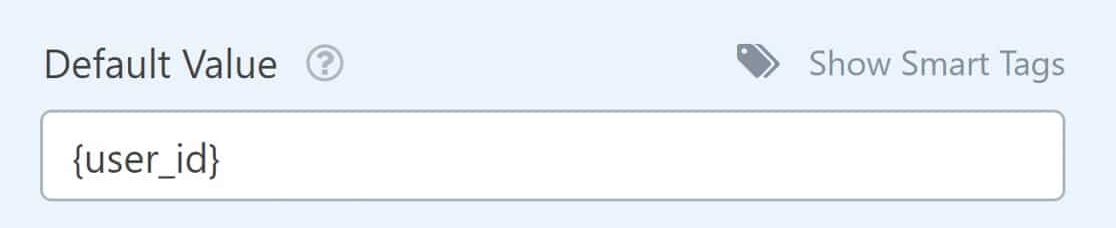Every [registered user](https://wpforms.com/how-to-create-a-user-registration-form-in-wordpress/) is automatically assigned an ID number on your WordPress site. Adding a Hidden Field with a User ID Smart Tag allows you to see the ID when a logged-in user submits a form.
## Pro Tip:
You can combine Smart Tags to create more detailed IDs. For example, combining the User ID with a Entry Date stamp gives you entries like “2024-05-26-123”.
This can be especially helpful if you’re [creating an anonymous survey](https://wpforms.com/create-a-survey-form-in-wordpress-step-by-step/) and want to see which users filled it out.
#### 6. Track Form Submissions by Page
Many of our customers use the same form across many different locations. For instance, you could have a newsletter signup form at the bottom of every blog article.
When you have a setup like this, it can be challenging to track the source page where entries for the same form are coming from.
To track form submissions by page, add a **Hidden Field** to your form and open its **Field Options**. Label it something descriptive like “Page Source” or “Form Location.”
Click the **Advanced** tab and locate the **Default Value** setting. Click **Show Smart Tags** next to it. Then, use the **Embedded Post/Page Title** Smart Tag.
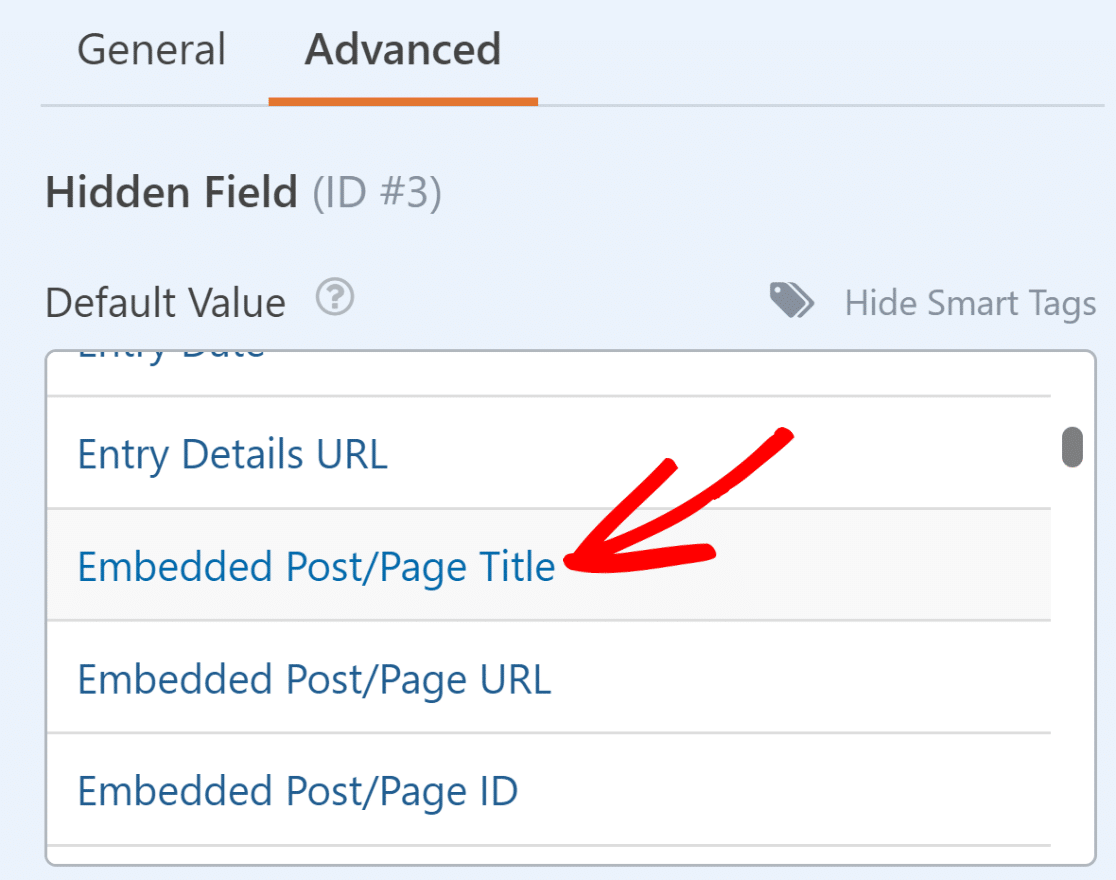This Smart Tag will silently capture the title of the page or post where the form submission occurred, so you can always see this information with every entry.
#### 7. Block Specific Email Addresses
If you get hit by a lot of spambots, you can [stop contact form spam](https://wpforms.com/how-to-build-spam-free-wordpress-contact-forms-the-ultimate-guide/) with Google reCAPTCHA or hCaptcha. But what about the spammers that are real, human visitors?
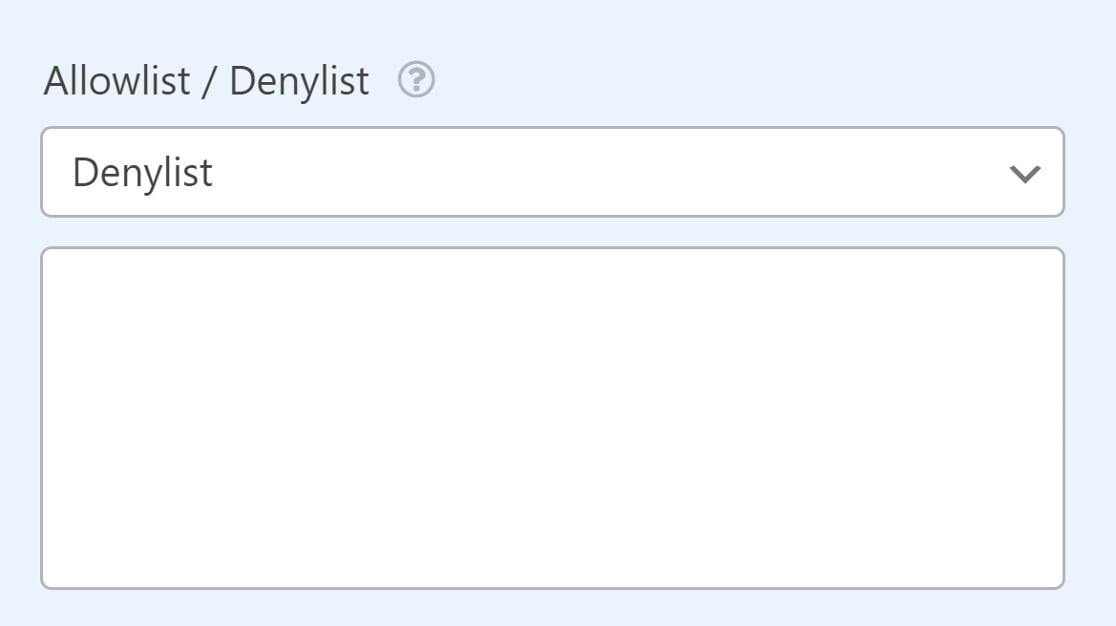
There’s a neat feature in WPForms that lets you easily lock down your forms to the email addresses that you specify. It’s called the Allowlist/Denylist.
You’ll find it by clicking the **Advanced** tab in the Field Options settings for your email address field.
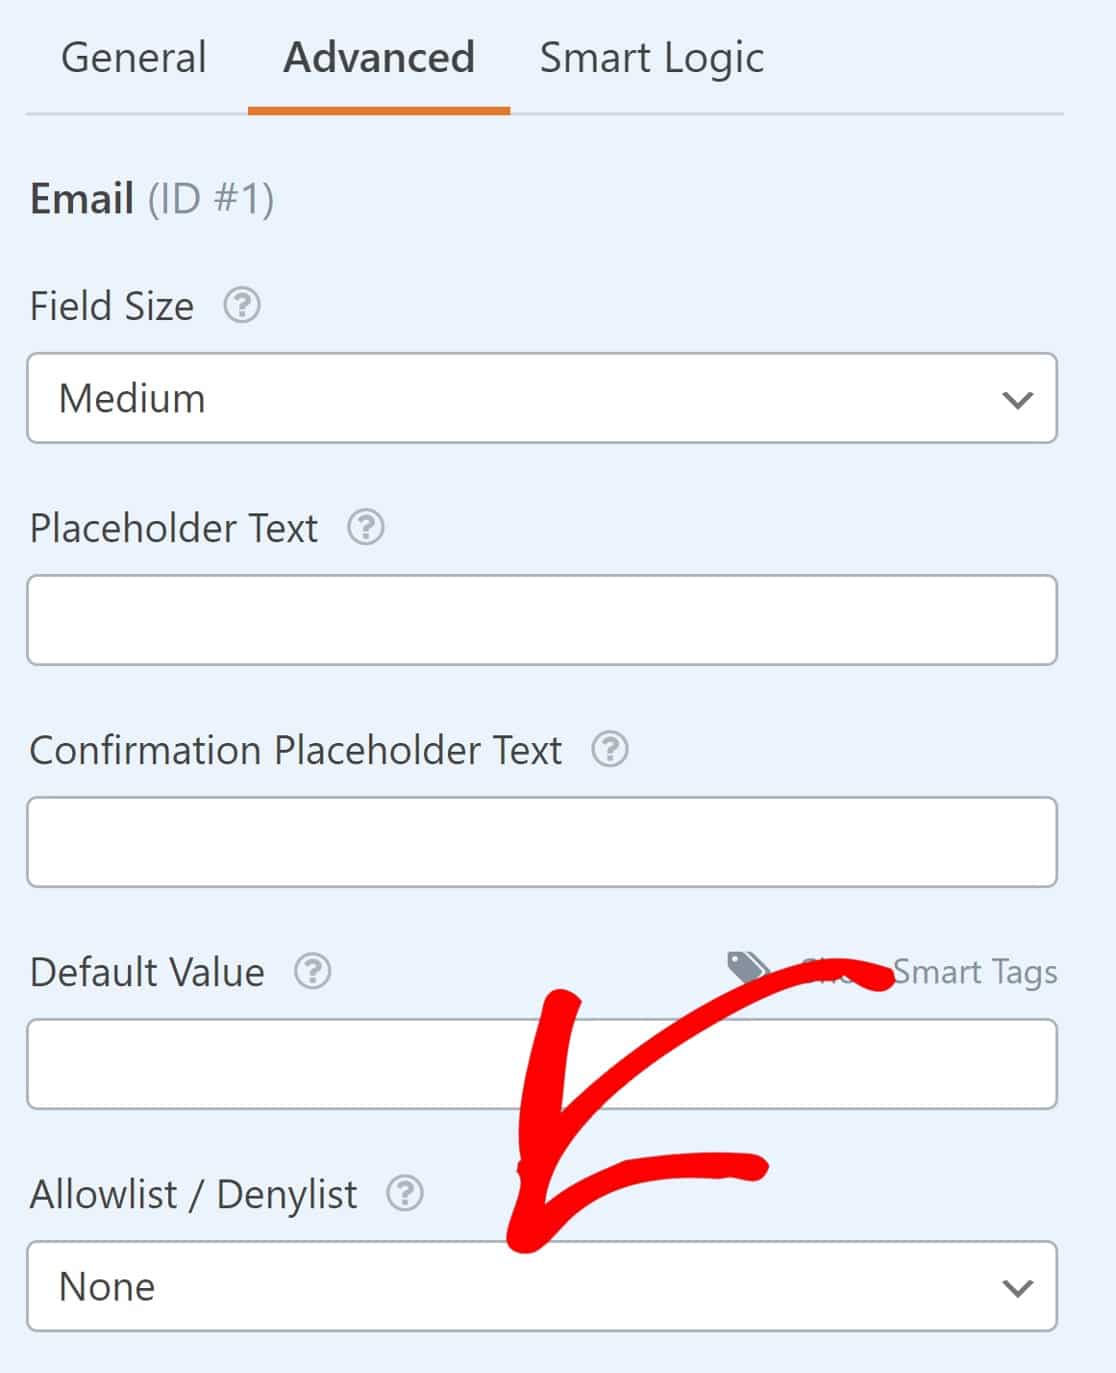Click the field to open a dropdown menu with Allowlist and Denylist as options. You can use the Allowlist to only allow the email addresses you type in.
Or, flip it around and choose **Denylist** to make the form accept all entries except for the email addresses you specify in the settings. Simply enter the email you would like to block in the field below.
## Pro Tip:
Keep a running list of blocked addresses in a separate document, so that the next time a spammer comes back to submit the form, they’ll get stopped in their tracks.
#### 8. See the Pages Driving Form Conversions
When you publish a form on your site, your ultimate goal is to get more form conversions: entries, leads, or sales.
If you know which pages are driving those conversions, you can develop more content that benefits your visitors and inspires them to act.
Here’s the great news. You can easily unlock this information with the [User Journey addon](https://wpforms.com/addons/user-journey-addon/) for WPForms.
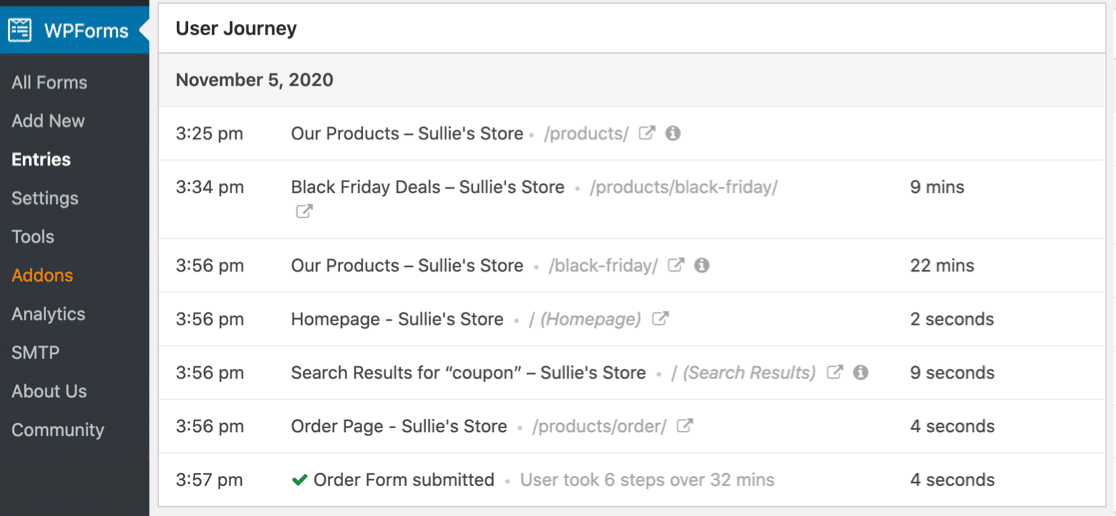Under every form entry, you’ll see a list of actions the user took before filling out your form. The addon is the perfect tool to create a [user journey map](https://wpforms.com/user-journey-mapping/). It records each user’s behavior automatically and shows it in the entry, right in WordPress.
You can retrace your visitors’ steps from the moment they hit your site to the point they submitted the form. And the addon even lets you see:
- What the visitor searched for
- The UTM parameters for the referring campaign
- How long they spent on each page or post
WPForms also lets you [measure form conversions with Facebook Pixel](https://wpforms.com/track-form-submissions-facebook-pixel/) or [Google Analytics](https://wpforms.com/how-to-use-google-analytics-to-track-form-submissions-in-wordpress/). But sometimes it takes a while to wade through all of that data.
### FAQs on What is the WPForms Hidden Field?
WPForms’ hidden field is a popular topic of interest among our readers. Here are answers to some common queries about it:
#### **How do I hide a field in WPForms?**
You can hide a field in WPForms by adding a **Hidden Field** from the form builder. It won’t appear on the form to users, but you can still collect data behind the scenes.
#### Can I capture the page URL using a hidden field in WPForms?
Yes. You can set a Smart Tag like **Embedded Post/PageURL** in a hidden field. This will record the page where the form was submitted.
#### How do I automatically fill a hidden field in WPForms?
To auto-fill a hidden field, use smart tags or pass values through the form’s URL. This helps you store useful info without asking users to type it.
#### What can I do with a hidden field in WPForms?
Hidden fields help collect extra info without showing anything on the form. You can use them to track pages, pass user data, or save campaign info like UTM codes.
#### Can I store the post title in a hidden WPForms field?
Yes. Add a hidden field to your form and use the **Embedded Post/Page Title** smart tag. This will save the title of the post or page where the form was submitted.
#### Is it possible to pass UTM parameters into WPForms hidden fields?
It is. Just add a hidden field and use query strings in the form URL. WPForms can pull UTM values directly into the hidden fields.
#### How do I use conditional logic with hidden fields in WPForms?
You can set rules based on the value of a hidden field. This lets you control what users see or what actions happen depending on the hidden data.
### Next, Create a Coupon Code Field for Your Order Form
And there it is! You now have some great hacks for using the hidden field to find extra data about your form users. If you want to add even more custom fields to your forms, read about how to add a [coupon code field](https://wpforms.com/coupon-code-field/) next.
And if you’d like to learn more about getting rid of spam with WPForms, here’s our guide to [stopping bots from filling your forms](https://wpforms.com/how-to-prevent-bots-from-submitting-your-forms/).
[Unlock the Hidden Field Now!](https://wpforms.com/pricing/)
Ready to build your form? Get started today with the easiest WordPress form builder plugin. [WPForms Pro](https://wpforms.com/pricing) includes lots of free templates and offers a 14-day money-back guarantee.
If this article helped you out, please follow us on [Facebook](https://facebook.com/wpforms) and [Twitter](https://twitter.com/easywpforms) for more free WordPress tutorials and guides.
**Categories:** WordPress Tutorials
**Tags:** form notification, geolocation, hidden field, smart tag
---