### [How to Accept PayPal Payments in WordPress for Free](https://wpforms.com/how-to-accept-paypal-payments-in-wordpress-for-free/)
**Published:** April 16, 2026
**Author:** Hamza Shahid
**Excerpt:** If you've been searching for a way to accept PayPal payments on your WordPress site, you've probably noticed that most guides point you toward WooCommerce or an expensive plugin.
The good news is WPForms Lite now includes PayPal Commerce as a built-in feature. It's a free plugin, and you can use it to collect one-time or recurring PayPal payments directly through your WordPress forms.
I'll walk you through the full setup in this guide. From plugin install to a live payment form, the whole thing takes about 10 minutes.
**Content:**
If you’ve been searching for a way to accept PayPal payments on your WordPress site, you’ve probably noticed that most guides point you toward WooCommerce or an expensive plugin.
The good news is WPForms Lite now includes PayPal Commerce as a built-in feature. It’s a free plugin, and you can use it to collect one-time or recurring PayPal payments directly through your WordPress forms.
I’ll walk you through the full setup in this guide. From plugin install to a live payment form, the whole thing takes about 10 minutes.
## How to Accept PayPal Payments in WordPress for Free
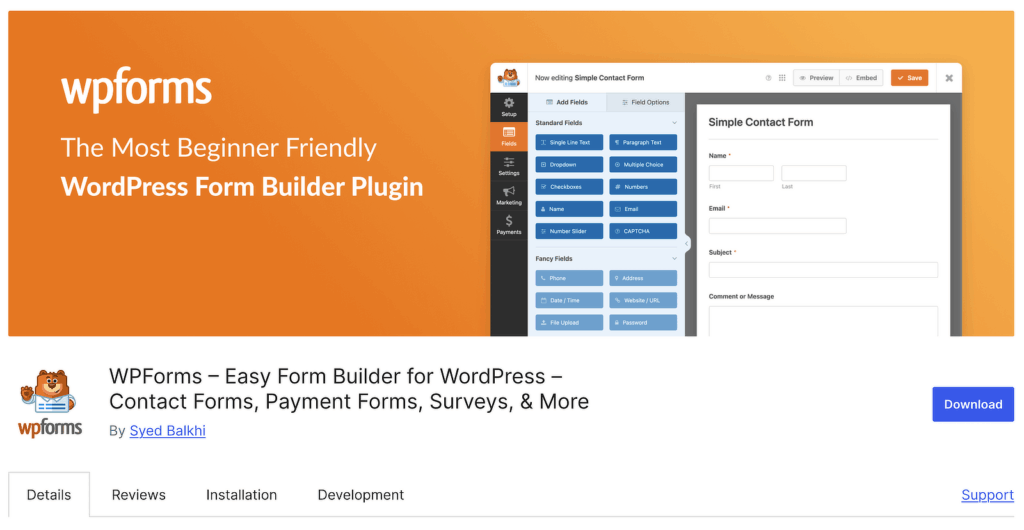
WPForms is a free [drag-and-drop form builder](https://wpforms.com/features/drag-drop-online-form-builder/) used by 6+ million WordPress sites. The Lite (free) version includes [PayPal Commerce](https://wpforms.com/features/paypal-commerce/) built right in.
That means you can accept PayPal payments on your forms without paying for a premium license. Here’s how to set everything up in 6 steps.
- [Step 1: Install and Activate WPForms Lite](#step-1-install-and-activate-wpforms-lite)
- [Step 2: Connect Your PayPal Business Account](#step-2-connect-your-paypal-business-account)
- [Step 3: Create Your Payment Form](#step-3-create-your-payment-form)
- [Step 4: Set Up Your PayPal Payment Settings](#step-4-set-up-your-paypal-payment-settings)
- [Step 5: Embed and Publish Your Form](#step-5-embed-and-publish-your-form)
- [Step 6: Track Your PayPal Payments in WordPress](#step-6-track-your-paypal-payments-in-wordpress)
- [Understanding the 3% WPForms Platform Fee](#understanding-the-3-wpforms-platform-fee)
- [When You Might Want to Upgrade to WPForms Pro](#when-you-might-want-to-upgrade-to-wpforms-pro)
**What You’ll Need**
Make sure you have these three things ready before getting started:
- **A self-hosted WordPress site** (WordPress.org, not WordPress.com Free plan)
- **A PayPal Business account** (free to create at paypal.com/business)
- **WPForms Lite version 1.10.0 or higher** (free from the WordPress plugin directory)
WPForms Lite does apply a 3% platform fee on PayPal Commerce transactions, on top of PayPal’s own processing fees. I’ll break down exactly what that means later in this guide.
### Step 1: Install and Activate WPForms Lite
WPForms is the most beginner-friendly form builder plugin for WordPress. It has 13+ thousand 5-star reviews on WordPress.org, and for good reason.
What I like most about WPForms for payment forms is that everything happens inside the plugin. You don’t need a separate payment addon or a third-party connector to get PayPal working.
The Lite version gives you the drag-and-drop builder, payment item fields, PayPal Commerce, [Stripe payments](https://wpforms.com/features/stripe-payments/), and an AI form builder.
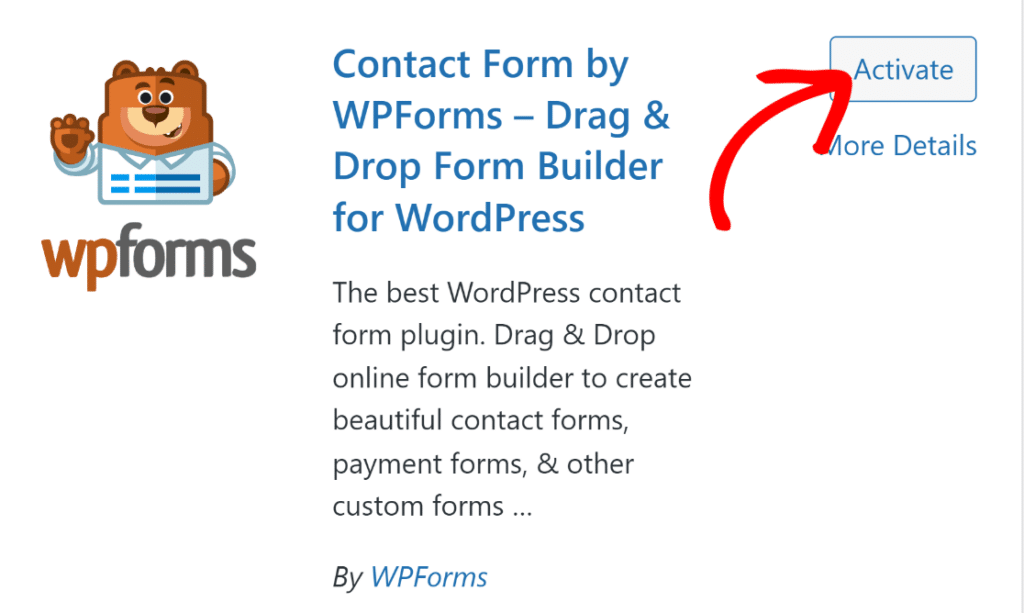
Go to your WordPress dashboard and navigate to **Plugins » Add New**. Search for “WPForms” and install the plugin by the WPForms team.
Click **Activate** once the installation finishes. If you’re installing a plugin for the first time, follow this guide on [how to add a plugin to WordPress](https://www.wpbeginner.com/beginners-guide/step-by-step-guide-to-install-a-wordpress-plugin-for-beginners/).
You can also [accept credit card payments online for free](https://wpforms.com/how-to-accept-credit-card-payments-online-for-free/) using the built-in Stripe integration if you want to offer multiple payment methods alongside PayPal.
[Try WPForms For Free! 🙂](https://wpforms.com/pricing/)
### Step 2: Connect Your PayPal Business Account
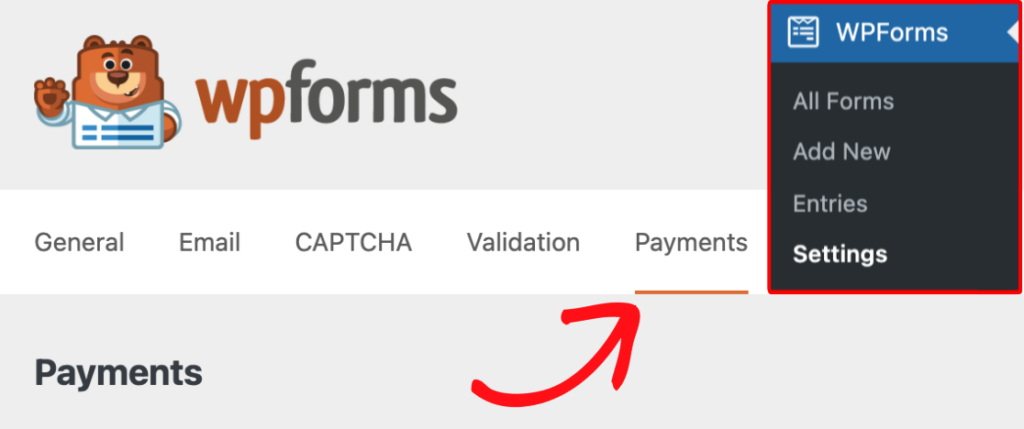
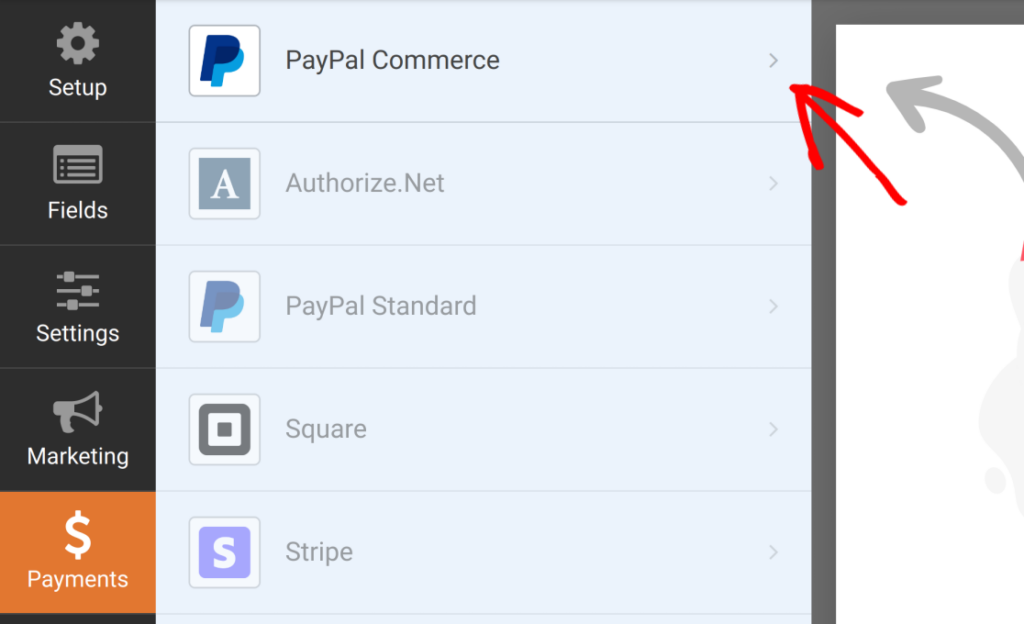
With WPForms installed, the next step is connecting your PayPal account. In your WordPress dashboard, go to **WPForms » Settings » Payments**.
If your site uses a currency other than USD, go ahead and select it from the **Currency** dropdown before moving on. Next, scroll down to the **PayPal Commerce** section and click **Connect with PayPal Commerce**.
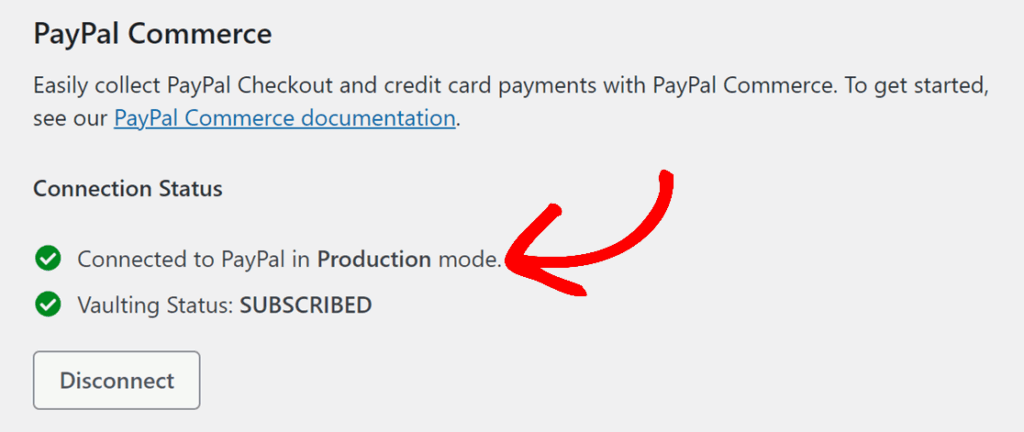
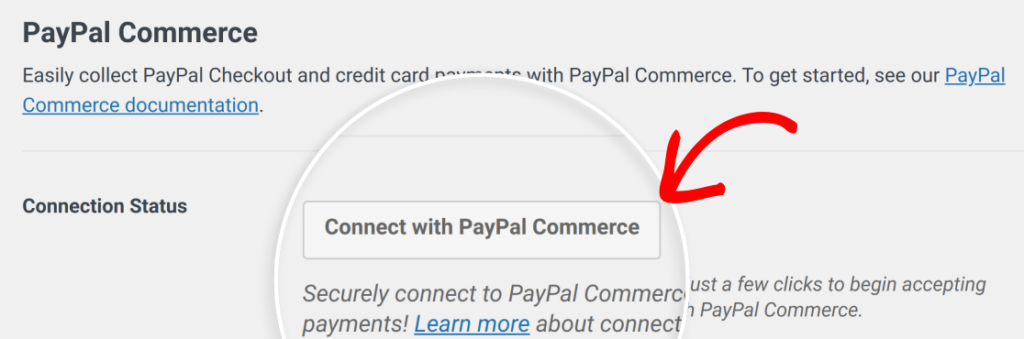A PayPal popup window will open. Log in with your PayPal Business credentials and follow the prompts to authorize the connection.
After the authorization completes, you’ll return to your WordPress admin area. Look for the green checkmark next to **Connection Status**. That confirms everything is linked up correctly.
**Don’t have a PayPal Business account yet?**
Creating one is free and takes just a few minutes. Head to [paypal.com/business](https://www.paypal.com/business "paypal.com/business") to sign up. A standard personal PayPal account won’t work with this integration.
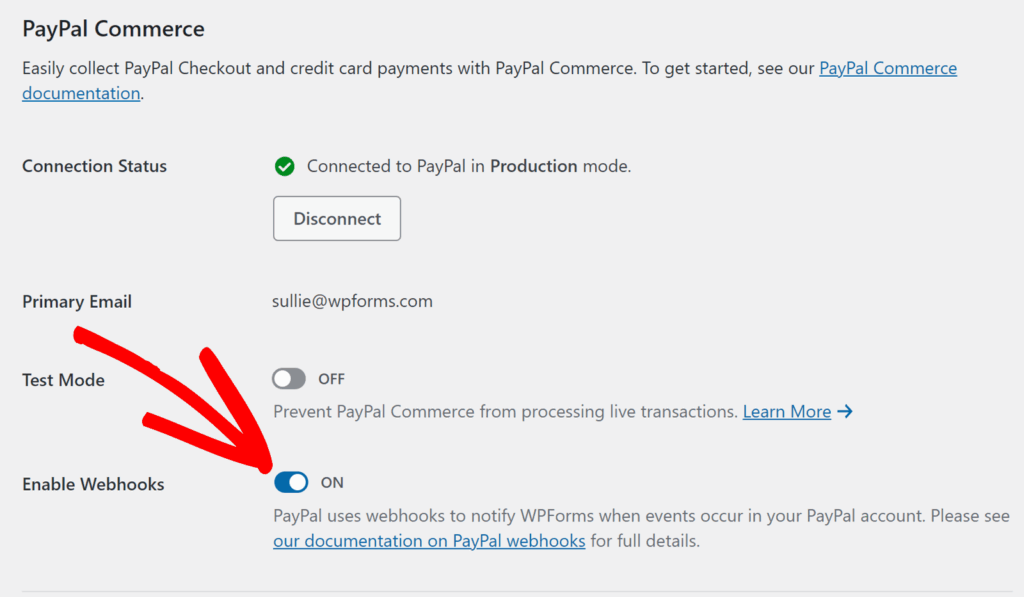
WPForms also configures PayPal Commerce webhooks automatically. Webhooks keep your payment records in sync between PayPal and WordPress.
If webhooks aren’t set up for some reason, you can configure them manually by following the guide on [setting up PayPal Commerce webhooks](https://wpforms.com/docs/setting-up-paypal-commerce-webhooks/).
### Step 3: Create Your Payment Form
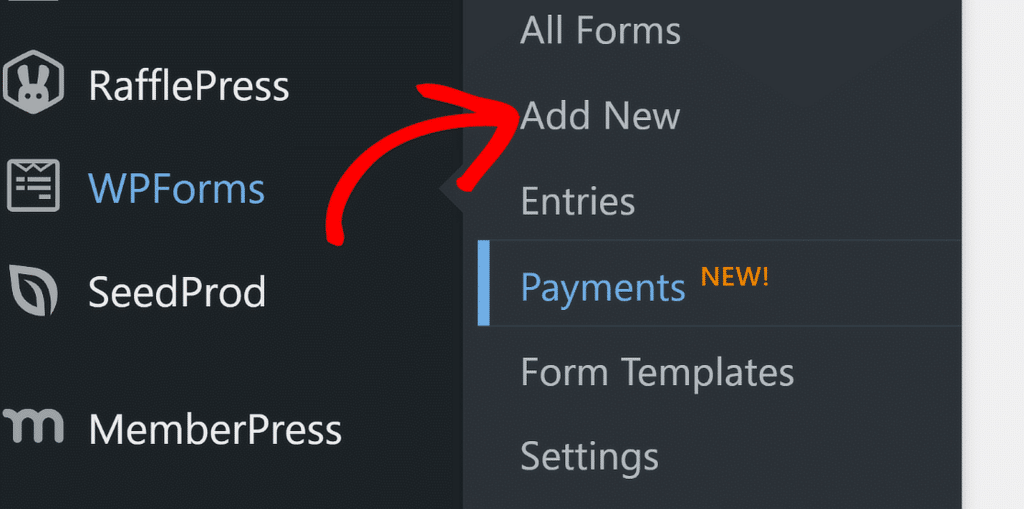
Now it’s time to build the actual form that will collect payments. From your WordPress dashboard, navigate to **WPForms** and click on the **Add New** option.
You can pick one of the available [form templates](https://wpforms.com/features/form-templates/) or start with a blank canvas. For a basic payment form, starting from scratch works perfectly.
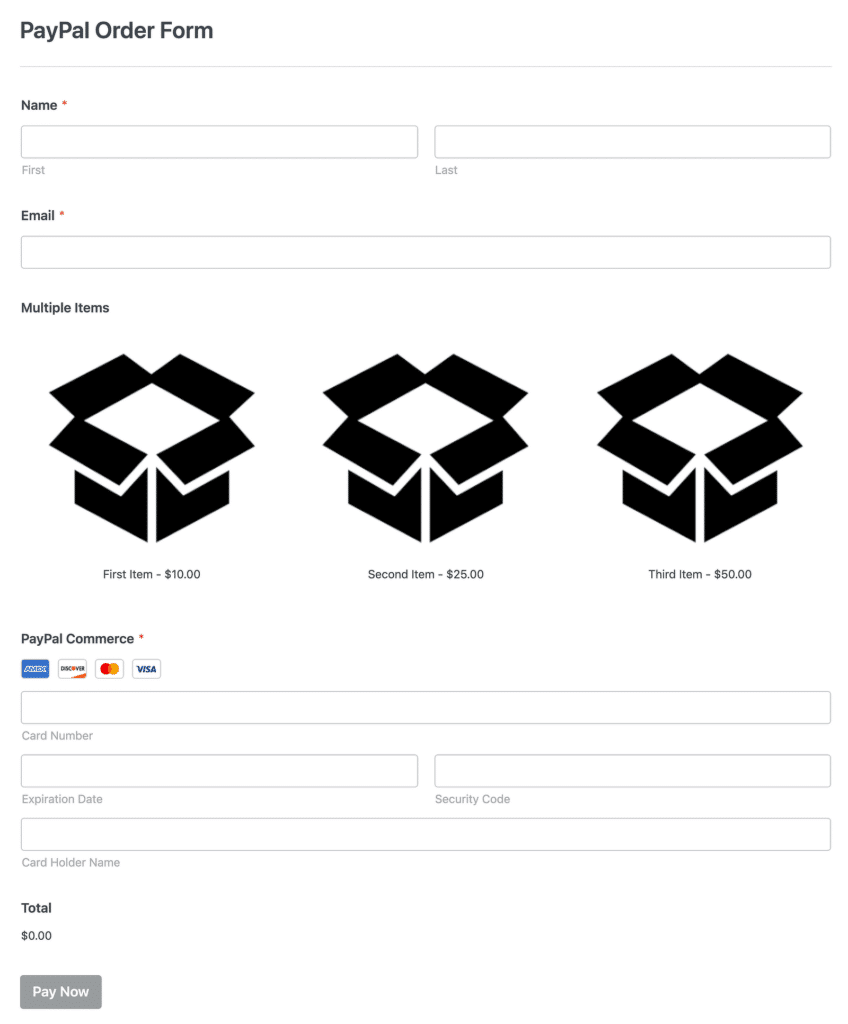
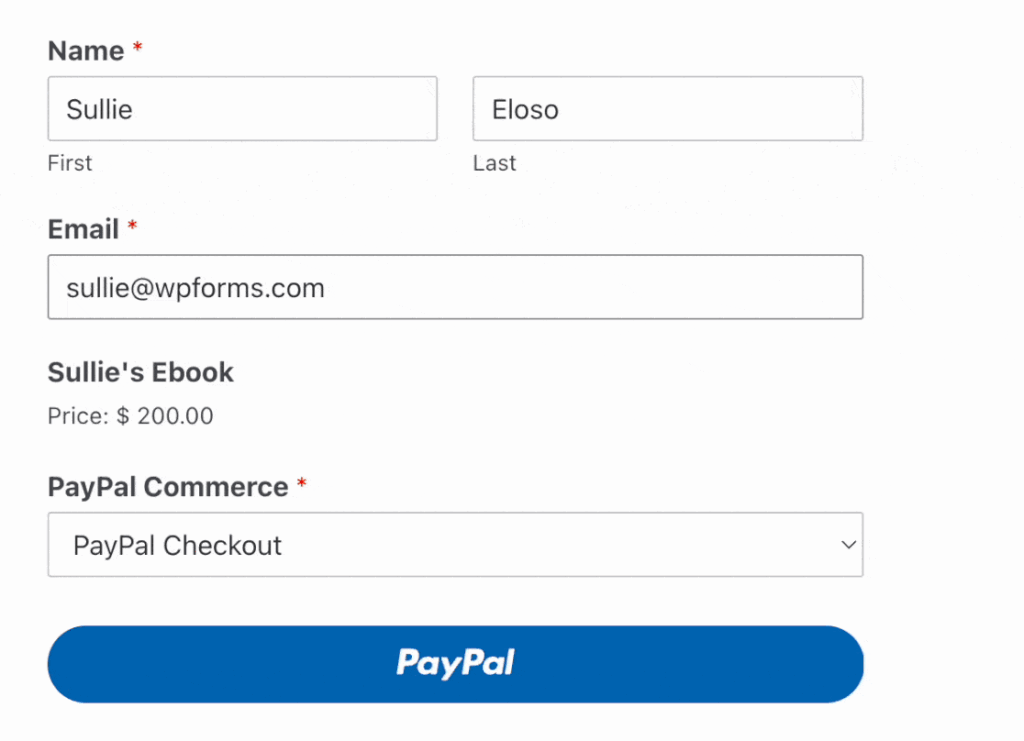
For PayPal Commerce to process payments, your form needs at least one payment item field and a PayPal Commerce field. I’d recommend adding these fields for a standard setup.
- **Name** and **Email** to capture buyer information
- **Single Item** or **Multiple Items** to define what you’re selling and at what price with images.
- **PayPal Commerce** to let buyers complete the payment
- **Total** so buyers can see their order amount before paying
If you’re selling different products or services, the **Multiple Items** field is your best bet. It lets buyers choose from a list of options, each with its own price and image.
For more ideas on structuring payment forms, check out how to [create a simple order form](https://wpforms.com/how-to-create-a-simple-order-form-in-wordpress/) in WordPress.
### Step 4: Set Up Your PayPal Payment Settings
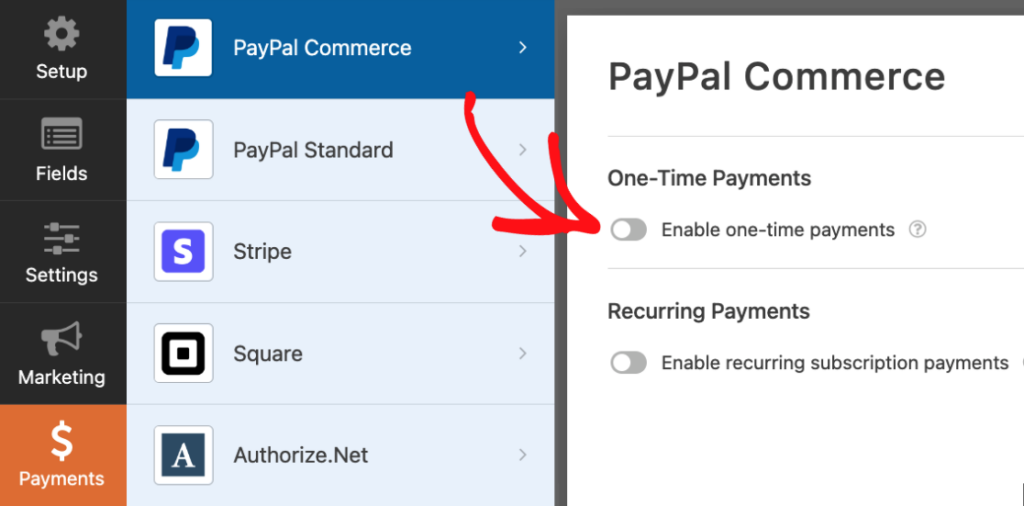
With your form fields in place, you need to configure how PayPal handles the payments. In the form builder, click **Payments » PayPal Commerce** in the left sidebar to open the payment settings.
#### One-Time Payments
To collect a single payment per form submission, toggle **Enable one-time payments** to the on position.
You’ll see a **Payment Description** field where you can add a short note that identifies the payment in your PayPal records. Something like “Website consultation fee” or “Product order” works well.
**Note**
Additional settings like **Billing Address**, **Shipping Address**, and **Conditional Logic** are available for Pro users only. For straightforward one-time payments, though, you have everything you need right here in Lite.
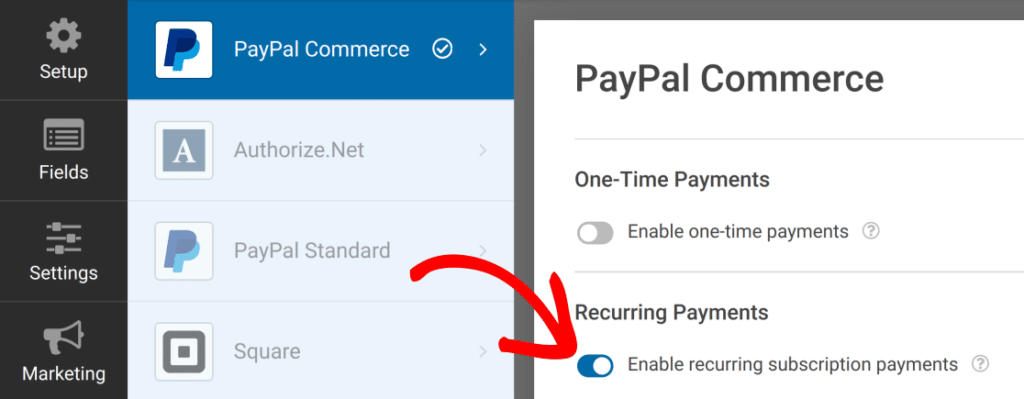
#### Recurring Payments
If you want to charge customers on a recurring schedule, toggle **Enable recurring subscription payments** instead. This works well for monthly memberships, subscription services, or ongoing retainers.
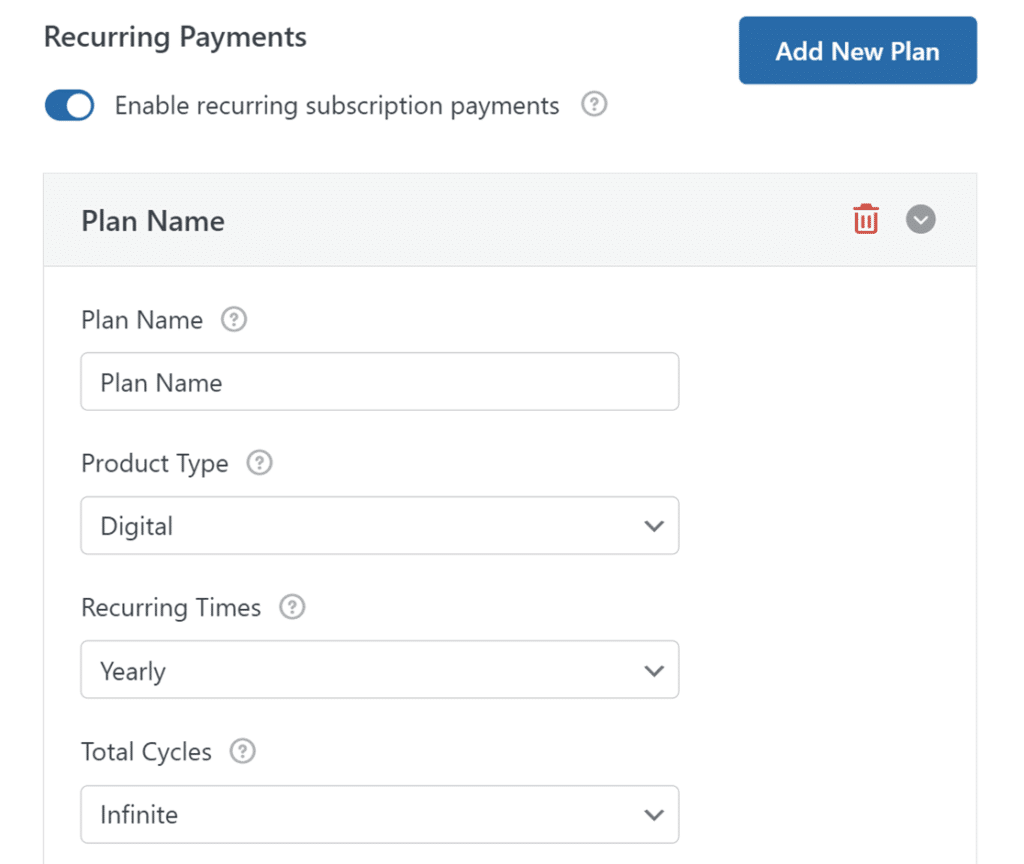
You’ll need to configure a few things for the recurring plan.
- **Plan Name** gives the subscription an internal label for your records
- **Product Type** categorizes what the payment is for
- **Recurring Times** sets the billing frequency (monthly, weekly, yearly)
- **Total Cycles** controls how many times the charge repeats before stopping
WPForms Lite also includes an automatic retry option if the first payment attempt fails. That’s a useful safety net for subscription-based businesses.
That said, Lite supports a single recurring plan per form, and you can’t offer both one-time and recurring options on the same form.
If you need that flexibility, WPForms Pro with the PayPal Commerce addon handles it through conditional logic. For more on subscription billing, take a look at how to [accept recurring payments on your WordPress forms](https://wpforms.com/how-to-accept-recurring-payments-on-your-wordpress-forms/).
### Step 5: Embed and Publish Your Form
Once you’re happy with your PayPal payment form, hit the Save button. Now, it’s time to put it on your site and start accepting payments.
Click the **Embed** button at the top of the form builder. You’ll see two options: add your quiz to an existing page or create a new page from scratch.
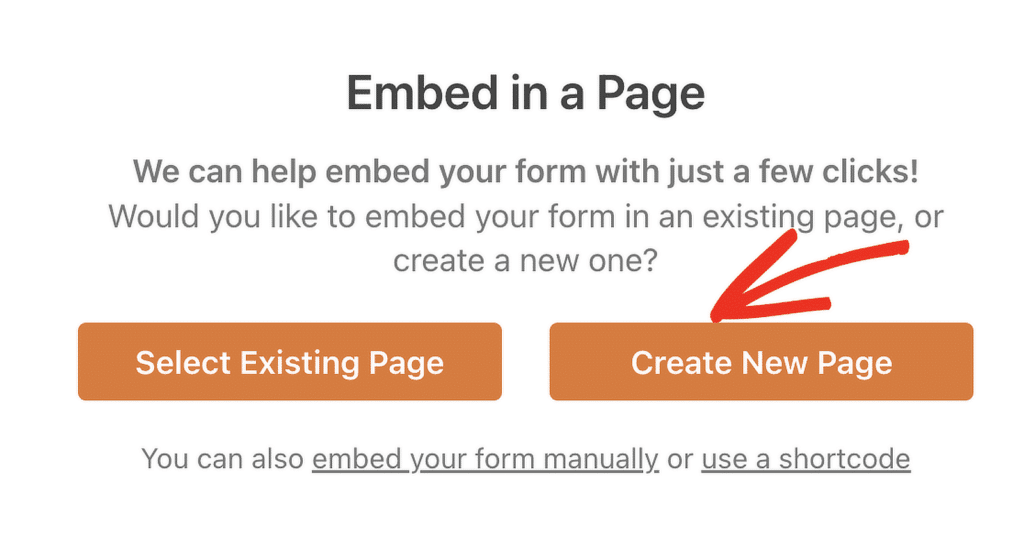If you’re creating a new page, go ahead and give it a name that matches your form. Something like “PayPal Order Form” works well. Then click **Let’s Go**.
WordPress will open the block editor with your form already embedded on the page. Now’s a good time to style things if you want using [WPForms’ native black editor styling options](https://wpforms.com/how-to-style-wpforms-using-the-block-editor/).
Preview the page before publishing. Make sure the form loads properly and the PayPal payment button shows up at the bottom.
Before accepting real payments, also run a quick test to confirm everything works. For a detailed walkthrough of the sandbox testing process, check out the full guide on [testing payments with PayPal Commerce](https://wpforms.com/docs/testing-payments-with-the-paypal-commerce-addon/).
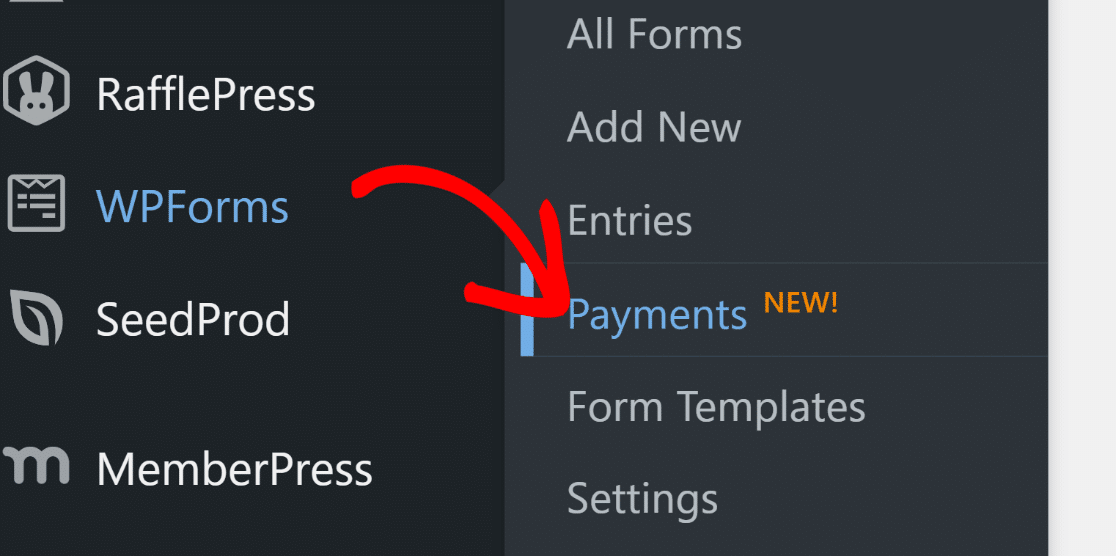
### Step 6: Track Your PayPal Payments in WordPress
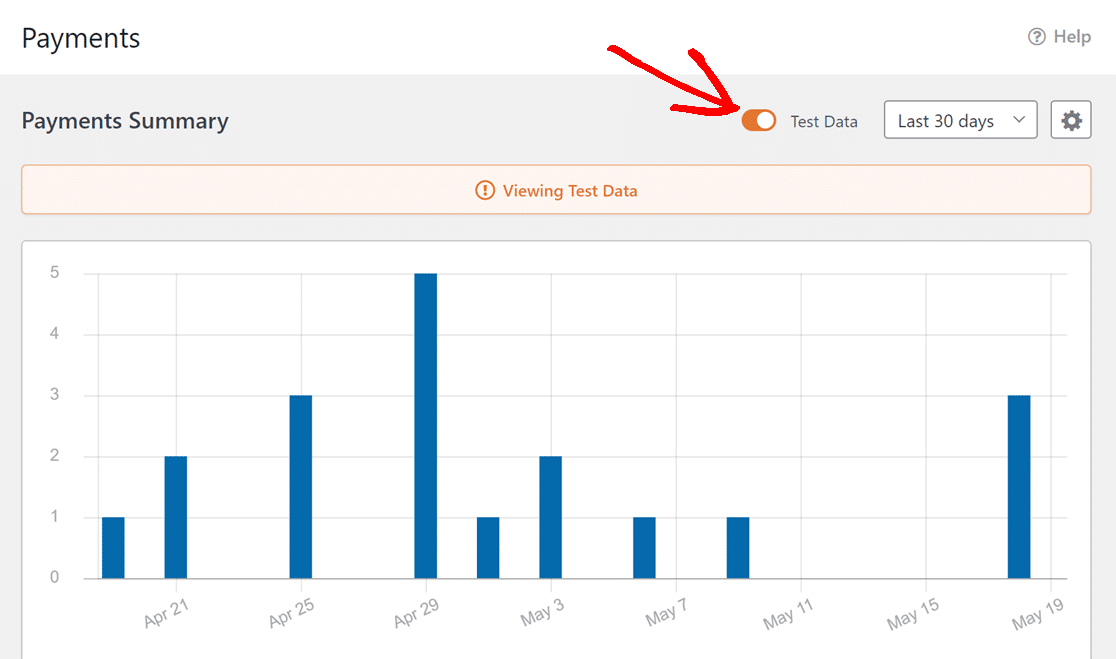
Once you start making sales with PayPal on your website, you can view your entire sales history and trends within the WordPress dashboard. This payments summary is accessible via **WPForms** **» Payments**.
With this payment summary, you can get a visual overview of your sales performance over time. It’s a massively helpful tool for monitoring your subscriptions, total payments, and sales value in dollars.
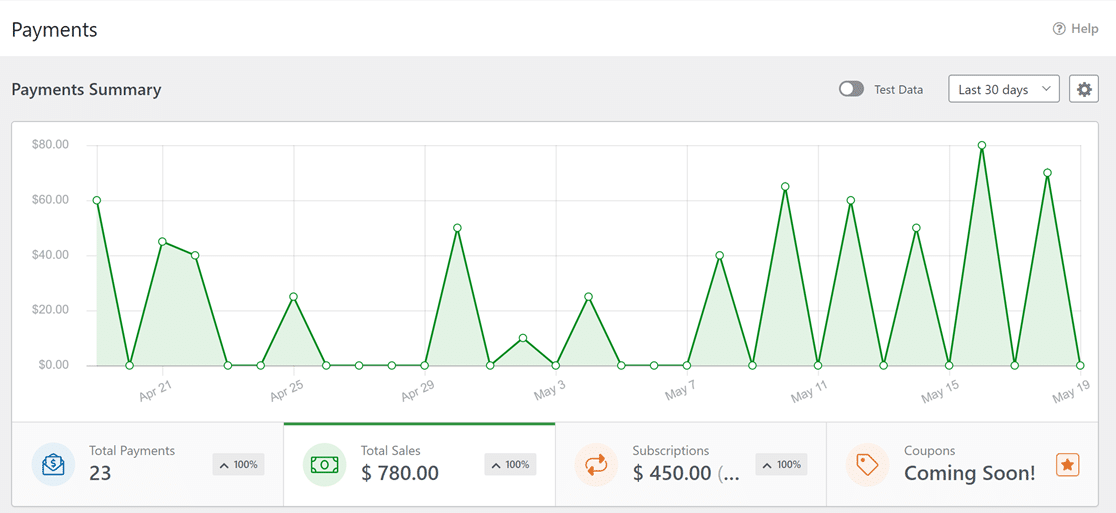If you haven’t started accepting live payments yet, you can just view the test payment data by toggling on the test button.
And that wraps it up. You’re now ready to start accepting PayPal payments in WordPress for free!
### Understanding the 3% WPForms Platform Fee
I want to be transparent about this because it matters when you’re choosing a payment solution. WPForms Lite charges a 3% platform fee on every PayPal Commerce transaction.
That’s on top of PayPal’s own processing fees, which are typically around 2.99% + $0.49 per transaction for US accounts. So on a $50 payment, you’d pay roughly $1.50 to WPForms and about $1.99 to PayPal.
Is that worth it? Honestly, it depends on your volume. Other free PayPal plugins might skip the platform fee, but most don’t include a proper form builder with drag-and-drop fields and recurring payment support.
And if you’re thinking about WooCommerce just for PayPal, that’s a lot of overhead for something WPForms handles in a few minutes. You can read more about that in our guide on how to [sell on WordPress without WooCommerce](https://wpforms.com/sell-on-wordpress-without-woocommerce/).
If you’re processing a handful of payments per month, the 3% is a small trade-off for the simplicity. If you’re moving hundreds or thousands of dollars regularly, the fee starts adding up. That’s when upgrading makes financial sense.
For a broader look at payment options, check out [Stripe vs PayPal](https://wpforms.com/stripe-vs-paypal-which-one-is-better/) to see how the two biggest processors compare and which one is the best one for you.
### When You Might Want to Upgrade to WPForms Pro
WPForms Lite handles the basics really well. But if your payment needs are growing, WPForms Pro with the [PayPal Commerce addon](https://wpforms.com/docs/paypal-commerce-addon/) opens up a lot more.
Here’s what the Pro upgrade gives you for PayPal payments.
- **No 3% WPForms platform fee** on any PayPal transaction
- **[Conditional logic](https://wpforms.com/features/conditional-logic/) on payments** to show or hide options based on what a customer selects
- **Both one-time and recurring payments** on the same form
- **Multiple subscription plans** per form
- **Advanced notification workflows** with full control over payment confirmation emails
- **Full refund and cancellation management** from your WordPress dashboard
Beyond PayPal, Pro also unlocks 2,100+ form templates, surveys, digital signatures, file uploads, and dozens of other features. If you’re collecting payments regularly, the upgrade pays for itself just by removing the platform fee.
[Get WPForms Pro Now! 🙂](https://wpforms.com/pricing/)
### FAQs About Accepting Free PayPal Payments on WordPress
PayPal Commerce in WPForms Lite is a relatively new feature. These are the questions I see most from people setting up their first WordPress PayPal payment form.
#### Do I Need a PayPal Business Account to Accept Payments?
Yes. The PayPal Commerce integration requires a Business account. Personal PayPal accounts won’t work. The good news is that creating a Business account is completely free. Just go to paypal.com/business and follow the signup process.
#### Can I Accept Both One-Time and Recurring Payments on the Same Form?
Not in WPForms Lite. A single form can handle one-time payments or recurring payments, but not both at the same time. Lite doesn’t include conditional logic for PayPal Commerce settings, so there’s no way to toggle between the two on one form. For that capability, you’d need WPForms Pro with the PayPal Commerce addon.
#### How Does the WPForms Fee Compare to Other Free Options?
On a $50 transaction, the 3% WPForms fee comes to $1.50 on top of PayPal’s standard processing fees. Some free plugins don’t charge a platform fee, but they typically lack features like recurring payments, a drag-and-drop builder, or proper payment tracking. When you factor in what WPForms Lite includes for free, the 3% is a reasonable trade-off for most small businesses and side projects.
#### Is WPForms Lite Really Free Forever?
Yes. WPForms Lite is available on WordPress.org with no trial period and no expiration. PayPal Commerce, Stripe payments, the AI form builder, and all standard form fields are included permanently. You only need to upgrade if you want premium features like conditional logic on payments, advanced addons, or entry management in the WordPress dashboard.
## Next, Explore More Payment Guides for WordPress
If you want to take your payment forms further, check out these related guides.
- [Best PayPal Plugins for WordPress](https://wpforms.com/best-paypal-plugins-for-wordpress/)
- [How to Create a Nonprofit Donation Form](https://wpforms.com/how-to-create-a-nonprofit-donation-form/)
[Build Your WordPress Form Now](https://wpforms.com/pricing/)
Ready to build your form? Get started today with the easiest WordPress form builder plugin. [WPForms Pro](https://wpforms.com/pricing) includes lots of free templates and offers a 14-day money-back guarantee.
If this article helped you out, please follow us on [Facebook](https://facebook.com/wpforms) and [Twitter](https://twitter.com/easywpforms) for more free WordPress tutorials and guides.
**Categories:** WordPress Tutorials
**Tags:** paypal for all users, paypal wordpress, wpforms free, wpforms lite
---