Would you like to send data from your WordPress forms to a third-party app or plugin? With the WPForms Webhooks addon, you can connect your forms to a secondary service.
This tutorial will show you how to install and use the Webhooks addon with WPForms.
In This Article
Requirements:
- You will need an Elite license level to access the Webhooks addon
- Ensure that you’ve installed the latest version of WPForms to meet the minimum required version for the Webhooks addon
What Are Webhooks?
A webhook allows you to automatically send information from your form to some other service or tool outside of your WordPress site. This is especially helpful if you need an integration, but there’s no addon available for it yet.
The most beginner-friendly way to set up a webhook is through our Zapier addon. Zapier is great for all user levels because it uses a wizard-style setup, which walks you through every step needed to connect your forms to a separate service.
Another option is our Uncanny Automator integration. This feature enables you to make connections between supported apps and services.
For more advanced users, the Webhooks addon offers similar capabilities without any connector service. However, as a tradeoff, the setup process is more technical.
Installing the Webhooks Addon
Before you get started, you’ll first need to make sure that WPForms is installed and activated on your WordPress site.
Once WPForms is installed and your license is verified, you’ll be able to quickly install and activate the Webhooks addon.
Setting Up a Webhook
Once the installation process is complete, you’re ready to set up your webhook. To get started, you’ll need to create a new form or edit an existing one.
After opening the form builder, you can enable webhooks under Settings » Webhooks. From here, toggle the Enable Webhooks option on.
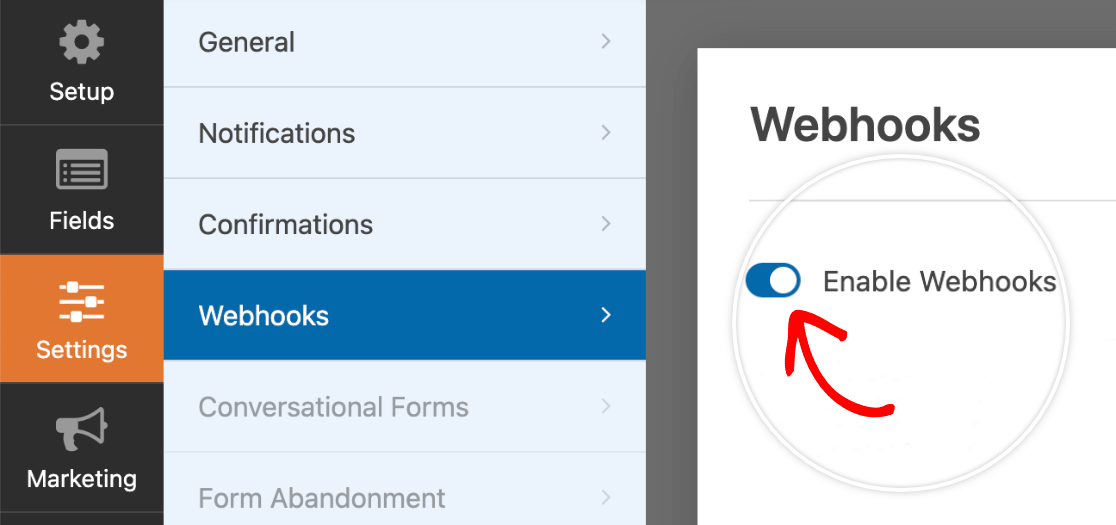
This will open up more settings that you can configure, including naming your webhook.
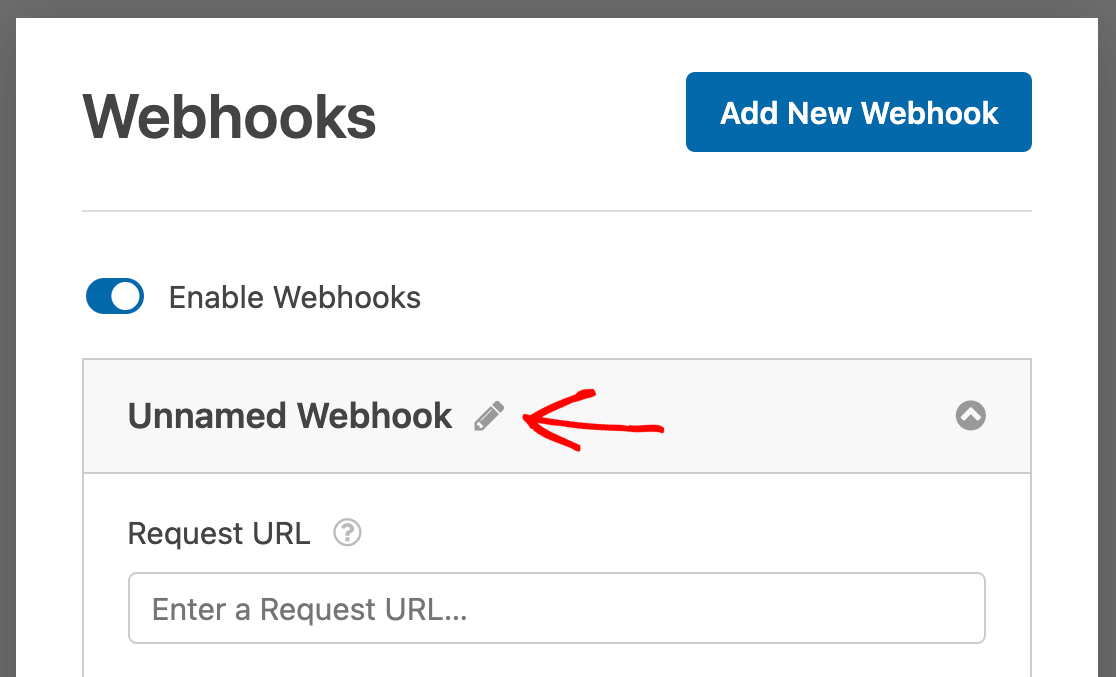
By default, new webhooks will be unnamed. If you’d like to edit or add a name to your webhook, click on the pencil icon.
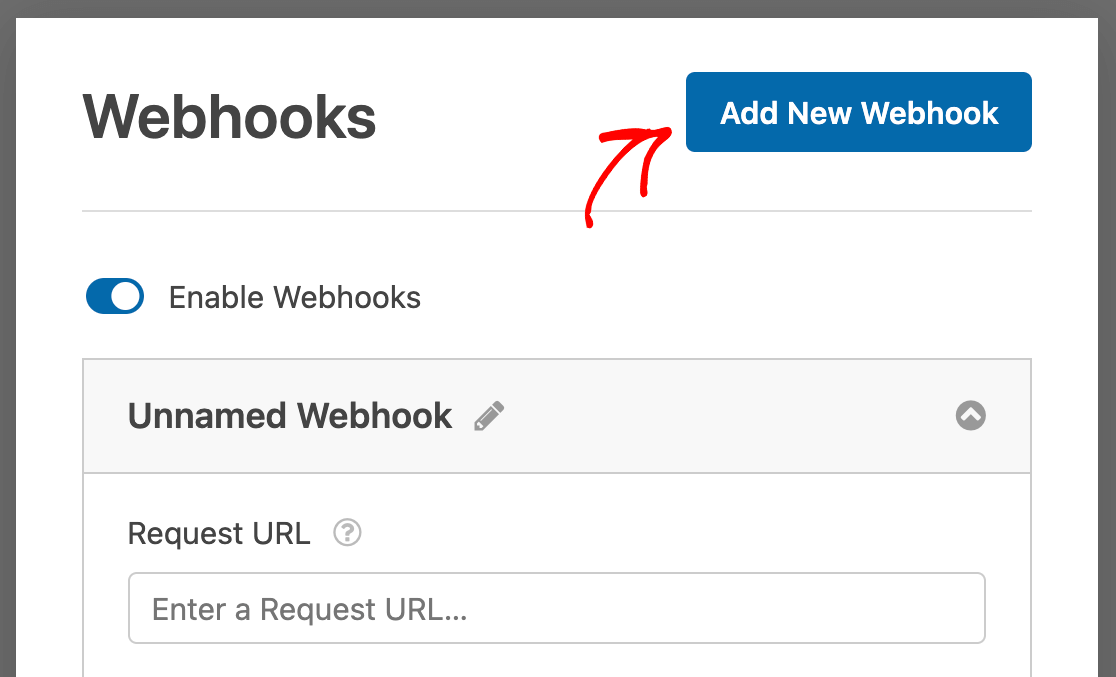
Additionally, if you’d like to add more webhooks, you can click the button labeled Add New Webhook and fill out the settings for each additional connection.
Below the name of your webhook, you’ll see all available settings for this connection. We’ve outlined what each of these does below.
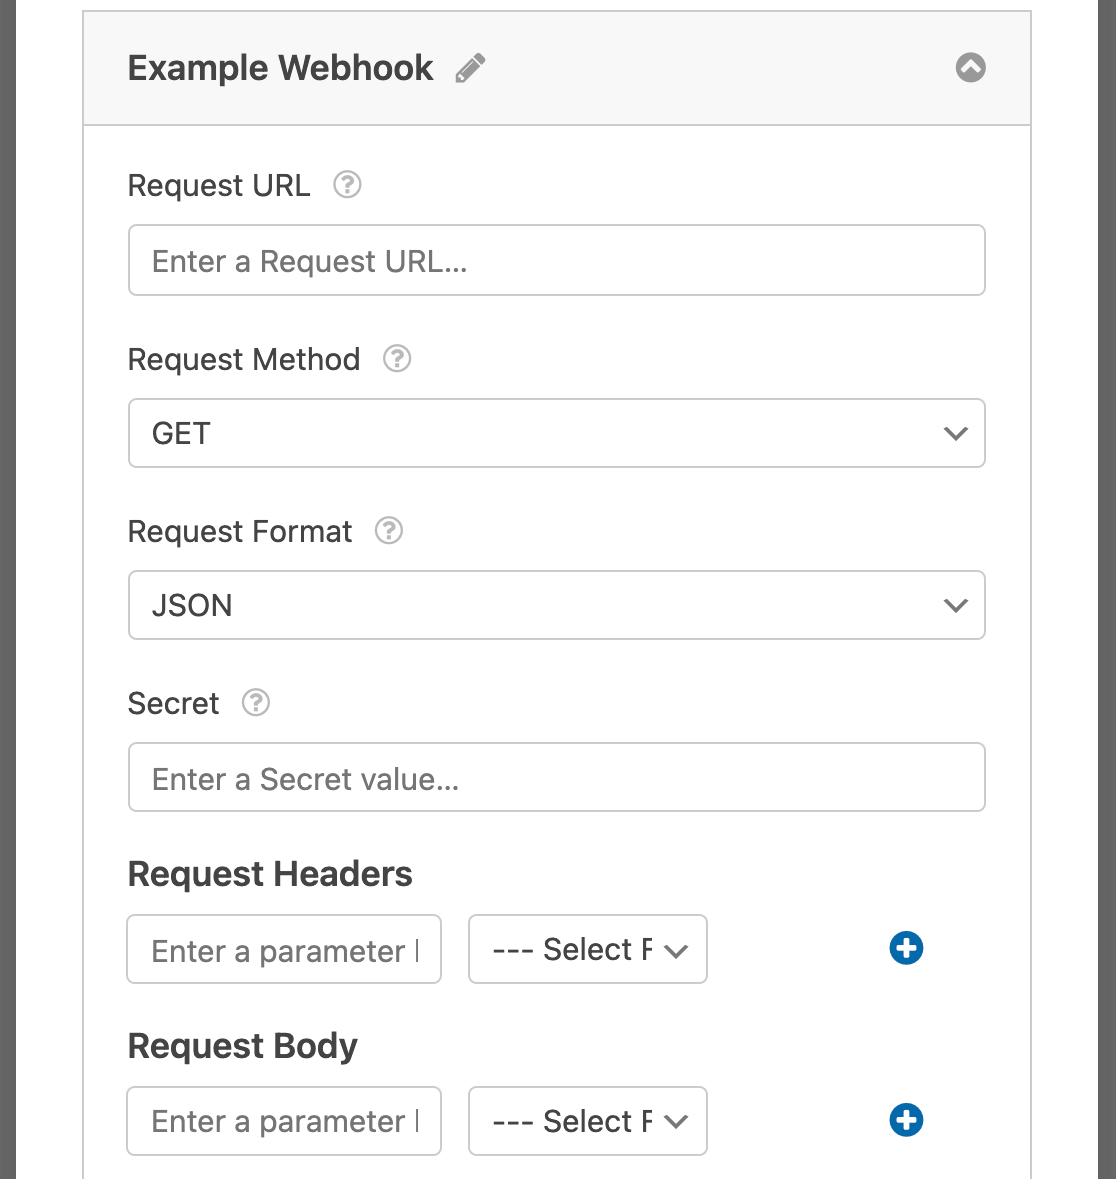
Request URL
The Request URL will be used to connect WPForms to a secondary app. You can usually get this URL from the service or tool’s API after setting up a basic connection.
Request Method
The Request Method allows you to select the HTTP method you’d like to use when your webhook request runs.
There are several different methods to choose from, based on what type of connection you’re looking to create:
- GET: The GET method will grab information from a submitted form and send the details to a connected app.
- POST: The POST method will take the information submitted through WPForms and send it to a secondary service.
- PUT: The PUT method allows you to update data when your webhook runs.
- PATCH: The PATCH method lets you replace data when your webhook runs.
- DELETE: The DELETE method enables you to delete information when this specific webhook runs.
Request Format
The Request Format will communicate to your server what type of data is being sent through your webhook. This will also set the Content-Type header value for your data.
There are two different request format types available:
- JSON: The JSON method will format your data in an
application/jsonformat and will set the content type ascharset=utf-8. - FORM: The FORM method will format your data in an
application/x-www-form-urlencodedformat, and will set the content type ascharset=utf-8.
Note: Data is typically sent in JSON format, as this will make things easier to change server-side (including validation, formatting, and sanitization changes).
Secret
The Secret key will generate a hash (or unique ID) for each completed request. This acts as a signature to verify the origin of your HTTP request, and will always be provided in the Request Header.
Note: In most cases, if you’re integrating your forms with a third-party service, you don’t need to fill out the Secret setting. The Secret setting is intended for developers integrating with their own APIs as a way to verify a request’s origin.
Request Headers
Request Headers allow you to define the HTTP header’s key(s) and value(s) to be sent with your webhook request.
Request Body
Similar to the Request Headers, the Request Body setting lets you define the key(s) and value(s) that will be sent in the body of your webhook’s request.
Note: For separating multiple values in fields like Address, Dropdown, Checkboxes, etc., WPForms uses two vertical slashes (like so: ||).
Example: Using Webhooks to Connect WPForms to Slack
As an example, we’ll walk you through how to connect WPForms to your Slack account using a webhook.
Note: This example walks through how to send a single form field to Slack. If you’d like to send multiple fields to Slack, be sure to check out our developer documentation for more details.
Creating Your Slack App
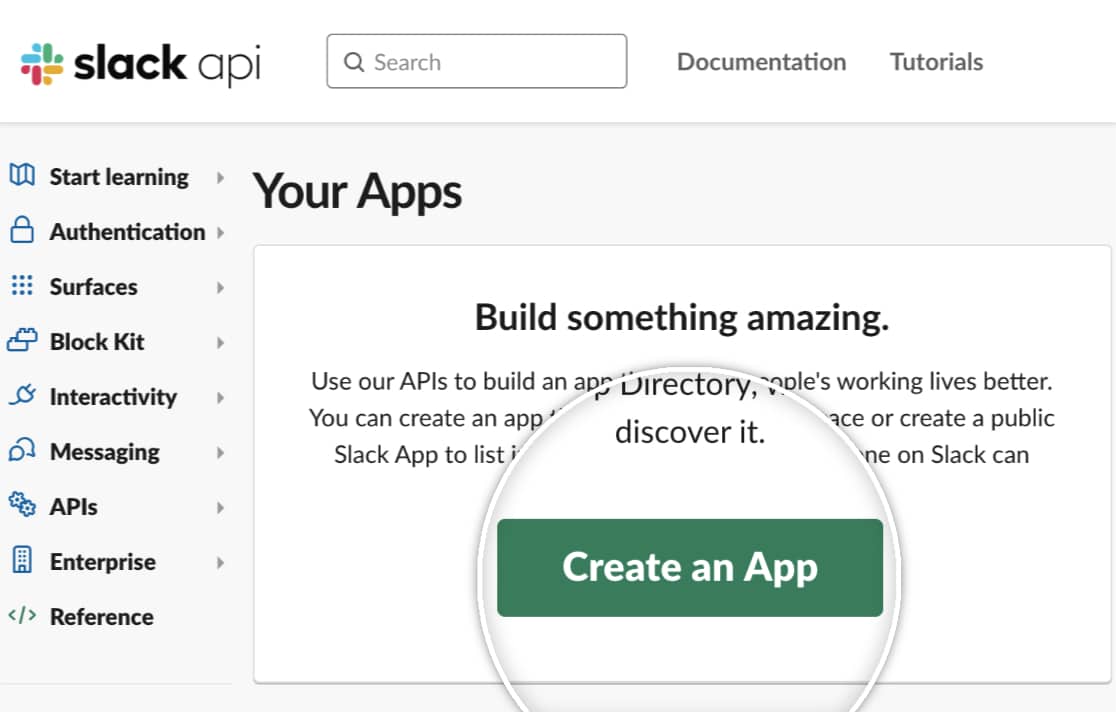
First, you’ll need to navigate to Slack’s API page. Then click on the Create an App button.
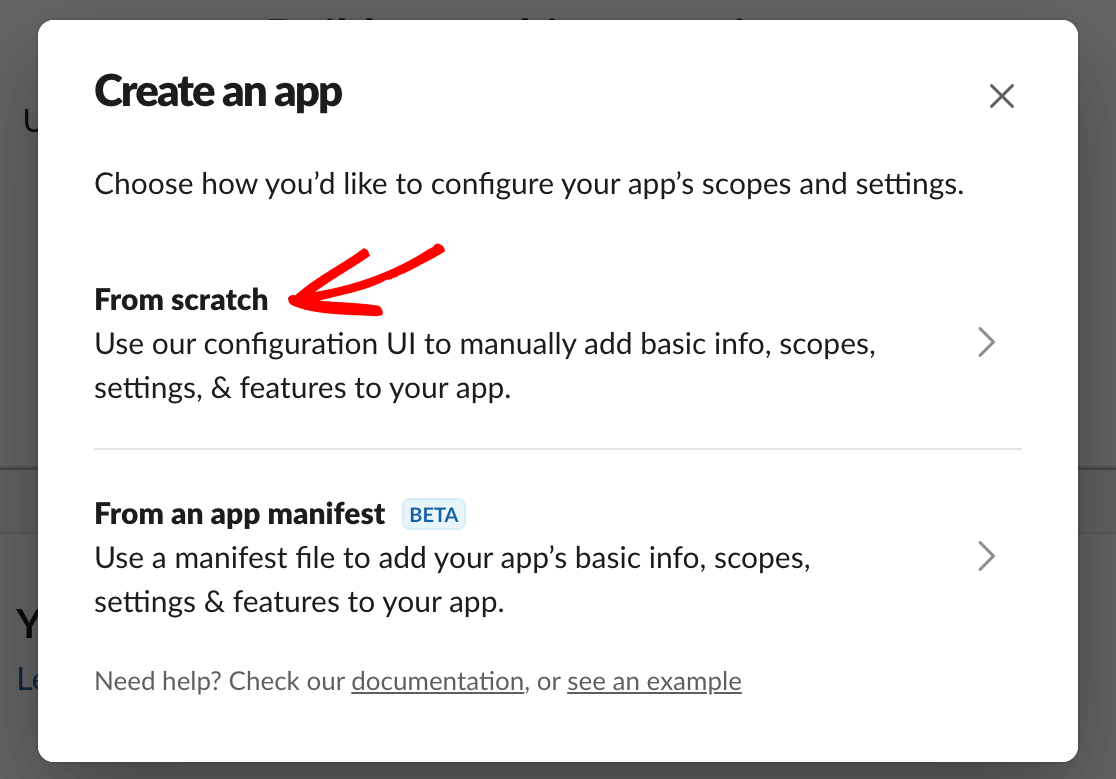
This will open up an overlay where you’ll need to select how you’d like to configure your app. Choose the From scratch option.
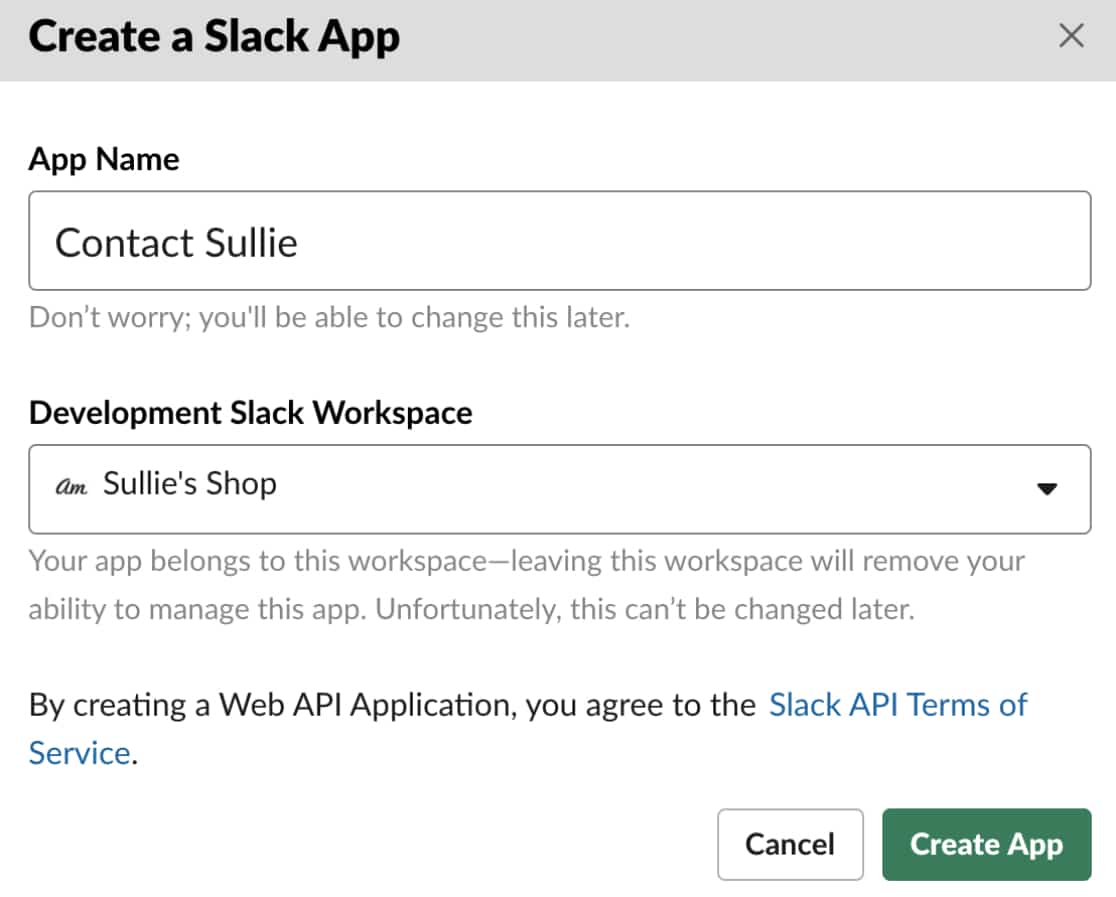
You’ll then be able to name your app and select which workspace you’d like to send form data to. For our example, we’ll name our app Contact Sullie. Click the Create App button to proceed.
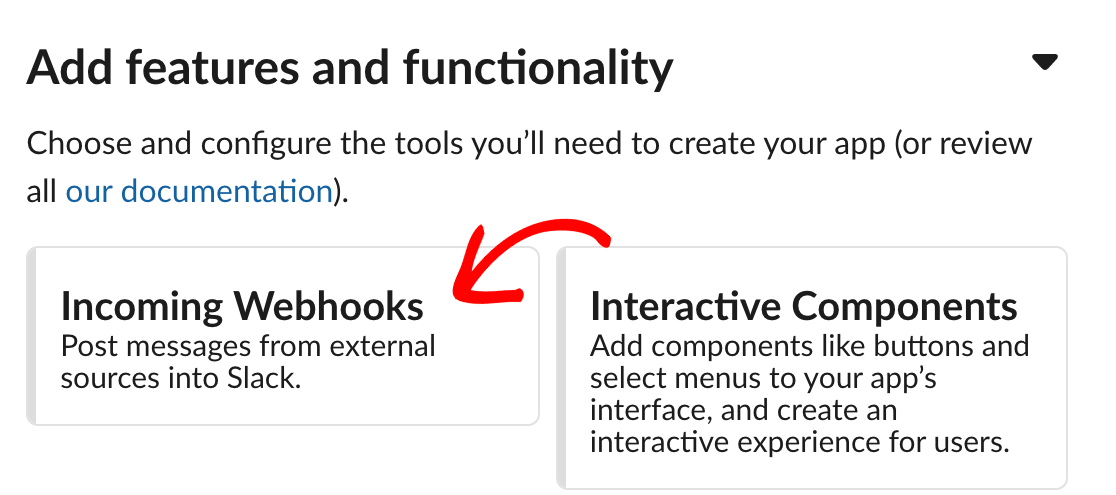
This will bring you to a page with some basic information about your app. Scroll down to the Add features and functionality settings and enable the Incoming Webhooks option.
Once you’ve enabled the Incoming Webhooks setting, toggle the Activate Incoming Webhooks option to On. This will open up more details further down on the page.
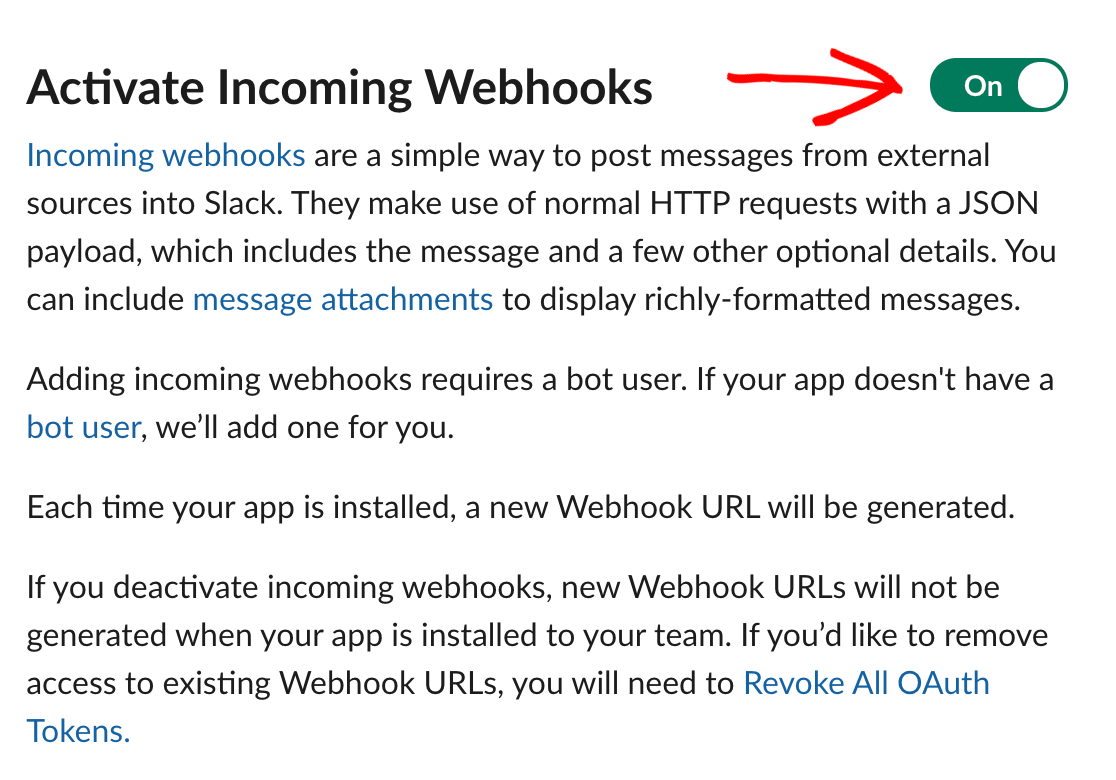
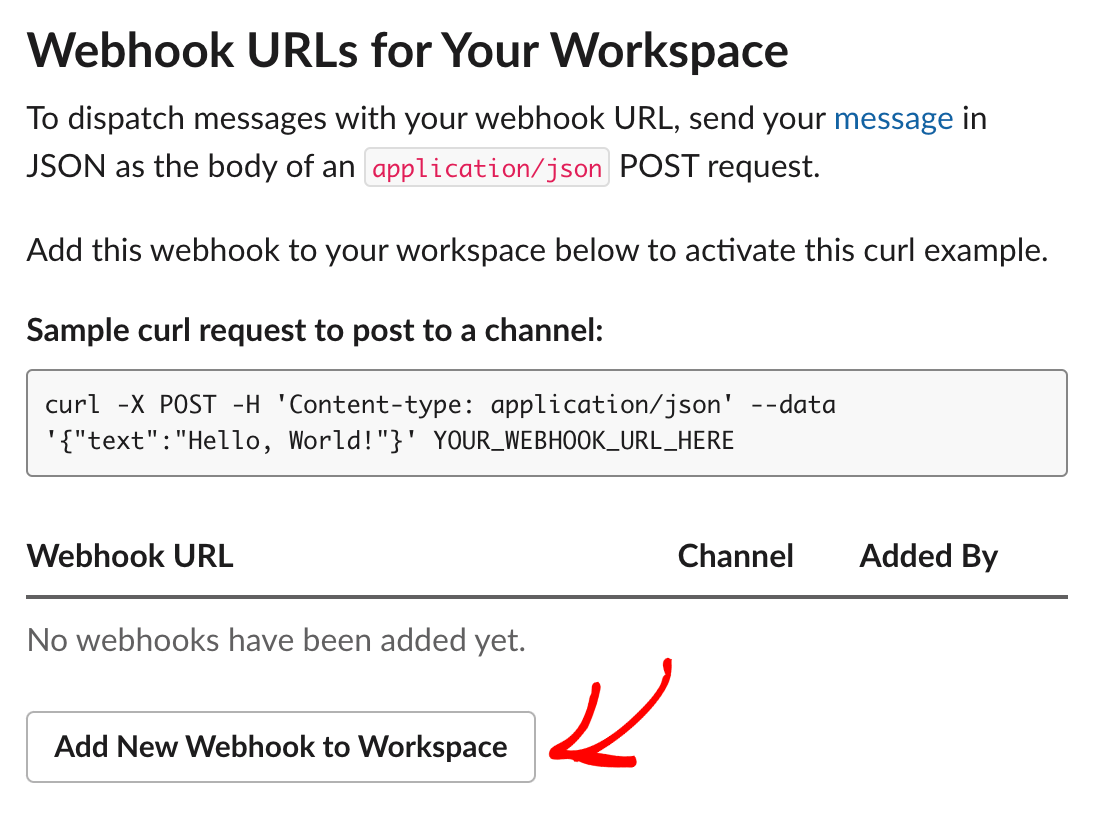
Underneath the Webhook URLs for Your Workspace section, click the Add New Webhook to Workspace button.
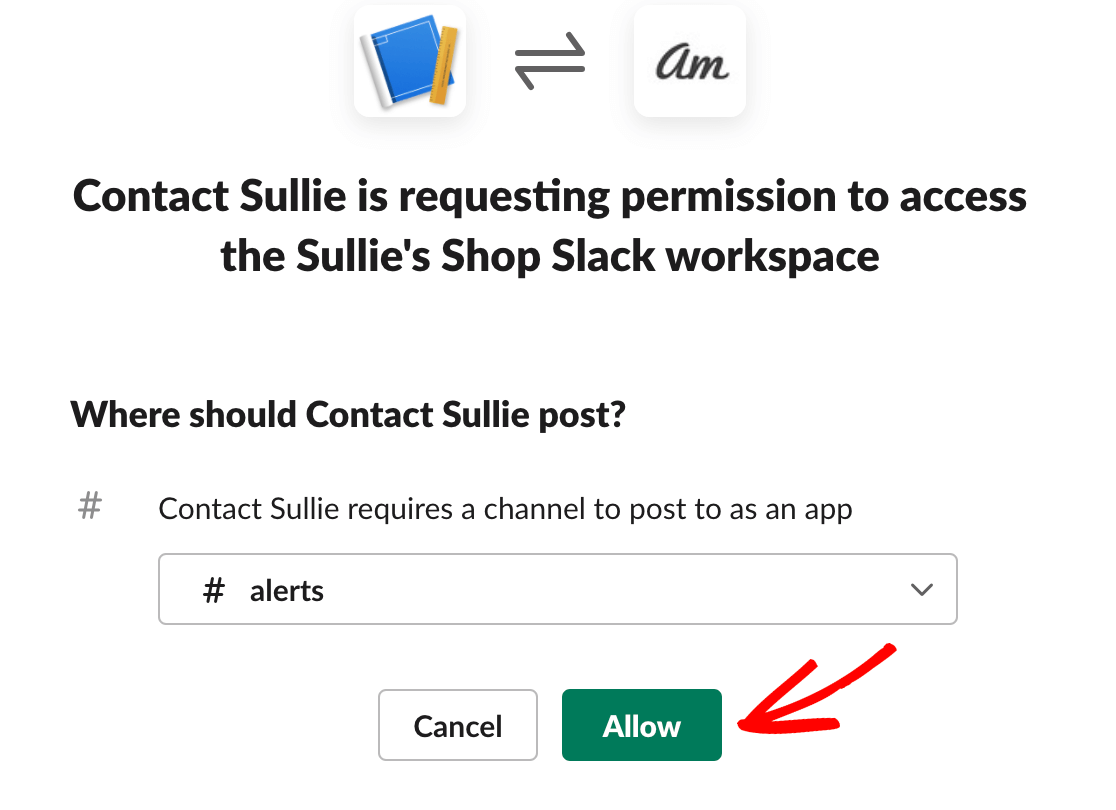
This will redirect you to another overlay where you’ll need to select a Slack channel to send your messages to. Choose a channel from the dropdown and click Allow.
This will bring you back to the previous page. You’ll see a new URL in the Webhook URLs for Your Workspace section. Go ahead and copy this URL, as you’ll be using it in the next step.
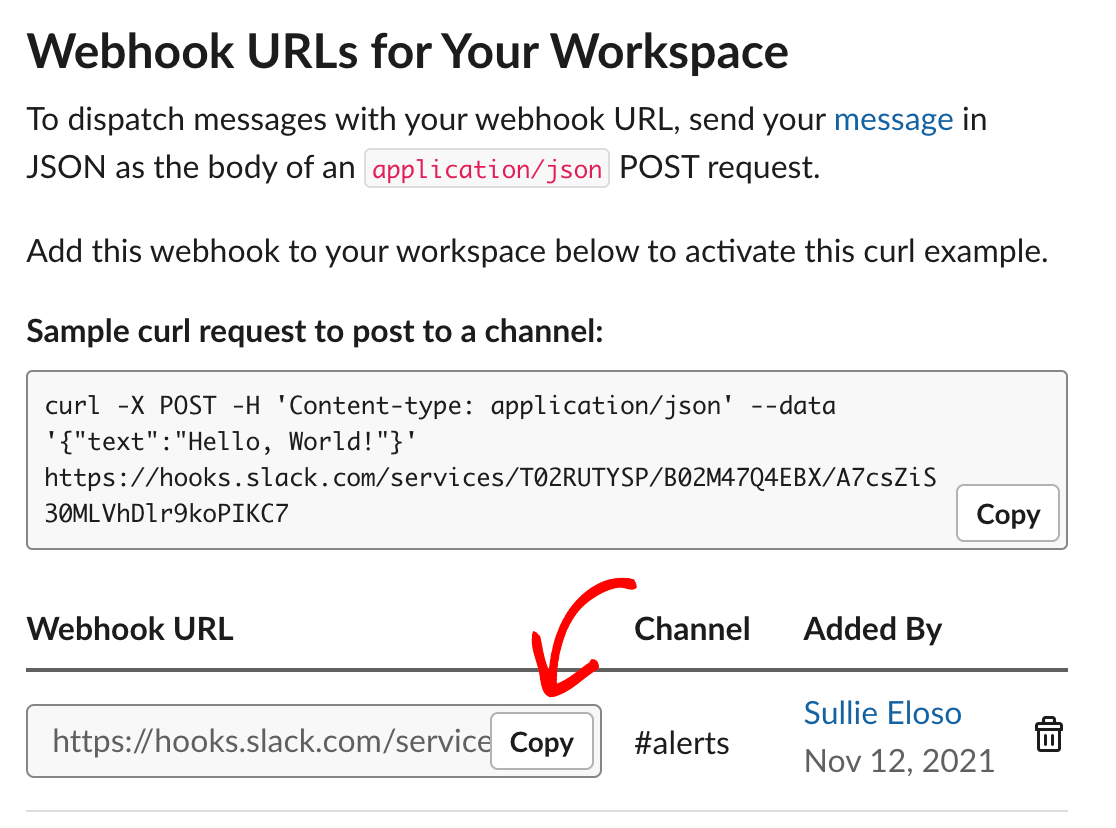
Be sure to keep this browser tab or window open, as you’ll need the information in this area later on.
Adding Your Slack Webhook to a Form
Next, you’ll need to open up the form you’ll be using your webhook in. If you haven’t already, make sure to set up your Webhooks addon in WPForms.
Once you’ve activated webhooks for your form, paste the URL that you copied from Slack into the Request URL field to connect your form with Slack’s API.
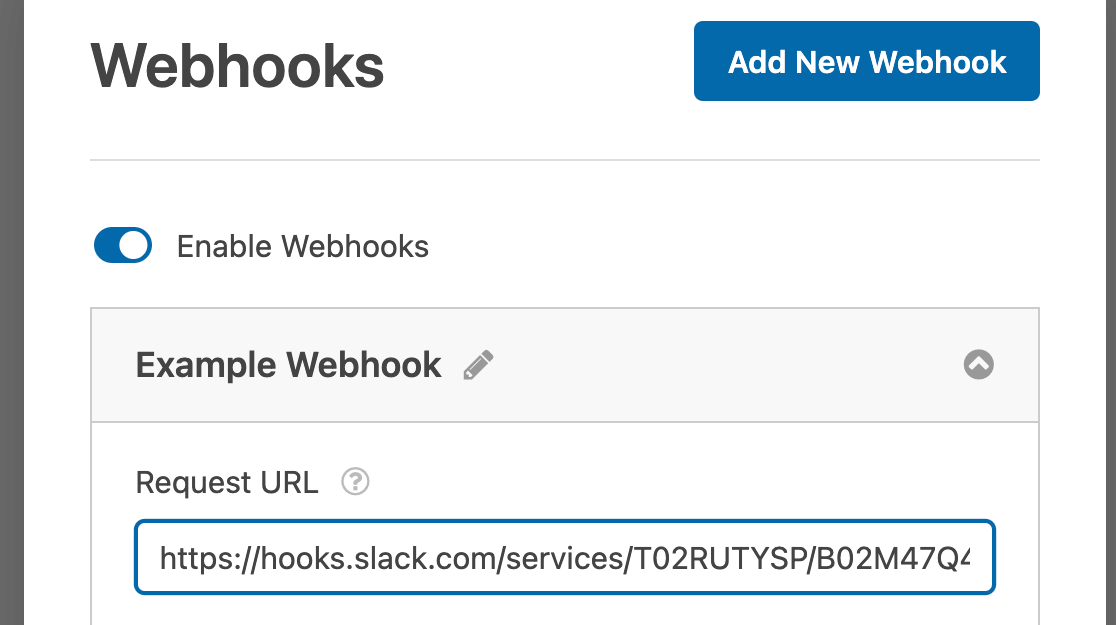
Next, configure the rest of the webhook settings. We’ve laid out all our configured settings for this example below:
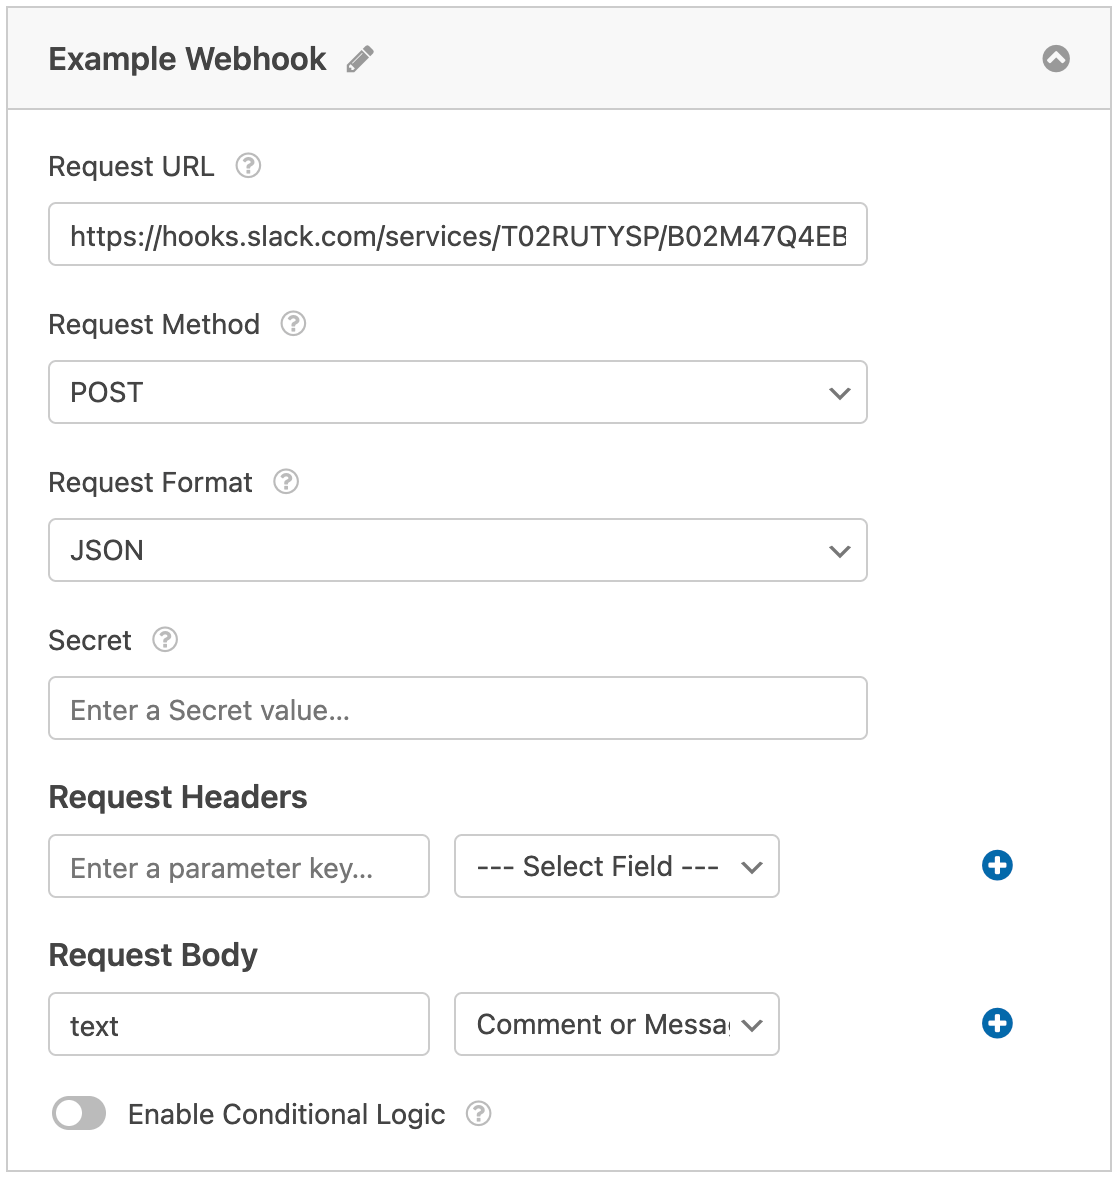
- Request Method: Since we’ll be looking to send data from our forms to Slack, we’ll set the Request Method to the POST option.
- Request Format: We’ll set the Request Format to standard JSON.
- Secret: For our example, we’ll leave the Secret field blank and let it auto-generate when our webhook runs. If you’re a developer and you’d like to enter your own Secret value, you can do so here.
- Request Headers: We don’t have any specific values we need to send with our request, so we’ll leave the Request Headers setting blank. When the webhook runs, the auto-generated Secret will be placed here.
- Request Body:
- Key: Enter text in the Request Body parameter key field as the form will be sending information in plain text. Failing to enter text as the value for this field will likely cause an error in your connection.
- Select Field: The Select Field setting will be the name of the field whose data you’d like to send. For our example, we’ll be sending the Comment or Message field’s data to Slack.
Remember to save your changes before leaving the form builder. We also recommend testing your form to make sure your webhook is working properly once you’ve set it up.
Adding Conditional Logic (Optional)
Conditional logic allows you to choose whether or not an action is performed based on a user’s choices in your form.
As an example, we’ll show you how you can use conditional logic to send a message to Slack if a user submits an entry to our contact form with a message that contains the word “Help.”
To set this up, you’ll need to make sure your form has either a Single Line Text or Paragraph Text field. For our example, we’ll add a Paragraph Text field.
Then you’ll need to adjust the label for the message input field. For our example, we’ll add the label Comment or Message.
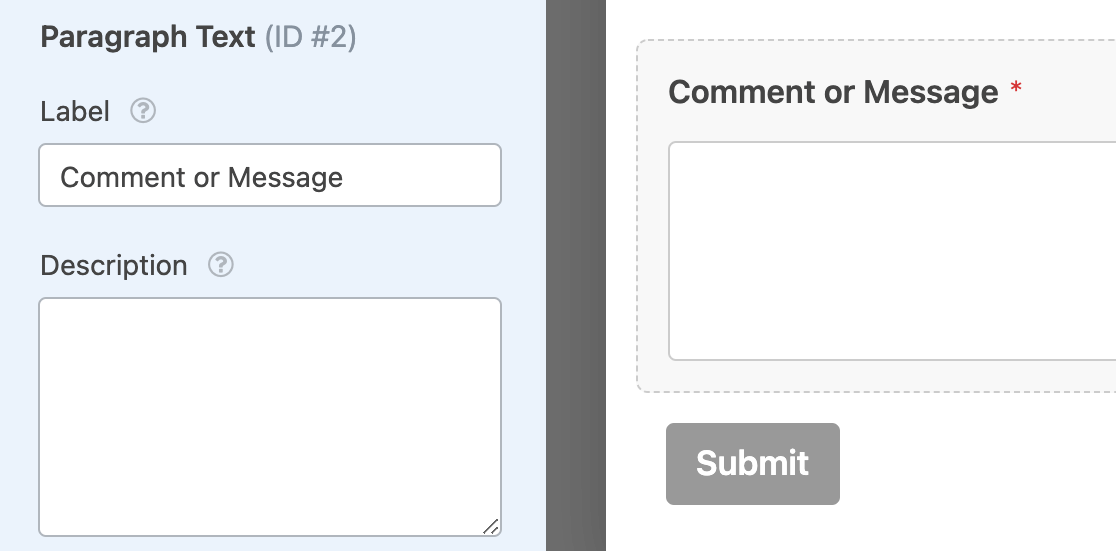
Next, you’ll need to set up your conditional logic. At the bottom of your Slack webhook’s settings, toggle on the option labeled Enable Conditional Logic to reveal the dropdowns to create your rule.

Then add the rule for your conditional logic. For our example, we’ll set the dropdowns to read, Send this webhook if Comment or Message contains help.

Note: Need help setting up your conditional logic rule? Our beginner’s tutorial on using conditional logic in WPForms has all the details.
As always, remember to save your form before you leave the builder.
Frequently Asked Questions
These are some of the top questions we see related to the Webhooks addon.
How can I use Smart Tags in the Request Header and Request Body?
Smart Tags can be used to dynamically insert information into your form’s request header and request body.
To use Smart Tags, select Add Custom Value from the Request Headers dropdown from your webhook’s settings, then add the Smart Tag as the parameter key. You can repeat the same step for the Request Body setting.

For a complete list of Smart Tags that can be used, be sure to check out all the available Smart Tags in WPForms.
That’s it! Now you know how to set up the Webhooks addon for WPForms.
Next, are you looking for a way to easily transfer your WPForms from one site to another? Check out our tutorial on how to import and export your forms.
